Configure SSO role mapping for Auth0
Auth0 stores role assignments in the Management API, not in the tokens it issues. A Post-Login Action copies the assigned role names into a custom claim, and Agent Router maps the values in that claim to its own roles on every login.
Base SSO must already be configured with Auth0 as the OpenID Connect (OIDC) provider. Skip this guide if roles are assigned manually in the Admin Console, or if the deployment does not use claim-driven role mapping.
Mapping Auth0 roles to Agent Router roles
Only the Auth0-specific work is described here. The provider-neutral pattern, the full list of Agent Router roles, and mapping precedence are covered in Configure SSO role mapping. Microsoft Entra ID needs no equivalent of Step 3, because it emits assigned app roles in the roles claim automatically.
Auth0 is the identity provider used for Agent Router proof-of-concept deployments, so this procedure is also the reference path for testing role-based access during an evaluation.
Outcomes
By the end of this guide:
- Roles are defined in Auth0 and assigned to users, either directly or through organization membership.
- A Post-Login Action emits those role names as a custom claim on the ID token and access token.
- Agent Router is configured with a role-claim path and a value-to-role mapping.
- Test users receive the correct Agent Router role on every login, with no per-user action inside Agent Router itself.
Plan for 15 to 30 minutes. Auth0 role assignments take effect on the next login, with none of the directory propagation delay Entra has.
In this guide
- Auth0 configuration: define roles, assign them, and emit them in a claim
- Agent Router configuration: map claim values to Agent Router roles
- Verify: confirm the mapping works end-to-end
Optional:
How it works
Auth0 roles are objects in the tenant's user management model, absent from the ID token and access token until an Action writes them there. Once the Action is in the Post Login flow, each successful authentication carries the user's role names into the token, where Agent Router reads them through the configured claim path.
[Auth0] assigned roles: ["tare-billing-admin"]
                                  ↓  Post-Login Action
[OIDC] id_token: { "auth0.roles": ["tare-billing-admin"] }
                                  ↓
roleClaimPath: "auth0.roles"
roleMapping: { "tare-billing-admin": "billing_admin" }
                                  ↓
[Agent Router] user.role = "billing_admin"
The Agent Router side uses the same two fields as every other provider:
| Field | What it does | Auth0 value |
|---|---|---|
roleClaimPath | Path to the claim to read | auth0.roles, matching the claim name set in the Action |
roleMapping | Maps each claim value to an Agent Router role | { "tare-billing-admin": "billing_admin" } |
The evaluation runs on every login, not just the first, so Auth0 remains the source of truth for as long as the mapping is in place.
Prerequisites
- Base SSO already configured, meaning an Auth0 application connected to Agent Router for corporate login. See Configure SSO.
- Auth0 tenant permissions to manage Roles and Actions, typically held by an Auth0 tenant administrator.
- Access to the Admin Console with the
super_adminrole, which is required to view and edit SSO provider configuration.
Step 1: create roles in Auth0
Each role created here produces one string in the custom claim and, through the mapping, one Agent Router role.
- Go to Auth0 Dashboard → User Management → Roles.
- Click Create Role.
- Enter a name using a consistent prefix, such as
tare-billing-adminortare-model-admin. - Enter a description for the administrators who manage the role later.
- Click Create.
- Repeat for each Agent Router role the deployment needs to support.
The role name is the literal string that ends up in the token and in the roleMapping keys, so it should be treated as a stable identifier and not renamed afterward. A rename in Auth0 silently breaks the mapping until the corresponding key is updated in Agent Router.
A prefix such as tare- keeps Agent Router roles easy to filter and audit in Auth0, and avoids collisions when the same tenant serves several applications with their own role schemes. This mirrors the convention recommended for Entra app roles.
For the list of Agent Router roles a claim value can be mapped to, see Available Agent Router roles.
Step 2: assign roles to users
Defining a role has no effect until it is assigned to the users who should hold it.
- Go to User Management → Users and select a user.
- Open the Roles tab.
- Click Assign Roles and select the roles created in Step 1.
- Click Assign.
Assignments apply on the user's next login. Existing sessions keep their current role until the token is refreshed.
For bulk assignment, either script the assignments against the Auth0 Management API, or, in tenants that use Auth0 Organizations for B2B access, assign roles at the organization-membership level instead of per user (see Appendix B). The Action in Step 3 sees the user's effective roles either way.
Step 3: emit roles as a custom claim
Step 3.1: create the action
- Go to Auth0 Dashboard → Actions → Library.
- Click Create Action → Build from scratch.
- Enter a name, such as
Add roles to tokens. - Select the Login / Post Login trigger.
- Click Create.
Step 3.2: add the action code
Replace the editor contents with the following:
exports.onExecutePostLogin = async (event, api) => {
  const namespace = 'auth0';

  if (event.authorization) {
    api.idToken.setCustomClaim(`${namespace}.roles`, event.authorization.roles);
    api.accessToken.setCustomClaim(`${namespace}.roles`, event.authorization.roles);
  }
};
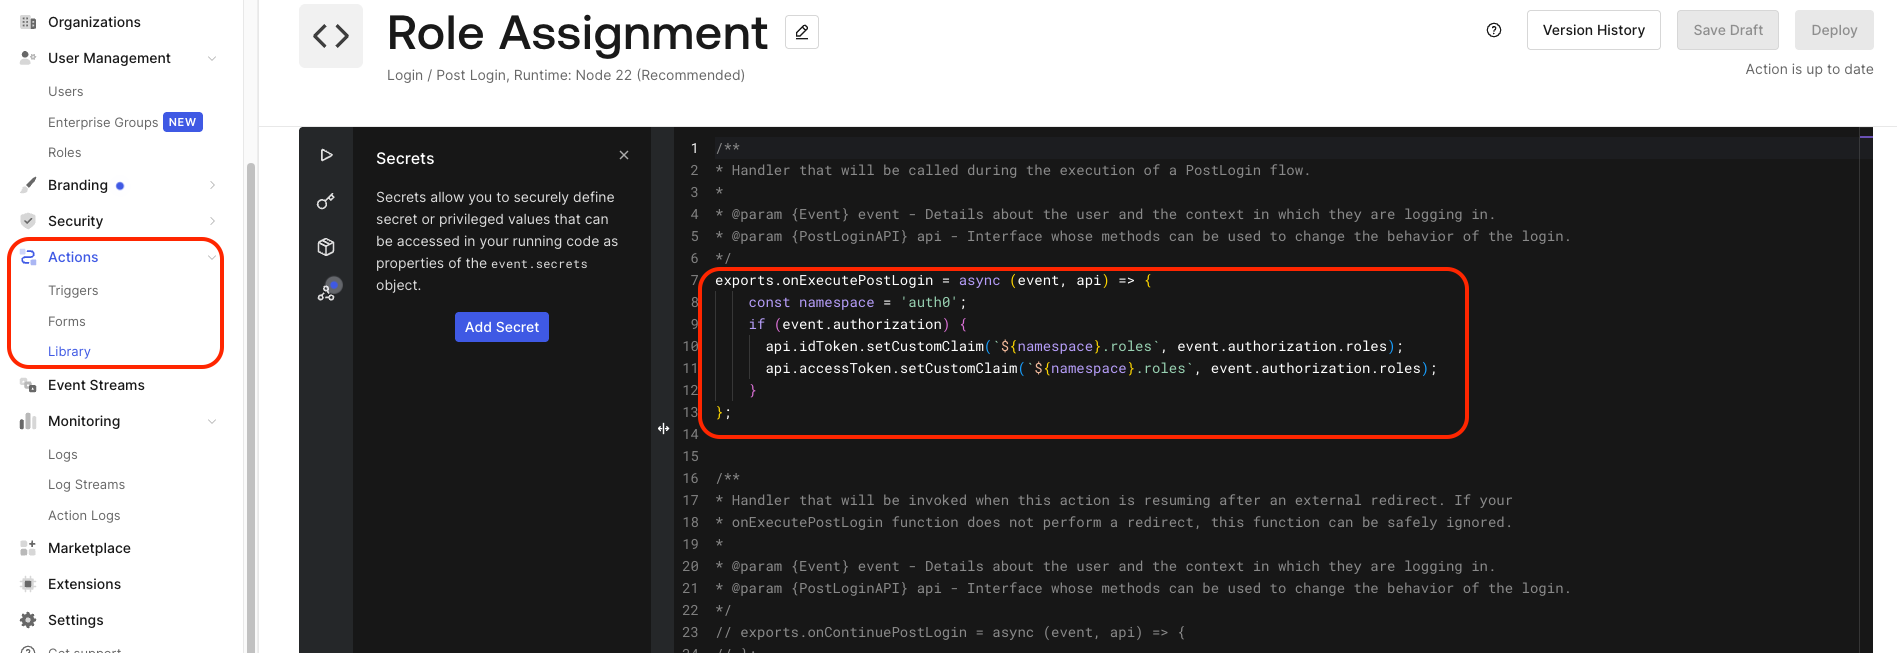
event.authorization.roles returns the user's assigned role names, exactly as entered in Step 1. Those strings are what the roleMapping keys must match in Step 4.
The claim name produced by this code is auth0.roles. Any other namespace works equally well provided the same string is used in Agent Router; see Appendix A for the naming conventions and the names Auth0 reserves.
Step 3.3: deploy the action into the login flow
- Click Deploy.
- Go to Actions → Triggers → Post Login.
- Drag the new Action from the right-hand panel into the flow, between Start and Complete.
- Click Apply.
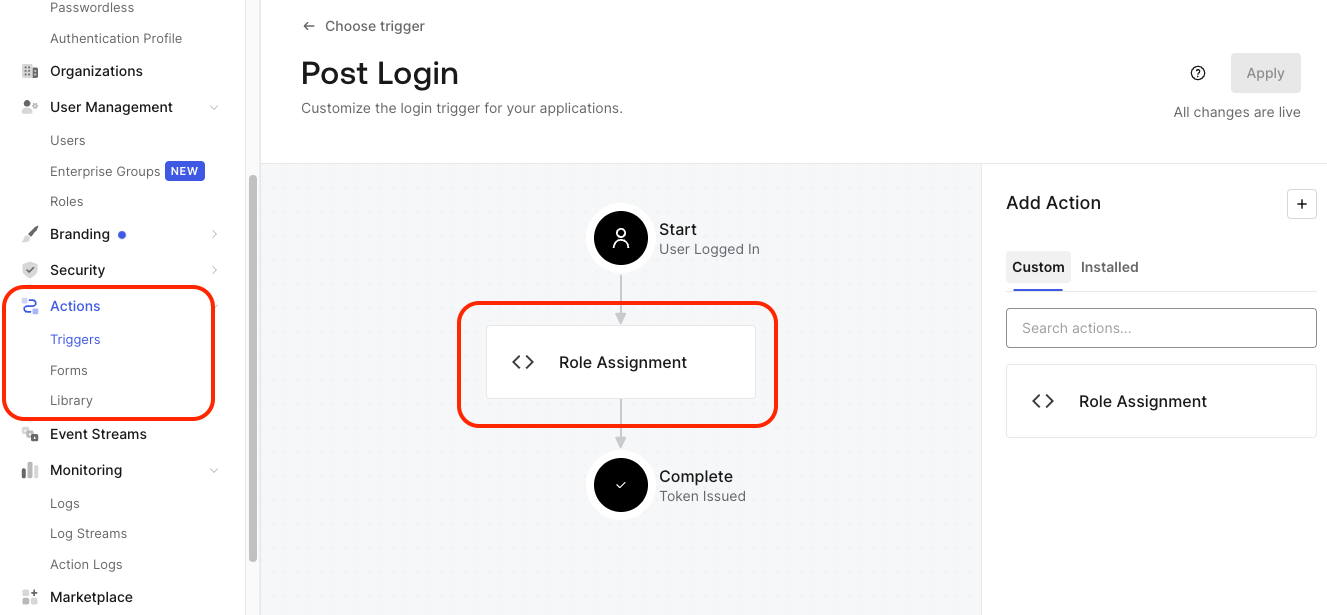
An Action that is deployed but never added to the trigger flow does not run, which is the most common reason for a missing claim despite correct-looking Action code.
The claim name in the Action and the role claim path configured in Agent Router in Step 4 must be identical, character for character. A mismatch is not reported as an error: the claim is simply not found, and every user falls through to the default user role.
Step 4: configure role mapping in Agent Router
The configuration is set once per SSO provider and applies to everyone who signs in through it.
-
Open the Admin Console.
-
Go to Settings → SSO and open the Auth0 SSO provider configuration.
-
Set Role claim path to
auth0.roles, matching the claim name set in Step 3. -
Add one mapping row for each Auth0 role name that should grant a role in Agent Router:
Auth0 role name Agent Router role tare-billing-adminbilling_admintare-model-adminmodel_admintare-super-adminsuper_admin -
Save the SSO provider configuration.
Any claim value that is not listed produces no admin role, and the user falls through to the default user role. The mapping takes effect on the next login, with no need to restart Agent Router or invalidate sessions.
Mapping keys are matched exactly and are case-sensitive. A mismatch is ignored rather than rejected, so a typo quietly leaves the affected user on the user role instead of surfacing an error. Values on the right-hand side must be valid Agent Router role slugs.
For the order in which Agent Router evaluates claim mapping against admin email lists and previously stored roles, see Role mapping precedence and defaults.
Step 5: verify the mapping
The mapping should be exercised end-to-end with at least one test user per mapped role before the configuration is announced more widely.
Step 5.1: log in as a test user
- Sign in to Agent Router through Auth0 SSO as a user holding one of the mapped roles.
- Open Users in the Admin Console.
- Confirm the user's role matches the role the Auth0 role name was mapped to.
A user assigned tare-billing-admin in Auth0 should appear as billing_admin in Agent Router immediately after the first login under the new configuration.
Step 5.2: confirm the claim itself
The Auth0 dashboard can run an authentication test against the tenant and return the resulting token, which shows whether the Action produced the expected claim and which exact strings it contained.
Tokens returned by a test flow are live credentials for the test user. They should be inspected locally rather than pasted into a third-party online decoder.
Step 5.3: what to check if the role is wrong
| Symptom | Likely cause | Fix |
|---|---|---|
| Claim is absent from the token | The Action is deployed but was never added to the Post Login trigger flow | Go to Actions → Triggers → Post Login, add the Action to the flow, and click Apply. |
| Claim is absent despite the Action running | The claim name uses a namespace reserved by Auth0 | Choose a different namespace. See Appendix A. |
| Claim is present but empty | The user holds no role assignments, or roles are assigned at organization level while the login is not organization-scoped | Confirm the assignment under User Management → Users → Roles, or check the organization login flow described in Appendix B. |
Claim is present but the user still gets user | The role claim path or a mapping key does not match the claim exactly | Compare the claim name and its values against the Agent Router configuration, including case. |
| Role did not change after the mapping was added | The user is on a role stored at a previous login | Have the user log out and log back in. The mapping is evaluated on every login. |
| Role reverts after each login | Expected behavior: claim mapping overwrites the stored role | Manage the role through Auth0 assignments rather than manual edits in the Admin Console. |
Appendix A: claim naming and namespaces
Auth0 recommends namespacing custom claims to avoid collisions with the standard OIDC claims. The namespace is a prefix on the claim name; it does not need to resolve to anything, and it is never fetched.
Two conventions are in common use, and Agent Router accepts either:
| Convention | Claim name | Role claim path in Agent Router |
|---|---|---|
| Short namespace | auth0.roles | auth0.roles |
| URI namespace | https://example.com/roles | https://example.com/roles |
The URI form is the convention in Auth0's own documentation, and it is the safer choice in tenants where several applications write custom claims, because a domain under the organization's control cannot collide with another vendor's claim names.
Whichever form is chosen, the string in the Action and the string in the Agent Router role claim path must be identical. With a URI namespace, that includes any trailing slash: https://example.com/roles and https://example.com/roles/ are different claims.
Auth0 reserves the auth0.com, webtask.io, and webtask.run namespaces. Claims written under those names are dropped from the token silently: the Action appears to run correctly, and the claim never arrives.
Appendix B: assigning roles through Auth0 Organizations
Tenants that use Auth0 Organizations for B2B access can attach roles to an organization membership rather than to the user record. The user then holds those roles for the duration of a session established through that organization.
- Go to Auth0 Dashboard → Organizations and select the organization.
- Open the Members tab and select a member.
- Assign the roles created in Step 1 to that membership.
No change is needed in the Action or in Agent Router. event.authorization.roles resolves the user's effective roles for the current login, so organization-level assignments arrive in the claim in the same shape as direct assignments.
Organization roles apply only when the login is scoped to that organization. A user who authenticates outside the organization context holds only their directly assigned roles, which shows up as an empty claim for a user who appears correctly assigned in the dashboard.
Where to go next