Set a budget and track spend against it
Finance sets limits in money, not tokens. This guide turns that ceiling into a budget that tracks currency spend, raises alerts, and, since 0.3.0, can enforce the ceiling as well.
Persona: Platform operator working in the Admin Console, implementing a ceiling agreed with finance or the relevant business owner.
Estimated time: 20 to 30 minutes for an initial setup with one or two teams; 5 to 10 minutes per budget thereafter.
Outcomes
By the end of this guide:
- Usage and cost, in both tokens and money, can be read per user and per team over a chosen period.
- A spend ceiling exists for a chosen team, its members, or a single API key, on a daily, weekly, or monthly cadence.
- The behavior at the ceiling is chosen deliberately: watch and alert, refuse requests, or reroute to a cheaper model.
- Spend is tracked against that ceiling on the Budgets page, so the operator and business owner can act in time.
Every budget measures spend against its ceiling and records threshold crossings. What happens at the ceiling is the budget's action, chosen when it is created. Watch spend is pure measurement: an exhausted budget leaves the caller free to keep calling. Since 0.3.0 the same form also authors enforcement: Hard stop rejects requests over the limit and Degrade gracefully reroutes them to a cheaper model. Enforcement happens in the gateway, on live traffic. Which arrangement fits which situation is worked through in Enforce budget caps with policies.
Prerequisites
- Administrator access to the Admin Console, typically the
super_adminorbilling_adminrole. Read permission shows budgets and their spend; write permission is needed to create, edit, deactivate, or delete. Without write permission the controls are visible but disabled, with an explanation. - API keys that follow the per-purpose convention, so that usage attributed to a user or team is precise rather than blurred across shared credentials. The convention is established in Onboard developers and issue keys.
- Group identity flowing in from the identity provider. Team budgets are only as meaningful as the team membership behind them; the mapping is covered in Map Entra ID groups to business functions.
- Agreement with finance or the relevant business owner on the ceiling itself and on what should happen when it is reached. A budget is a policy decision before it is a configuration; the operator implements the decision rather than originating it.
Step 1: read the baseline before setting the number
Before a budget can be set sensibly, the existing consumption has to be visible at the same dimension the budget will use.
- Sign in to the Admin Console and open Usage → Analytics.
- Select tab Cost.
- Apply a time range that matches the budgeting cadence: last 30 days or the last billing cycle is the usual choice for a monthly budget.
- Select the Group by User breakdown and review the ranked list. Each row carries the request count, token totals, and estimated cost for that user across all of their keys.
- Select a user row to drill into the specific keys, models, and costs behind it. To compare several people or teams side by side before the number is set, see Compare user and team spend in Analytics.
The team dimension is the aggregate of its members. Where the deployment surfaces a team breakdown directly, it is read the same way; where it does not, team spend is derived by summing the cost of the users mapped to that team, which is exactly why the group-to-team mapping has to be correct before team budgets carry any weight. A user counted in the wrong team is spend charged to the wrong cost center.
Size the ceiling from this baseline rather than guesswork: comfortably above normal consumption but well below any level that would be a problem. A budget for a team with no history is tightened rather than left loose; real traffic surfaces the true shape quickly, and relaxing a tight ceiling is a low-risk adjustment.
The budget form repeats part of this homework beside the fields: once a target is picked, the Policy preview panel shows its billable spend over the last six months, and the limit field notes the range of the budgets that already exist.
Step 2: choose the budget scope
Open the New budget drawer with Add budget on Usage → Budgets, and select one of the three scopes.
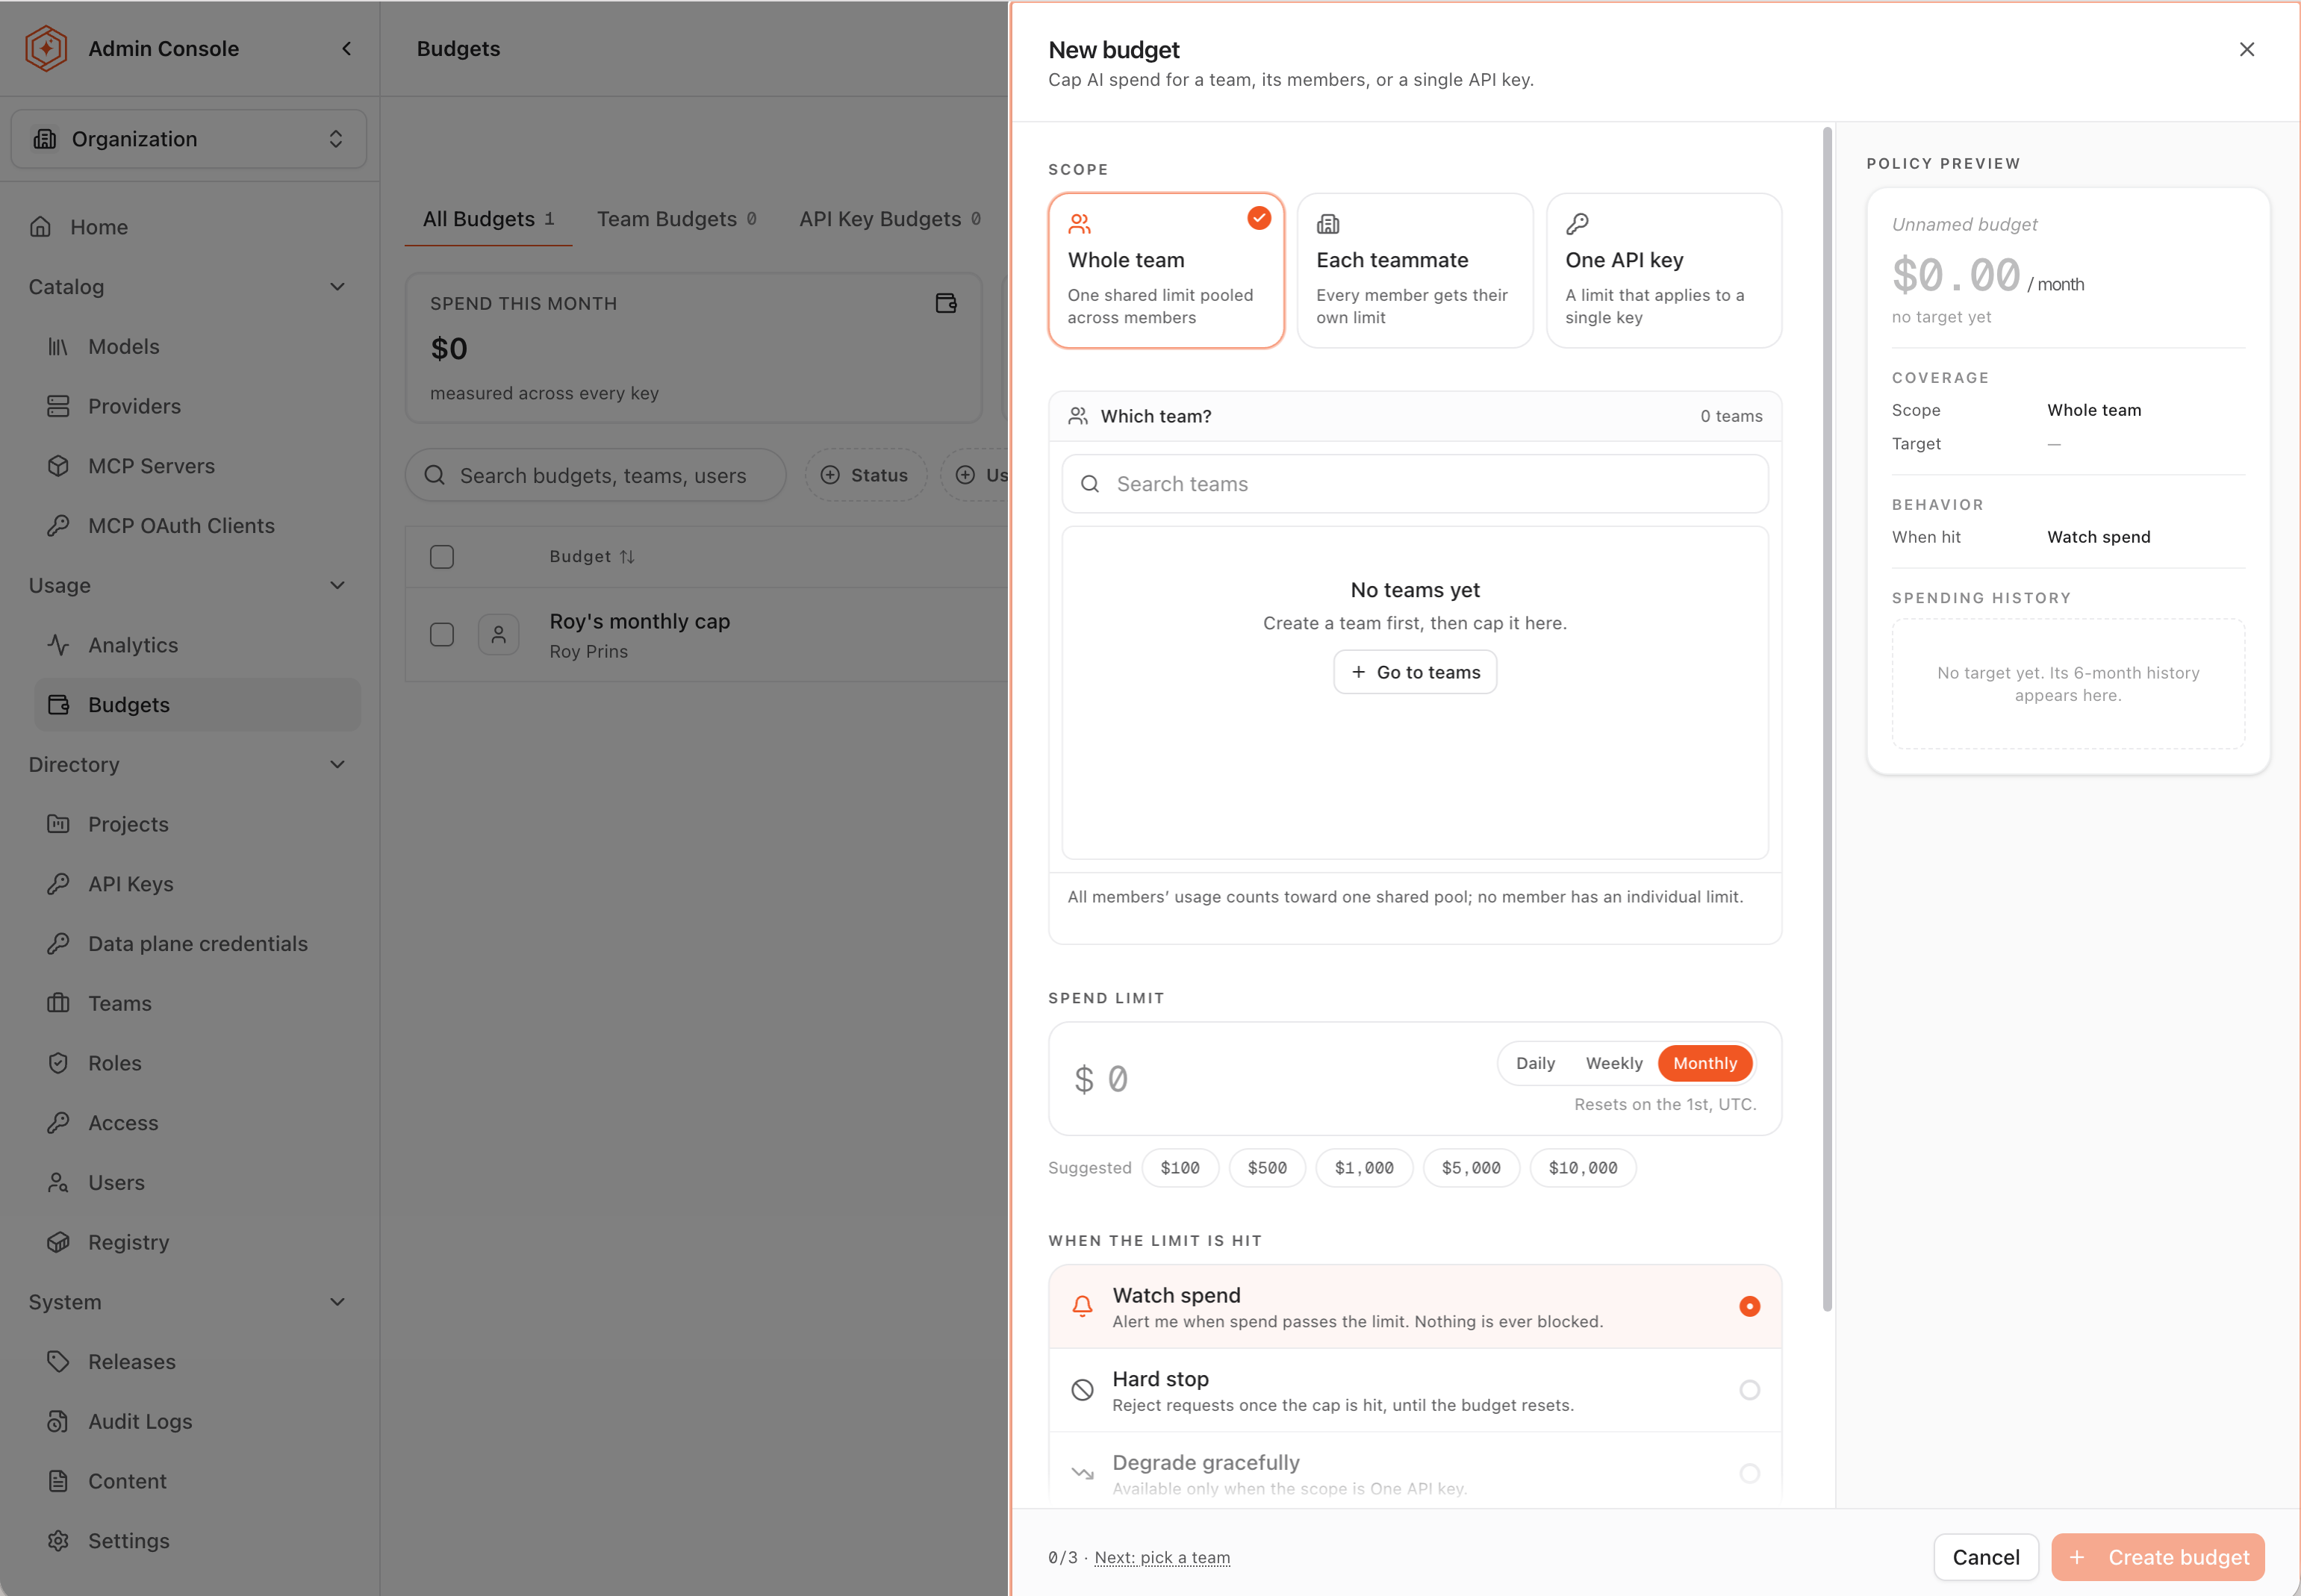
| Scope | What the limit covers | When it fits |
|---|---|---|
| Whole team | One shared limit pooled across all members of the team | A cost center with a single ceiling over everyone charged to it, where one member's heavy month can be offset by another's light one |
| Each teammate | The same limit applied to every member individually | A per-person allowance whose consumption should be visible member by member |
| One API key | A limit that applies to a single key | An application or agent bounded on its own, independent of whoever owns the key |
A pooled limit bounds the team as a unit and tolerates uneven consumption between members; a per-member limit holds each person to the same allowance and names any single member who exceeds it. The two layers coexist: a team can carry an overall ceiling while a key underneath it carries its own, and each budget measures on its own terms.
Older budgets could also be created for tags, projects, and single users. Those scopes can no longer be created from the Console, but existing budgets on them still show up, keep measuring spend, and can still be edited.
Step 3: select the team or key
The selection list below the scope cards follows the scope: a team scope lists teams with their member counts, and the API key scope lists keys with their owner and last use.
- Use the search box to filter the list by name when it is long. The match count is shown alongside the field.
- Select the target. A target that already carries a budget is labeled Already budgeted, with its amount and period, so a duplicate is visible before it is created.
- Read the caption under the list, which states the coverage in one sentence: a whole-team budget pools all members' usage with no individual limits, and a key budget counts only that key, leaving other keys owned by the same user unaffected.
Step 4: set the spend limit and the period
The spend limit is the ceiling itself, expressed in US dollars for one period, because the conversation behind it was conducted in money.
- Select the Period: Daily, Weekly, or Monthly. Monthly matches the cadence finance works in and is the usual choice; a shorter period suits a workload whose overrun should be caught within days rather than at the end of the month.
- Enter the amount in the Spend limit field, or select one of the suggested amounts, which follow the period: $100 to $10,000 on a monthly budget, $25 to $2,500 on a weekly one.
- Confirm the reset cadence in the caption under the field: a daily budget resets at midnight UTC, a weekly budget on Monday, and a monthly budget on the 1st. A limit set mid-period governs the remainder of that period against spend already recorded. The same caption notes the range of the budgets that already exist, as a sanity check on the number.
The period is not fixed at creation: a budget on the wrong cadence is corrected in place rather than replaced. See Raise a spend ceiling without interrupting delivery.
Step 5: choose what happens at the limit
When the limit is hit is the budget's action. The default watches; the other two enforce.
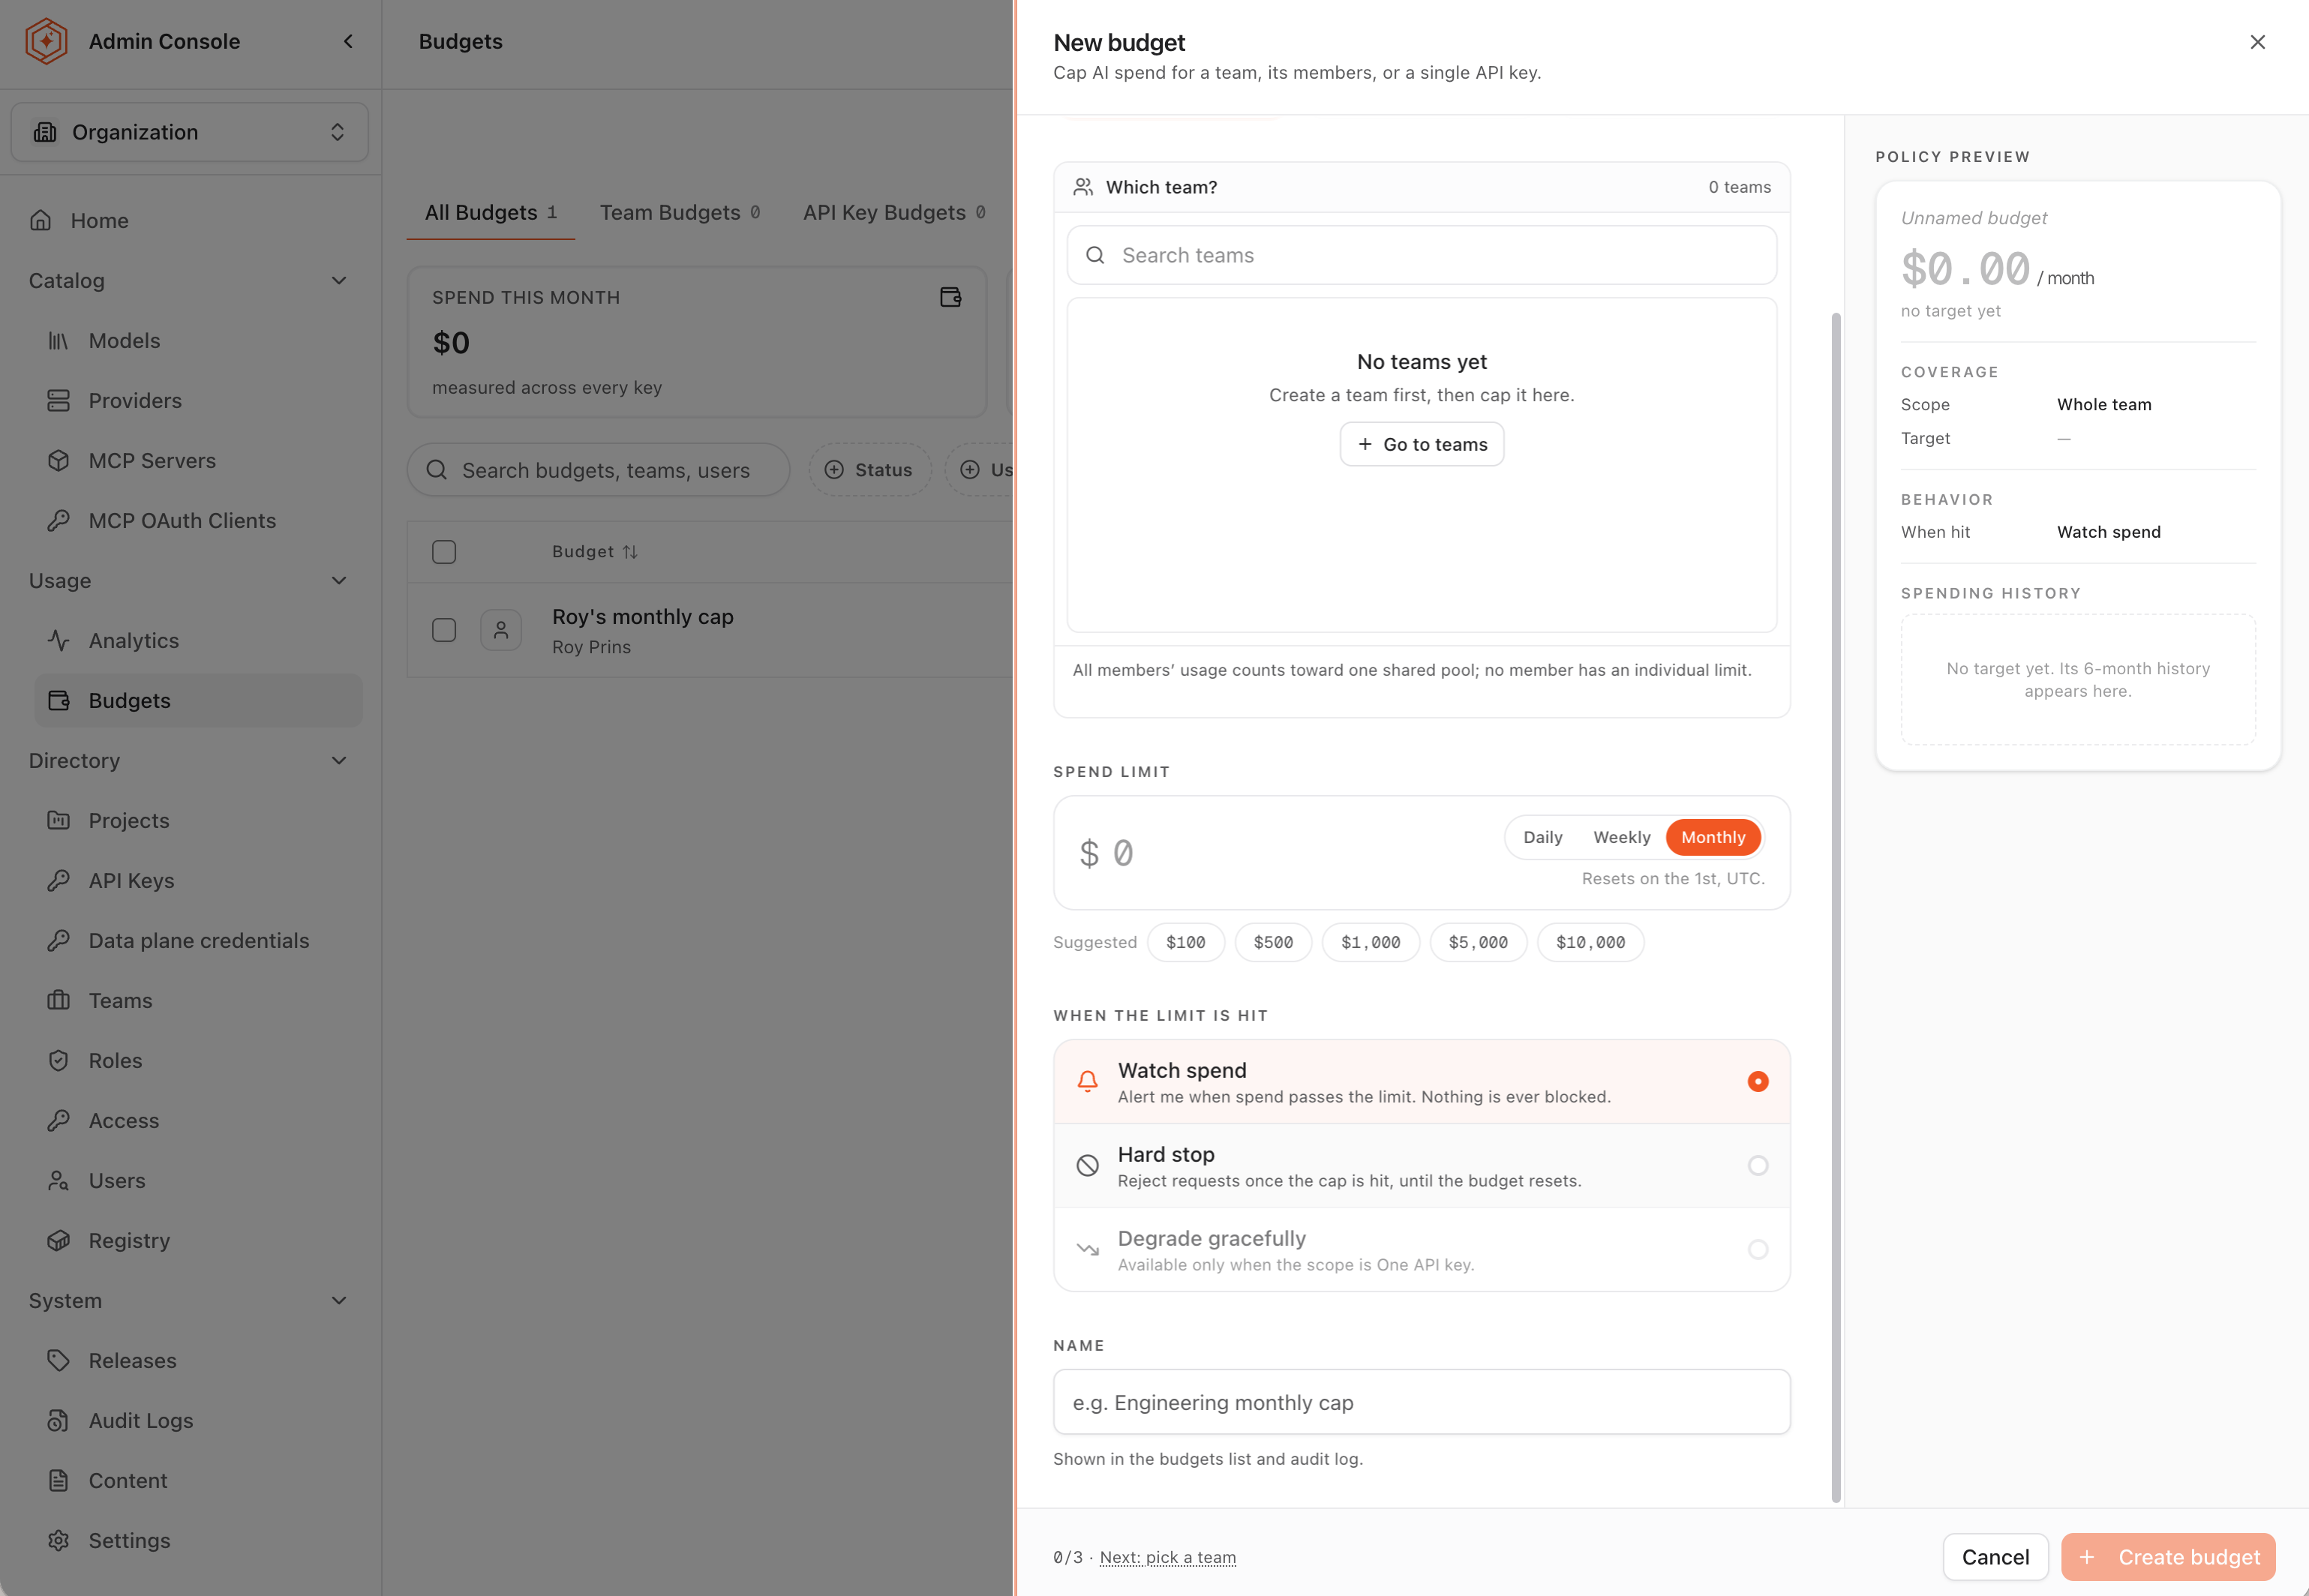
| Action | At the limit | Fits |
|---|---|---|
| Watch spend | An alert is raised when spend passes the limit. Nothing is ever blocked | Accountability and forecasting, and any ceiling being introduced for the first time |
| Hard stop | Requests are rejected once the cap is hit, until the budget resets | A ceiling that must hold, on a workload that can tolerate refusal |
| Degrade gracefully | Requests keep being served over the cap, rerouted to a chosen fallback model | Service that must continue past the number, on a cheaper model |
Three constraints worth knowing before choosing:
- Not every action is available at every scope. Degrade gracefully is available only when the scope is One API key, and an each-teammate budget only watches. A disabled action states its reason in the form rather than disappearing.
- The fallback model must be served over an OpenAI-compatible API. A request cannot be converted to another provider API mid-flight, so a target that is not OpenAI-compatible fails the request instead of degrading it. And if the fallback model is later disabled for the project, requests over the limit run on the original model and the cap stops applying; they still succeed, so nothing flags it.
- Enforcement is not instant. Spend is totaled from usage rollups and pushed to the gateway, so a hard stop lands minutes after the ceiling is crossed, not on the next request. Where a runaway must be cut off automatically and immediately, pair the budget with a rate limit on a dedicated key, which is enforced inline.
Blocking and degrading pause traffic only until the period resets; nothing needs to be manually re-enabled. When a watched budget is approached, the legitimate responses are to investigate the spend, raise the ceiling if the growth is agreed and funded, or accept the overspend for the remainder of the period. See See budget exhaustion coming for reading the burn in time to intervene.
Step 6: name the budget and create it
- Enter a descriptive name in the Name field, or take the suggested one with Use suggested. The name identifies the budget in the budgets list and the audit log, so it should describe what the budget covers rather than restate the amount.
- Review the Policy preview panel, which restates the coverage (scope and target), the behavior at the limit, and the target's recent spending history. The footer confirms readiness: what is previewed is exactly what Create budget makes.
- Select Create budget.
Once the budget exists, the reasoning behind the ceiling belongs somewhere durable alongside it. The audit trail in Audit Agent Router activity records that the budget was created and who created it; the business justification for the number belongs next to that record.
Step 7: read spend on the Budgets page
The Budgets page is where every ceiling is reviewed together, on the All Budgets, Team Budgets, and User Budgets tabs. The summary cards total the spend across all budgets and count the active ones, those near their limit, and those over it; each row below shows the current period's spend against the limit with a status.
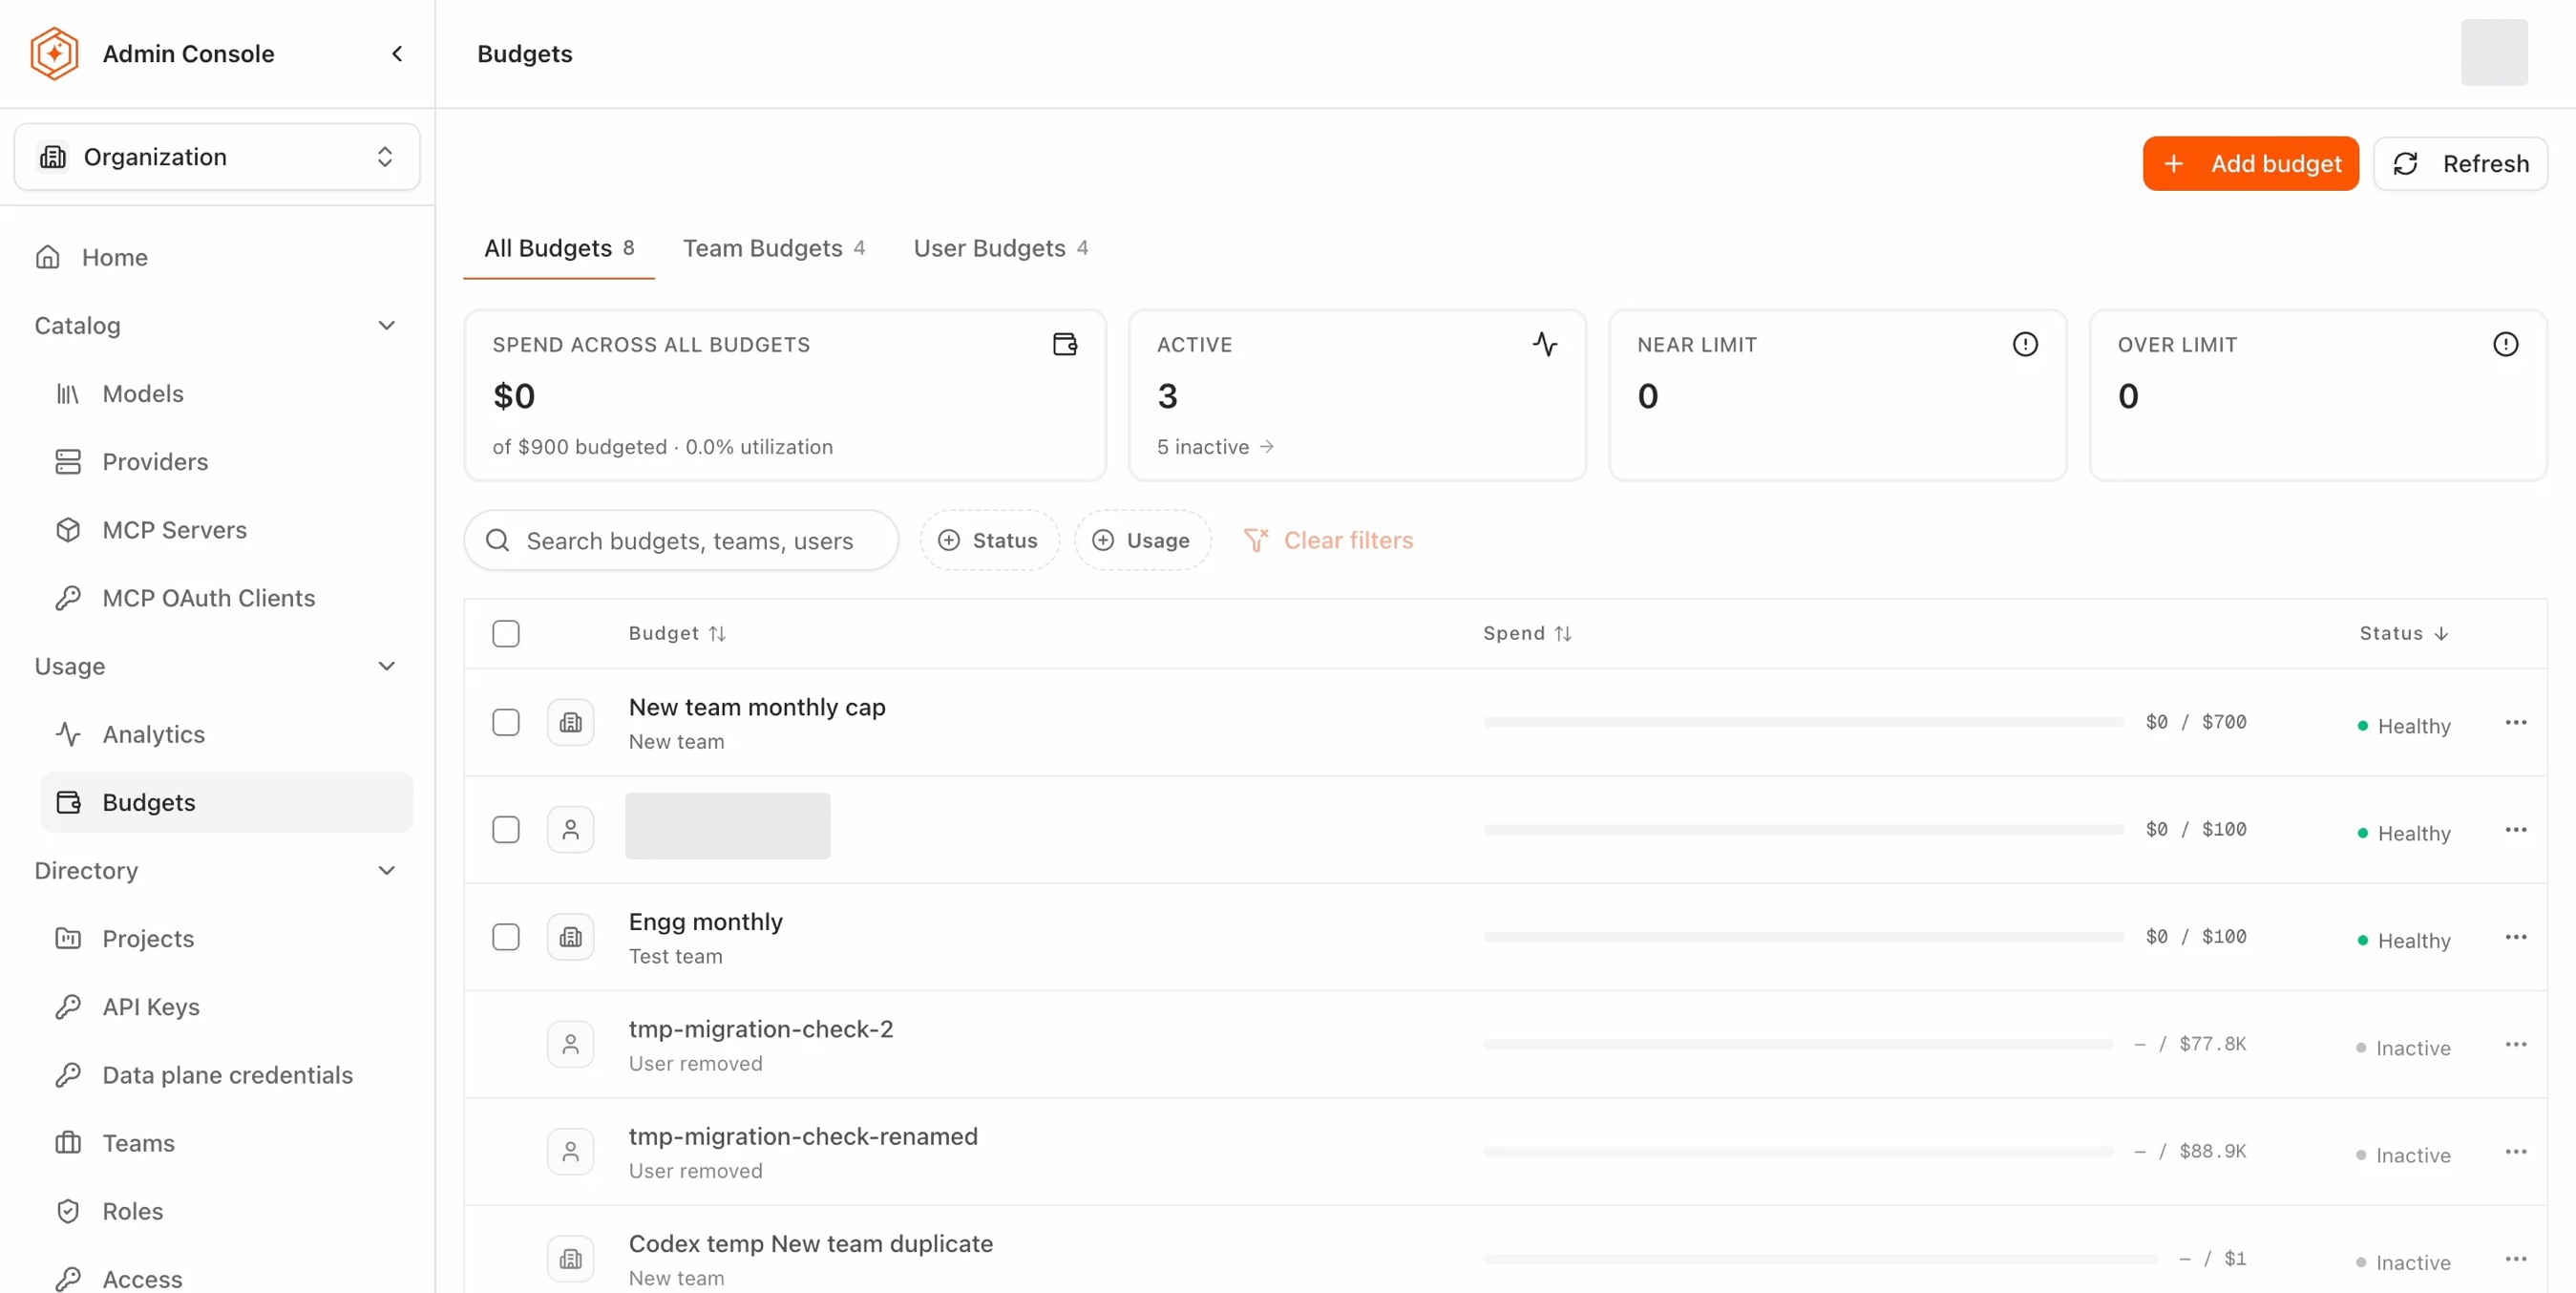
Three reading rules:
- A dash means not measured here. It is never a healthy 0%. An inactive budget, or one whose target no longer exists (a removed user, for example), shows a dash rather than a number.
- Spend numbers update on a short delay. They come from usage rollups, not from each request, so a just-created budget can take a little while to show numbers.
- Statuses refresh automatically after changes that affect whose spend counts, for example adding or removing a team member.
A budget's lifecycle runs from the row's menu: Edit changes the limit, period, or action (switching to Degrade gracefully asks for a fallback model; switching away clears it), Deactivate pauses a budget without deleting it, and Delete removes it behind an extra confirmation step.
Where to go next
Enforce budget caps with policies
Nine scenarios for the enforcing half: caps, fallbacks, and the cases a budget cannot cover.
See budget exhaustion coming
Read burn, headroom, and the members driving it before the ceiling hits.
Split the AI bill across the teams that caused it
Produce the per-user and per-team statements finance consumes.
Stop runaway workloads
The inline companion for cutoffs that cannot wait for a rollup.