Manage roles and permissions
Access to the Tetrate Agent Router Admin Console is governed by roles. A role is a named set of permissions, and the role granted to a user or a team determines which menus, pages, and actions that person is shown. A role applies either across the whole organization or inside a single project, so a delegated operator can be given exactly one project to administer and nothing beyond it.
Persona: Platform operator working in the Admin Console, holding a role that can manage access.
Estimated time: 10 to 20 minutes to define a role and grant it; recurring thereafter as people join, move, and leave.
These actions require either Super Admin access or a role with the IAM permissions configured.
When this guide applies
| Situation | What it covers |
|---|---|
| A new administrator needs a subset of Admin Console capabilities | Selecting a built-in role, or defining a custom one |
| An operator should administer one project and nothing else | Granting a project-scoped role |
| Several people all need the same access | Granting a role to a team once instead of per person |
| Access has become broader or narrower than intended | Reviewing, editing, and revoking grants on the Access page |
| A granted role must be confirmed to restrict as intended | Verifying the result from the recipient's own session |
| Someone has changed job, or access was granted too broadly | Editing a grant in place, or revoking it |
A single worked example runs through the tasks below: a custom Guardrails Admin role is created, granted to a user across the whole organization, and then revoked.
Outcomes
By the end of this guide:
- The difference between read and write permissions is clear, along with how each is reflected in the Admin Console.
- A built-in role has been selected, or a custom role has been created.
- That role has been granted to a user and to a team, at organization or project scope.
- The combined effect of overlapping grants is understood.
- The restriction has been verified from the recipient's session.
- A grant has been edited in place, and one has been revoked.
Prerequisites
- Access to the Admin Console (
https://dashboard.<tenant>.tetrate.ai) with a role that can manage access, such as Super Admin. - The users involved already exist in Agent Router. A user record is created on first sign-in, as described in Onboard developers and issue keys.
- For team-based grants, a team under Directory → Teams with the intended members.
The two pages used throughout this guide sit in the sidebar under Directory: Roles and Access.
In this guide
- Concepts: how a role decides what a person is shown
- Tasks: define access, grant it, and take it away
- Reference
How access is decided
Every menu and page in the Admin Console is tied to a permission. A menu is shown only when the role includes its read permission, and the page itself rejects anyone who arrives without that permission. Enforcement happens in two places at once. Hiding a menu is therefore a genuine restriction, not a cosmetic one.
Permissions come in two kinds:
- Read: view a resource, for example view models, view users, or view audit logs. Read permissions determine which menus are visible.
- Write: create, edit, or delete a resource. Write permissions determine whether the New, Edit, and Delete buttons appear and whether the action is accepted.
role permissions: { models.read, providers.read }
                              ↓
sidebar shows:  Models, Providers      (their read permissions)
buttons shown:  none                   (no write permissions)
other pages:    redirect to "unauthorized"
A role carrying read permissions only is view-only: every change button is hidden, and the server refuses the change even when it is submitted directly.
Scope: organization or project
Scope appears in two distinct places, and they answer different questions.
| Where | What it decides |
|---|---|
| Scope levels, on the role | Where the role is allowed to be granted. A role can permit one level or both, so a role marked Organization & Project can be used for either kind of grant. |
| Apply to, on the grant | Where this particular grant actually applies: the whole organization, or named projects. |
The two levels cover the following.
| Scope | What it covers |
|---|---|
| Organization | The whole organization, including organization-wide resources such as users, teams, API keys, billing, and the shared model, provider, and Model Context Protocol (MCP) catalog. |
| Project | A single project only: the models, providers, MCP servers, and members of that project, and nothing outside it. |
A user can hold an organization role, one or more project roles, or a combination of the two. Someone holding a project role alone is shown only that project's pages; the organization-wide administrative pages (Users, Roles, Settings, and Audit Logs) remain closed.
Built-in roles
The following roles are predefined. Each can be granted as-is, or copied as the starting point for a custom role. The permission counts are those shipped with the current release and are shown in the Permissions column on the Roles page.
Organization roles
| Role | Slug | Permissions | What it is for |
|---|---|---|---|
| Super Admin | super_admin | 163 | Full access to every resource and setting. |
| Viewer | read_only | 37 | Read-only access to every resource: all menus are visible, nothing can be changed. |
| Billing Admin | billing_admin | 14 | Manage billing, service accounts, and bonus claims. |
| User Admin | user_admin | 12 | Manage users, teams, and API keys. |
| Model Admin | model_admin | 8 | Manage models and providers. |
| Provider Admin | provider_admin | 4 | Manage providers. |
| MCP Admin | mcp_admin | 4 | Manage MCP servers. |
Super Admin is the exception to the normal role-grant flow. The first holder is established during onboarding: the account that completes the setup wizard is granted the role. From that point it is granted like any other role, within three limits. Only a Super Admin can grant it, only to a user, and only across the whole organization. It cannot be granted to a team or scoped to a project.
A deployment is not limited to one Super Admin, and holding more than one is the recommended arrangement. A single holder is a single point of failure: if that account is lost, disabled, or leaves the organization, no one remains who can grant the role back.
Project roles
| Role | Slug | Permissions | What it is for |
|---|---|---|---|
| Project Owner | project_owner | 18 | Full administration within the project, covering models, providers, MCP, members, settings, and the gateway. |
| Project Member | project_member | 2 | Work within the project without managing its members or settings. |
The Viewer role's slug is read_only, which is the value to use where a role is referenced by slug rather than by display name, as in identity-provider claim mapping.
Step 1: create a custom role
The built-in roles cover most deployments. This step applies only where no built-in role matches the intended access, for example a role confined to guardrails, or one shown the Models and Providers menus and nothing else.
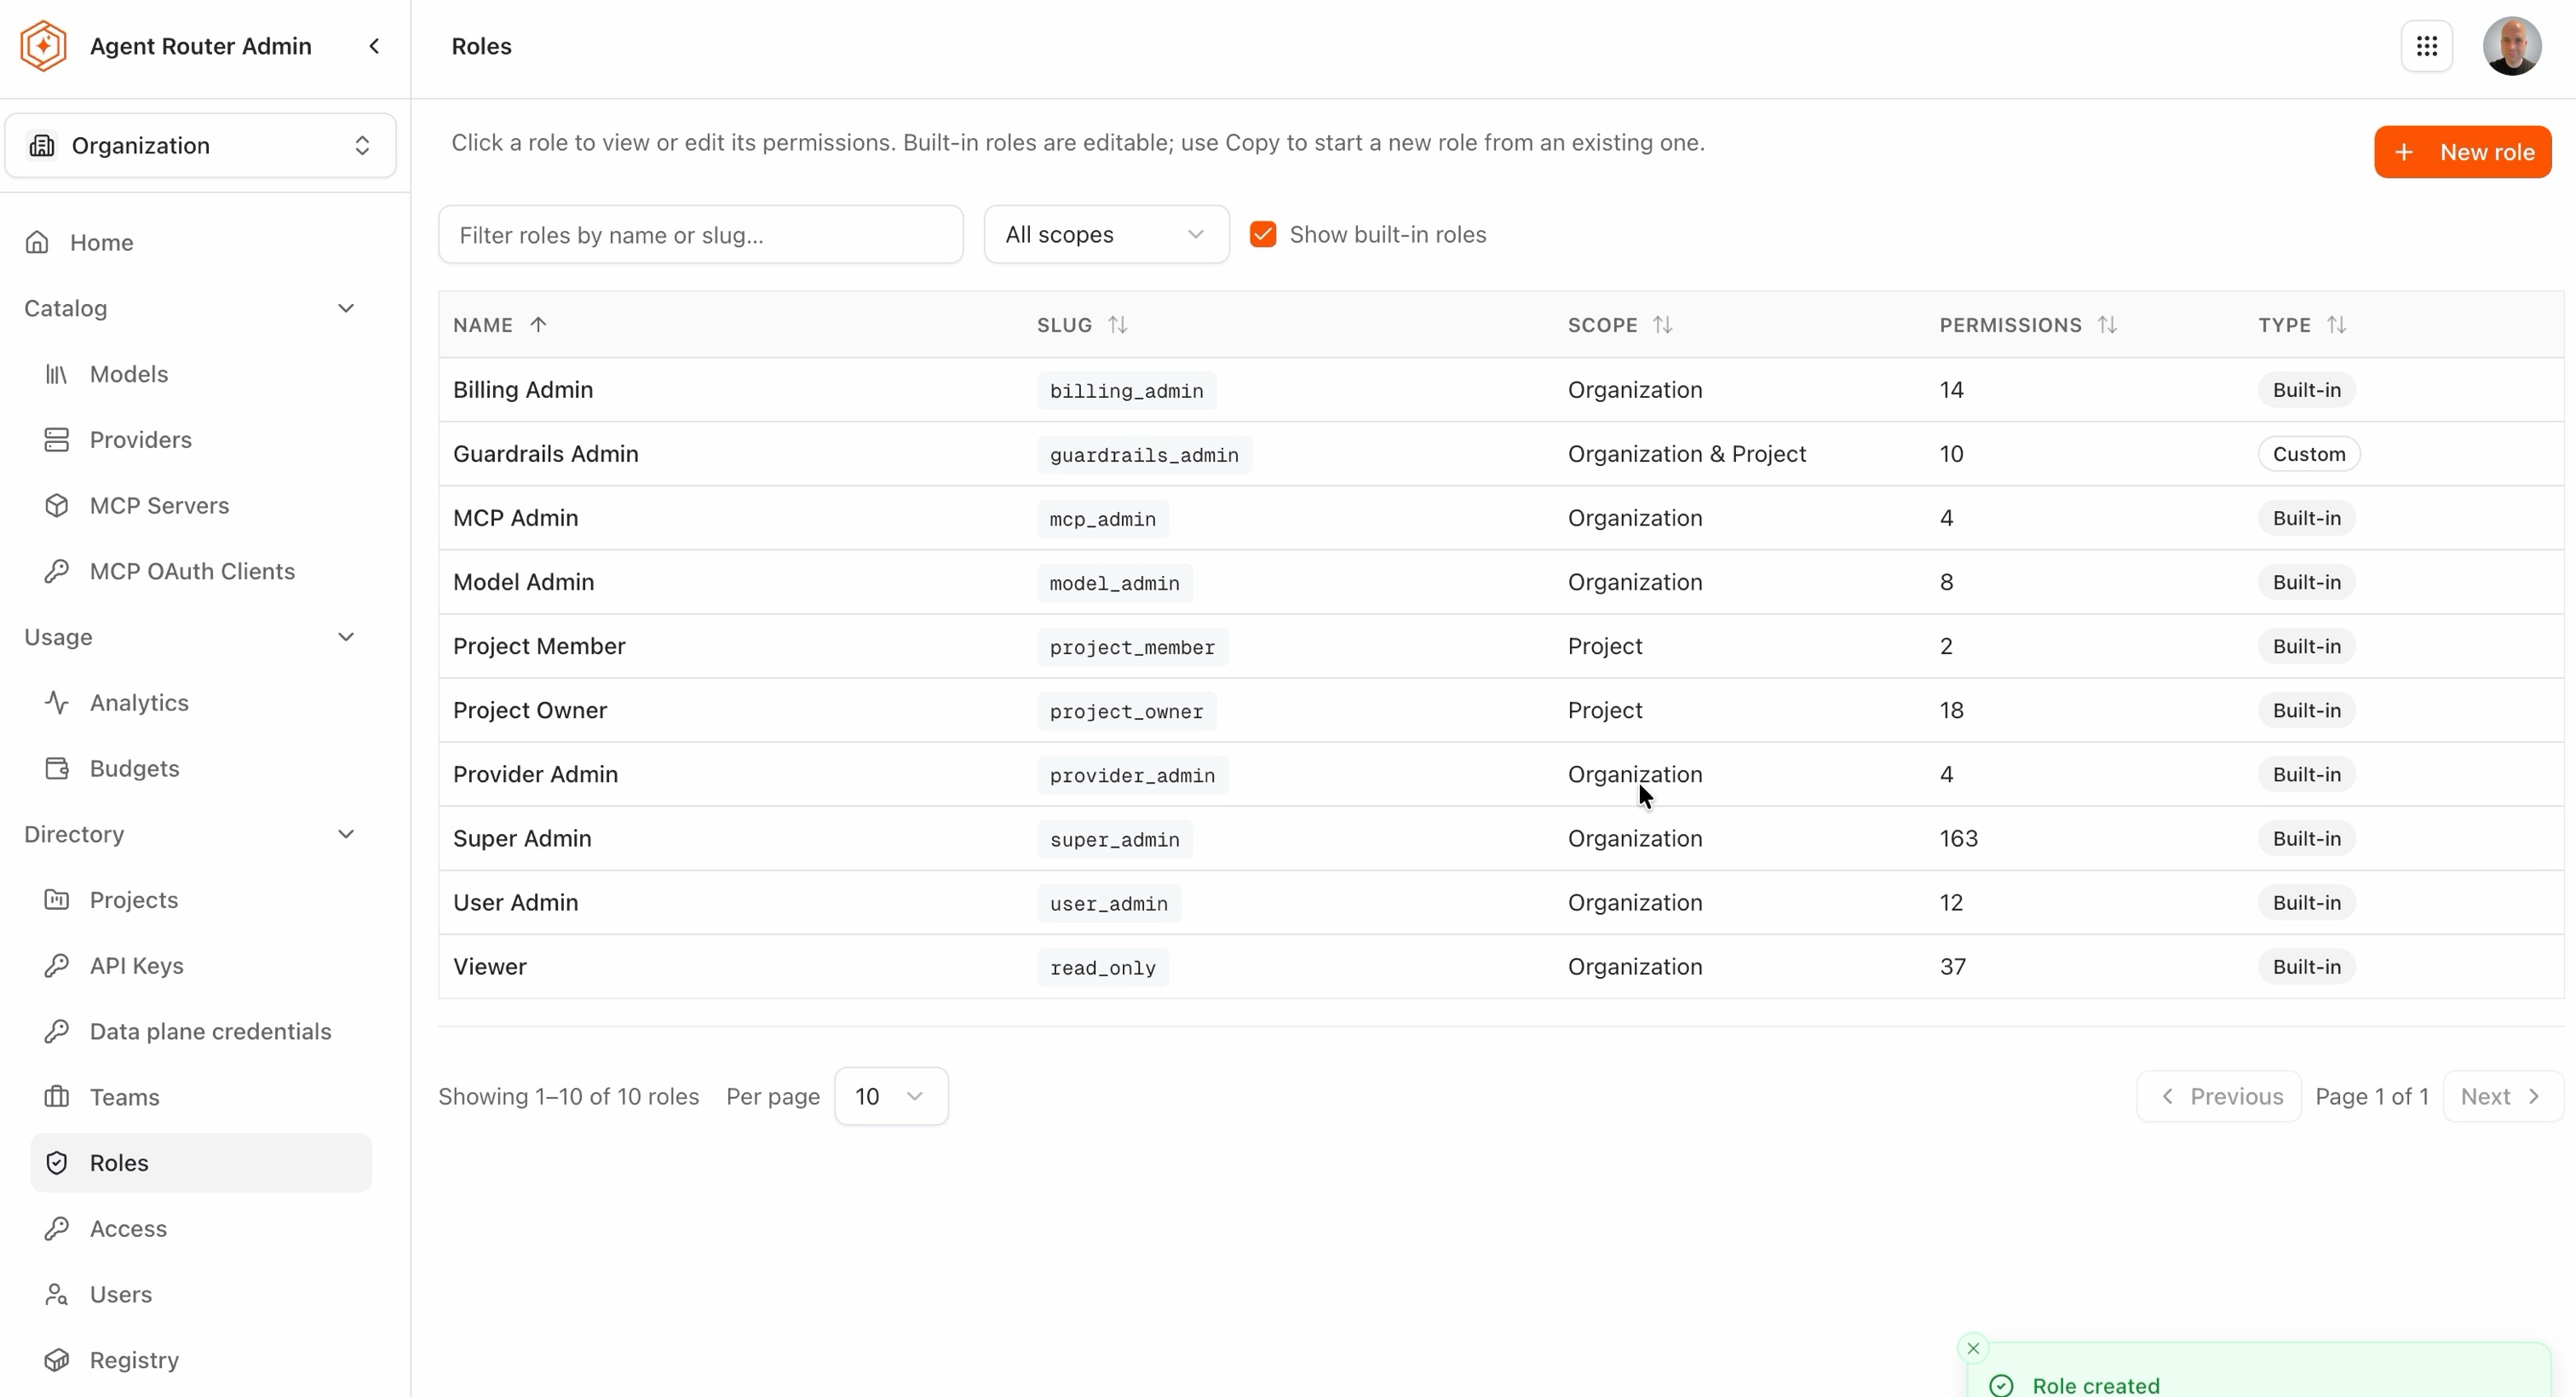
The Roles page lists every role with its slug, scope, permission count, and type, where Built-in marks a shipped role and Custom marks one defined locally. The list can be narrowed with the name and slug filter, restricted by scope, and built-in roles can be hidden altogether to leave only the custom ones in view.
- In the Admin Console, go to Directory → Roles.
- Select New role, or open an existing role and select Copy to start from its permission set.
- Enter the Slug. It must be lower case with words joined by underscores, for example
guardrails_admin. The slug is the role's stable identifier. - Enter the Display name, which is the label shown everywhere the role is offered, for example
Guardrails Admin. - Optionally enter a Description.
- Under Scope levels, select Organization, Project, or both. This sets where the role is permitted to be granted, not where it is granted. Levels required by the permissions selected below are added automatically.
- Select the permissions the role carries. Include a resource's read permission to make its menu visible; add its create, edit, and delete permissions to allow changes.
- Select Create role.
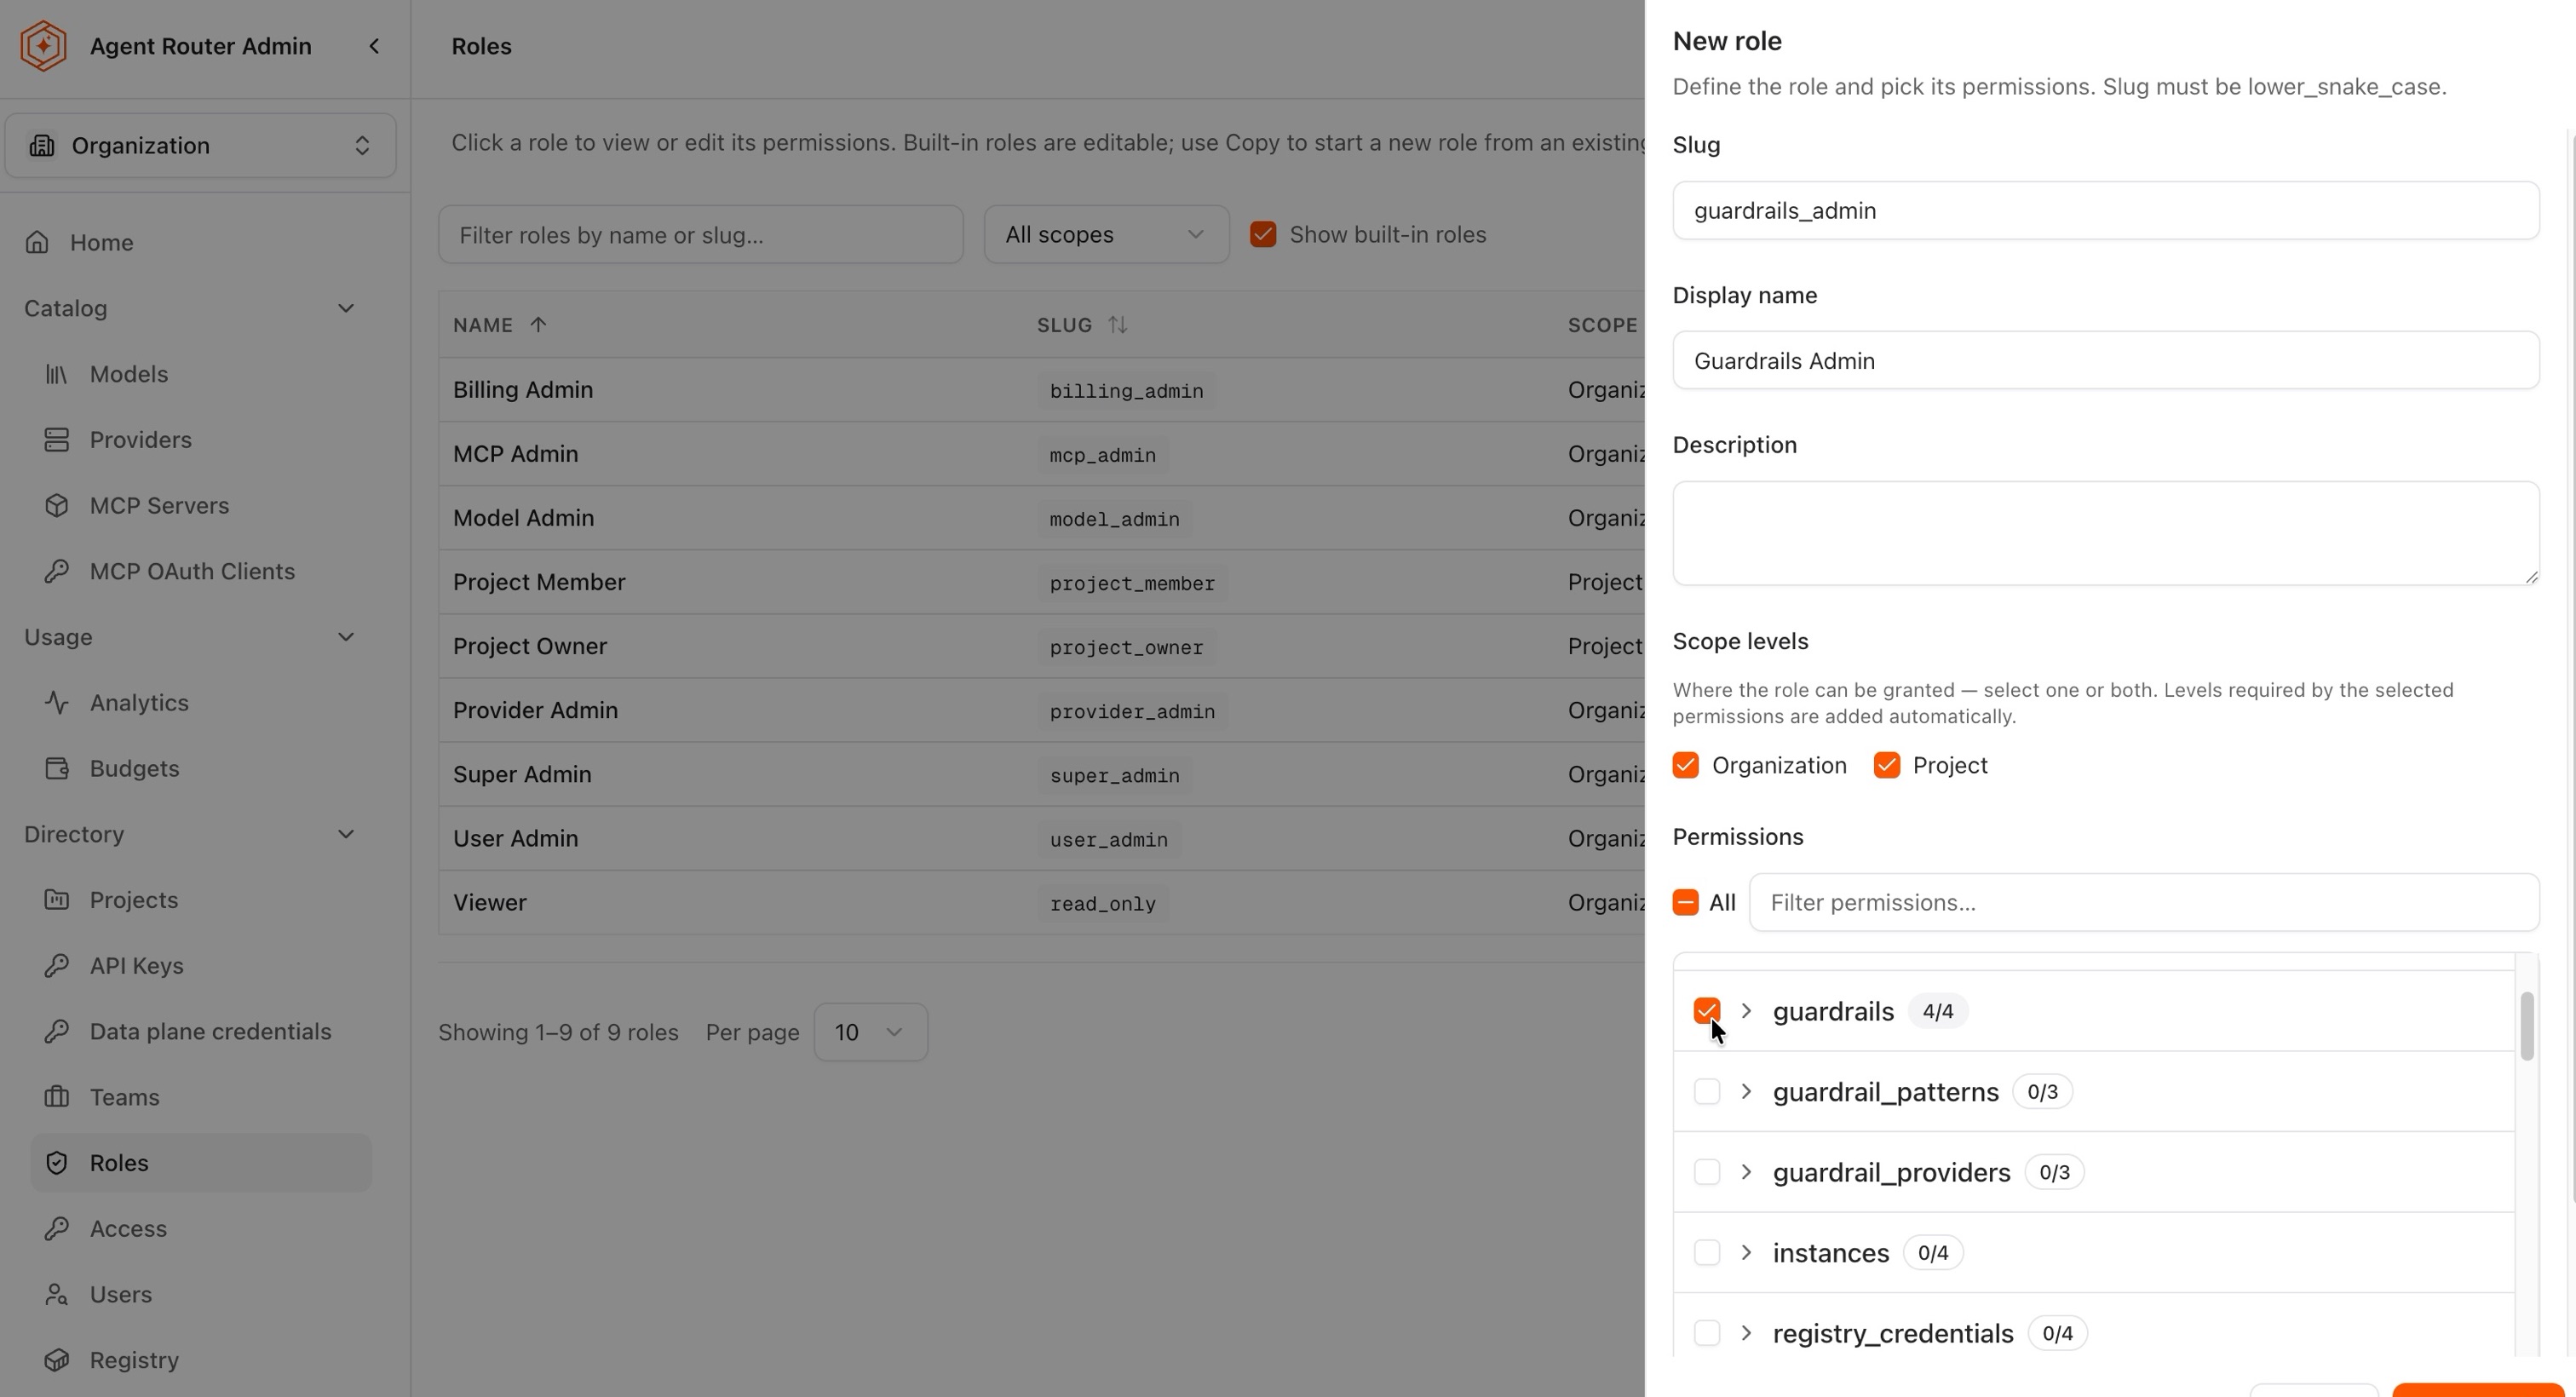
Permissions are grouped by resource, and each group carries a selected/total count, so guardrails 4/4 means all four of that resource's permissions are held. Selecting a group's checkbox takes every permission in it, expanding the group with the chevron selects them individually, Filter permissions narrows a long list, and All takes everything at once.
In the example, three groups are taken in full (guardrails, guardrail_patterns, and guardrail_providers), giving a role of 10 permissions that can administer guardrails and nothing else.
On submission the role appears in the list marked Custom, with the scope shown as Organization & Project where both levels were selected.
Editing, copying, and deleting a role
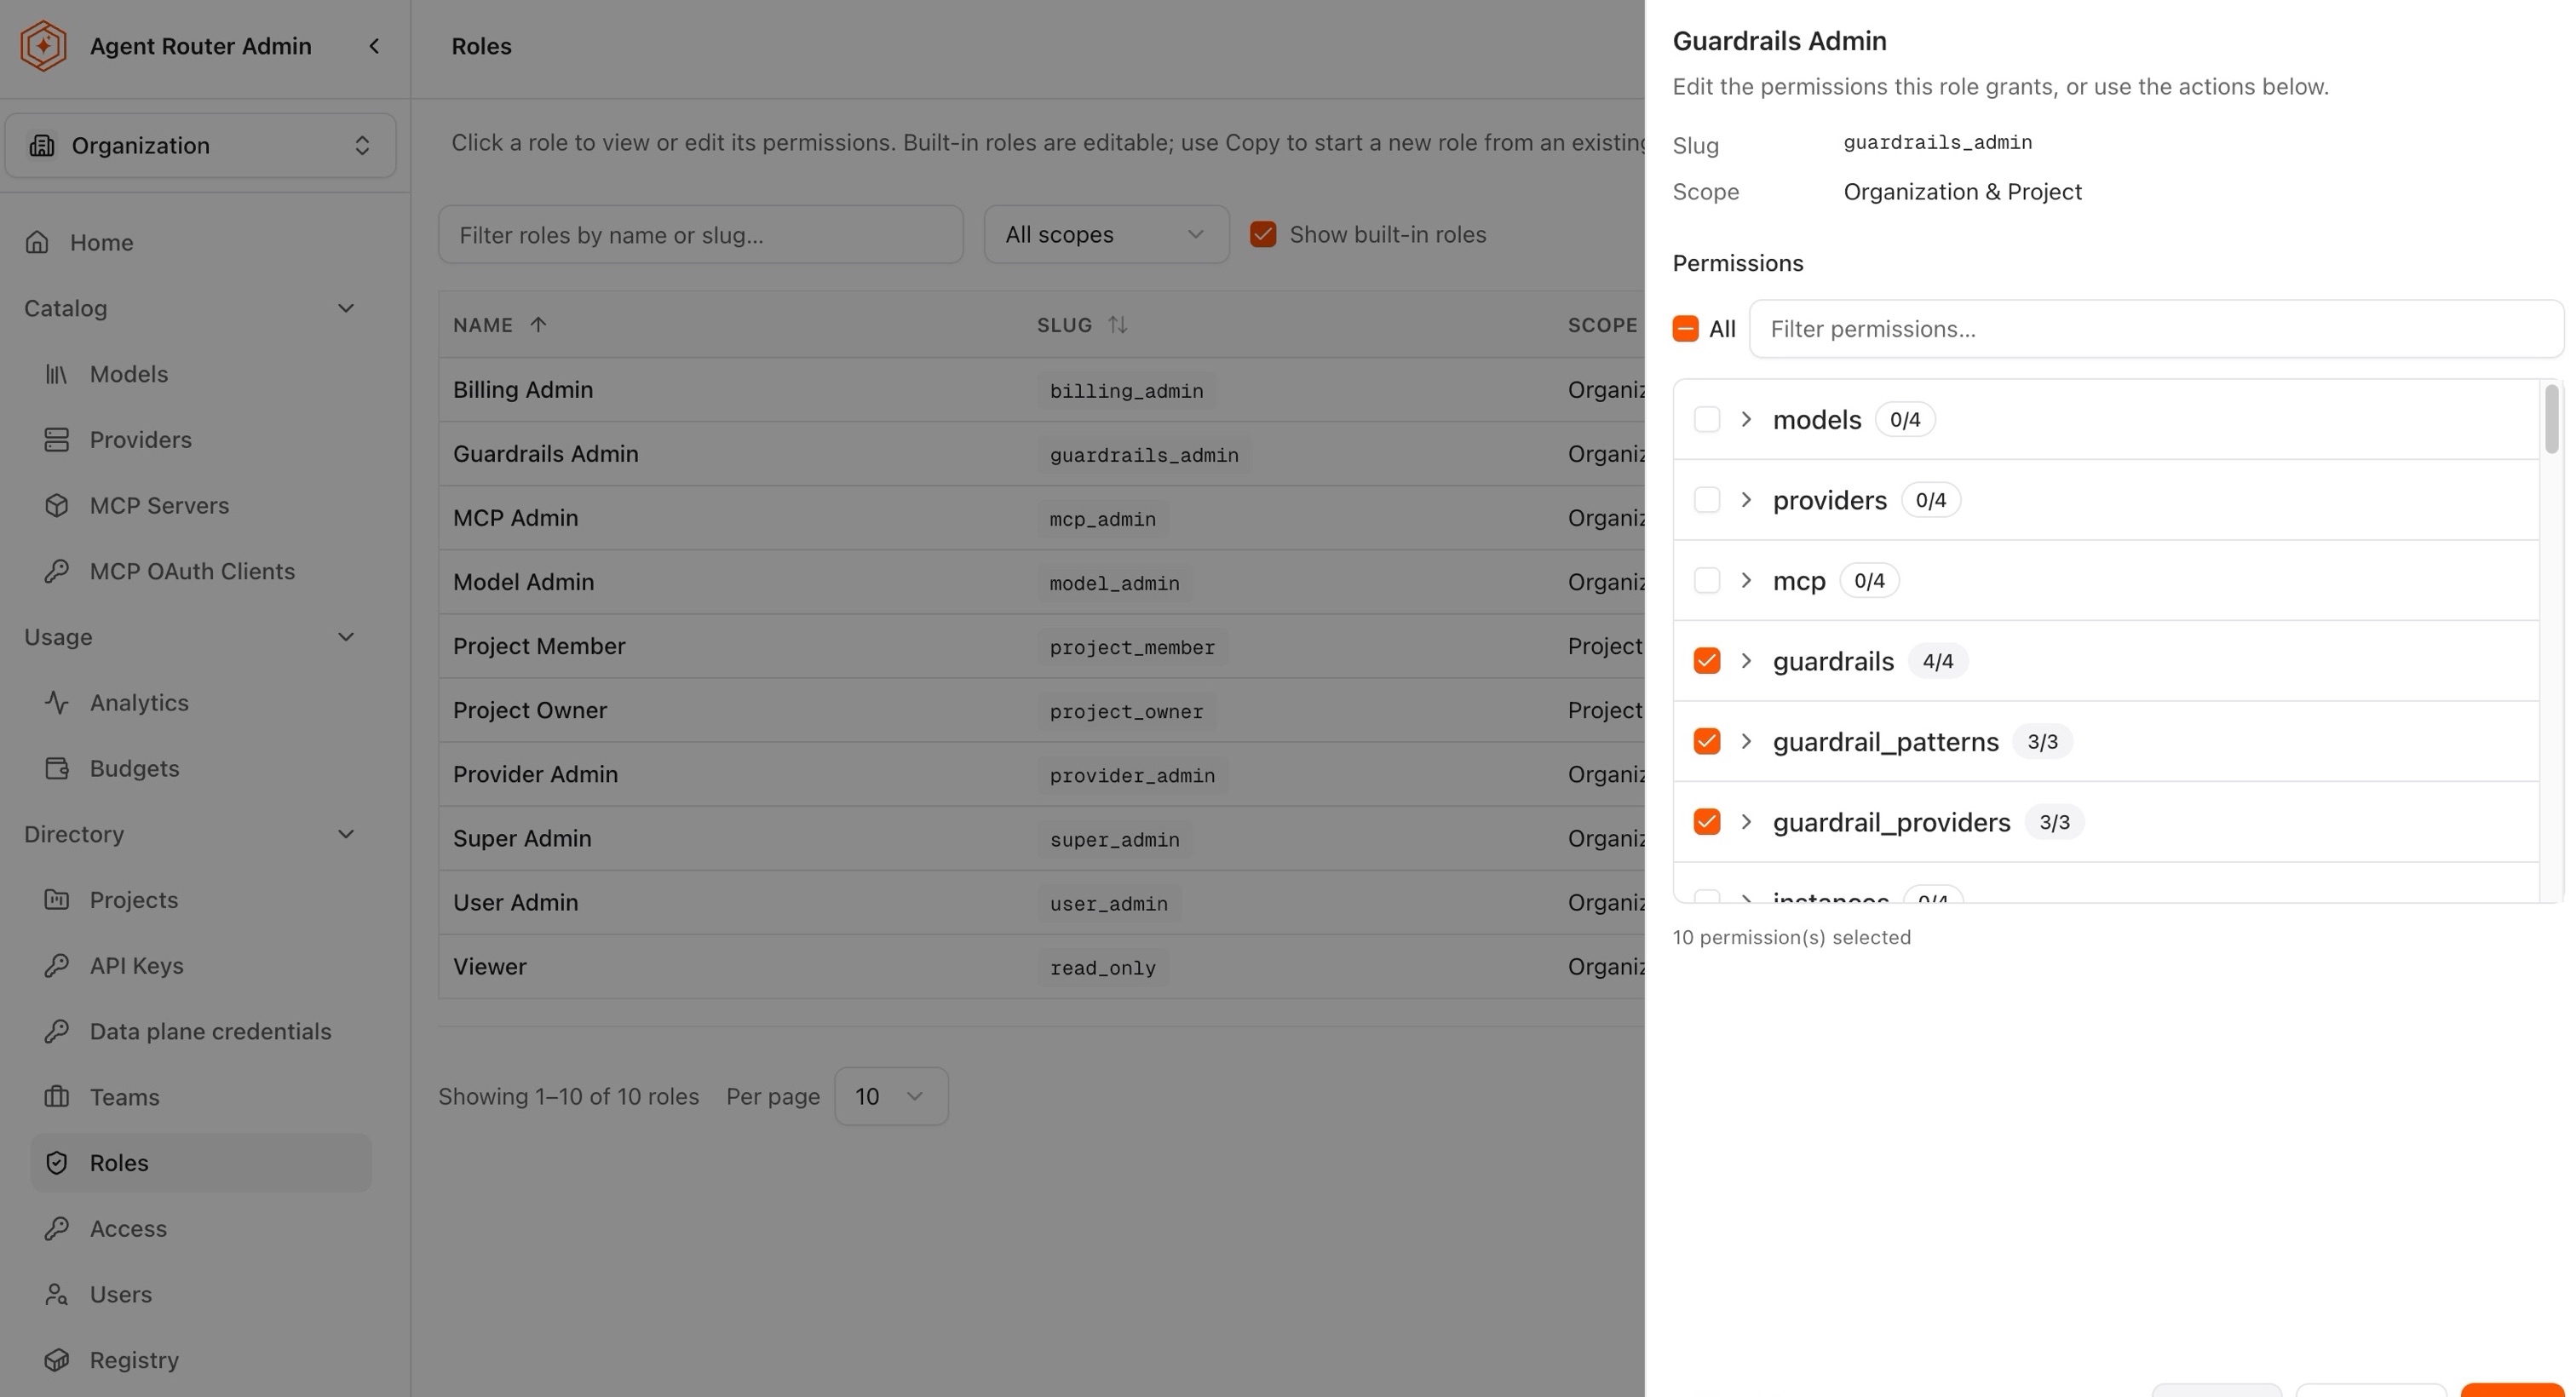
Selecting a role opens it for editing. The slug and scope are shown for reference, the permission tree is editable, and a running total is reported beneath it (10 permission(s) selected). Three actions sit in the panel footer: Copy creates a new role starting from this permission set, Save applies the changes, and Delete removes the role.
Built-in roles are editable in the same way. Copying one and editing the copy is the safer pattern, because the original stays intact for comparison and reuse.
Example: a role limited to the catalog menus
An organization role named Gateway Viewer that carries only the read permissions for Models and Providers restricts its holder to the catalog. The sidebar shows Home, the Catalog group, Models, and Providers, and nothing else; every other address redirects to the unauthorized page. Adding the Models and Providers edit permissions extends the same role to changing those two resources, while the rest of the Admin Console stays closed.
Step 2: grant a role to a user
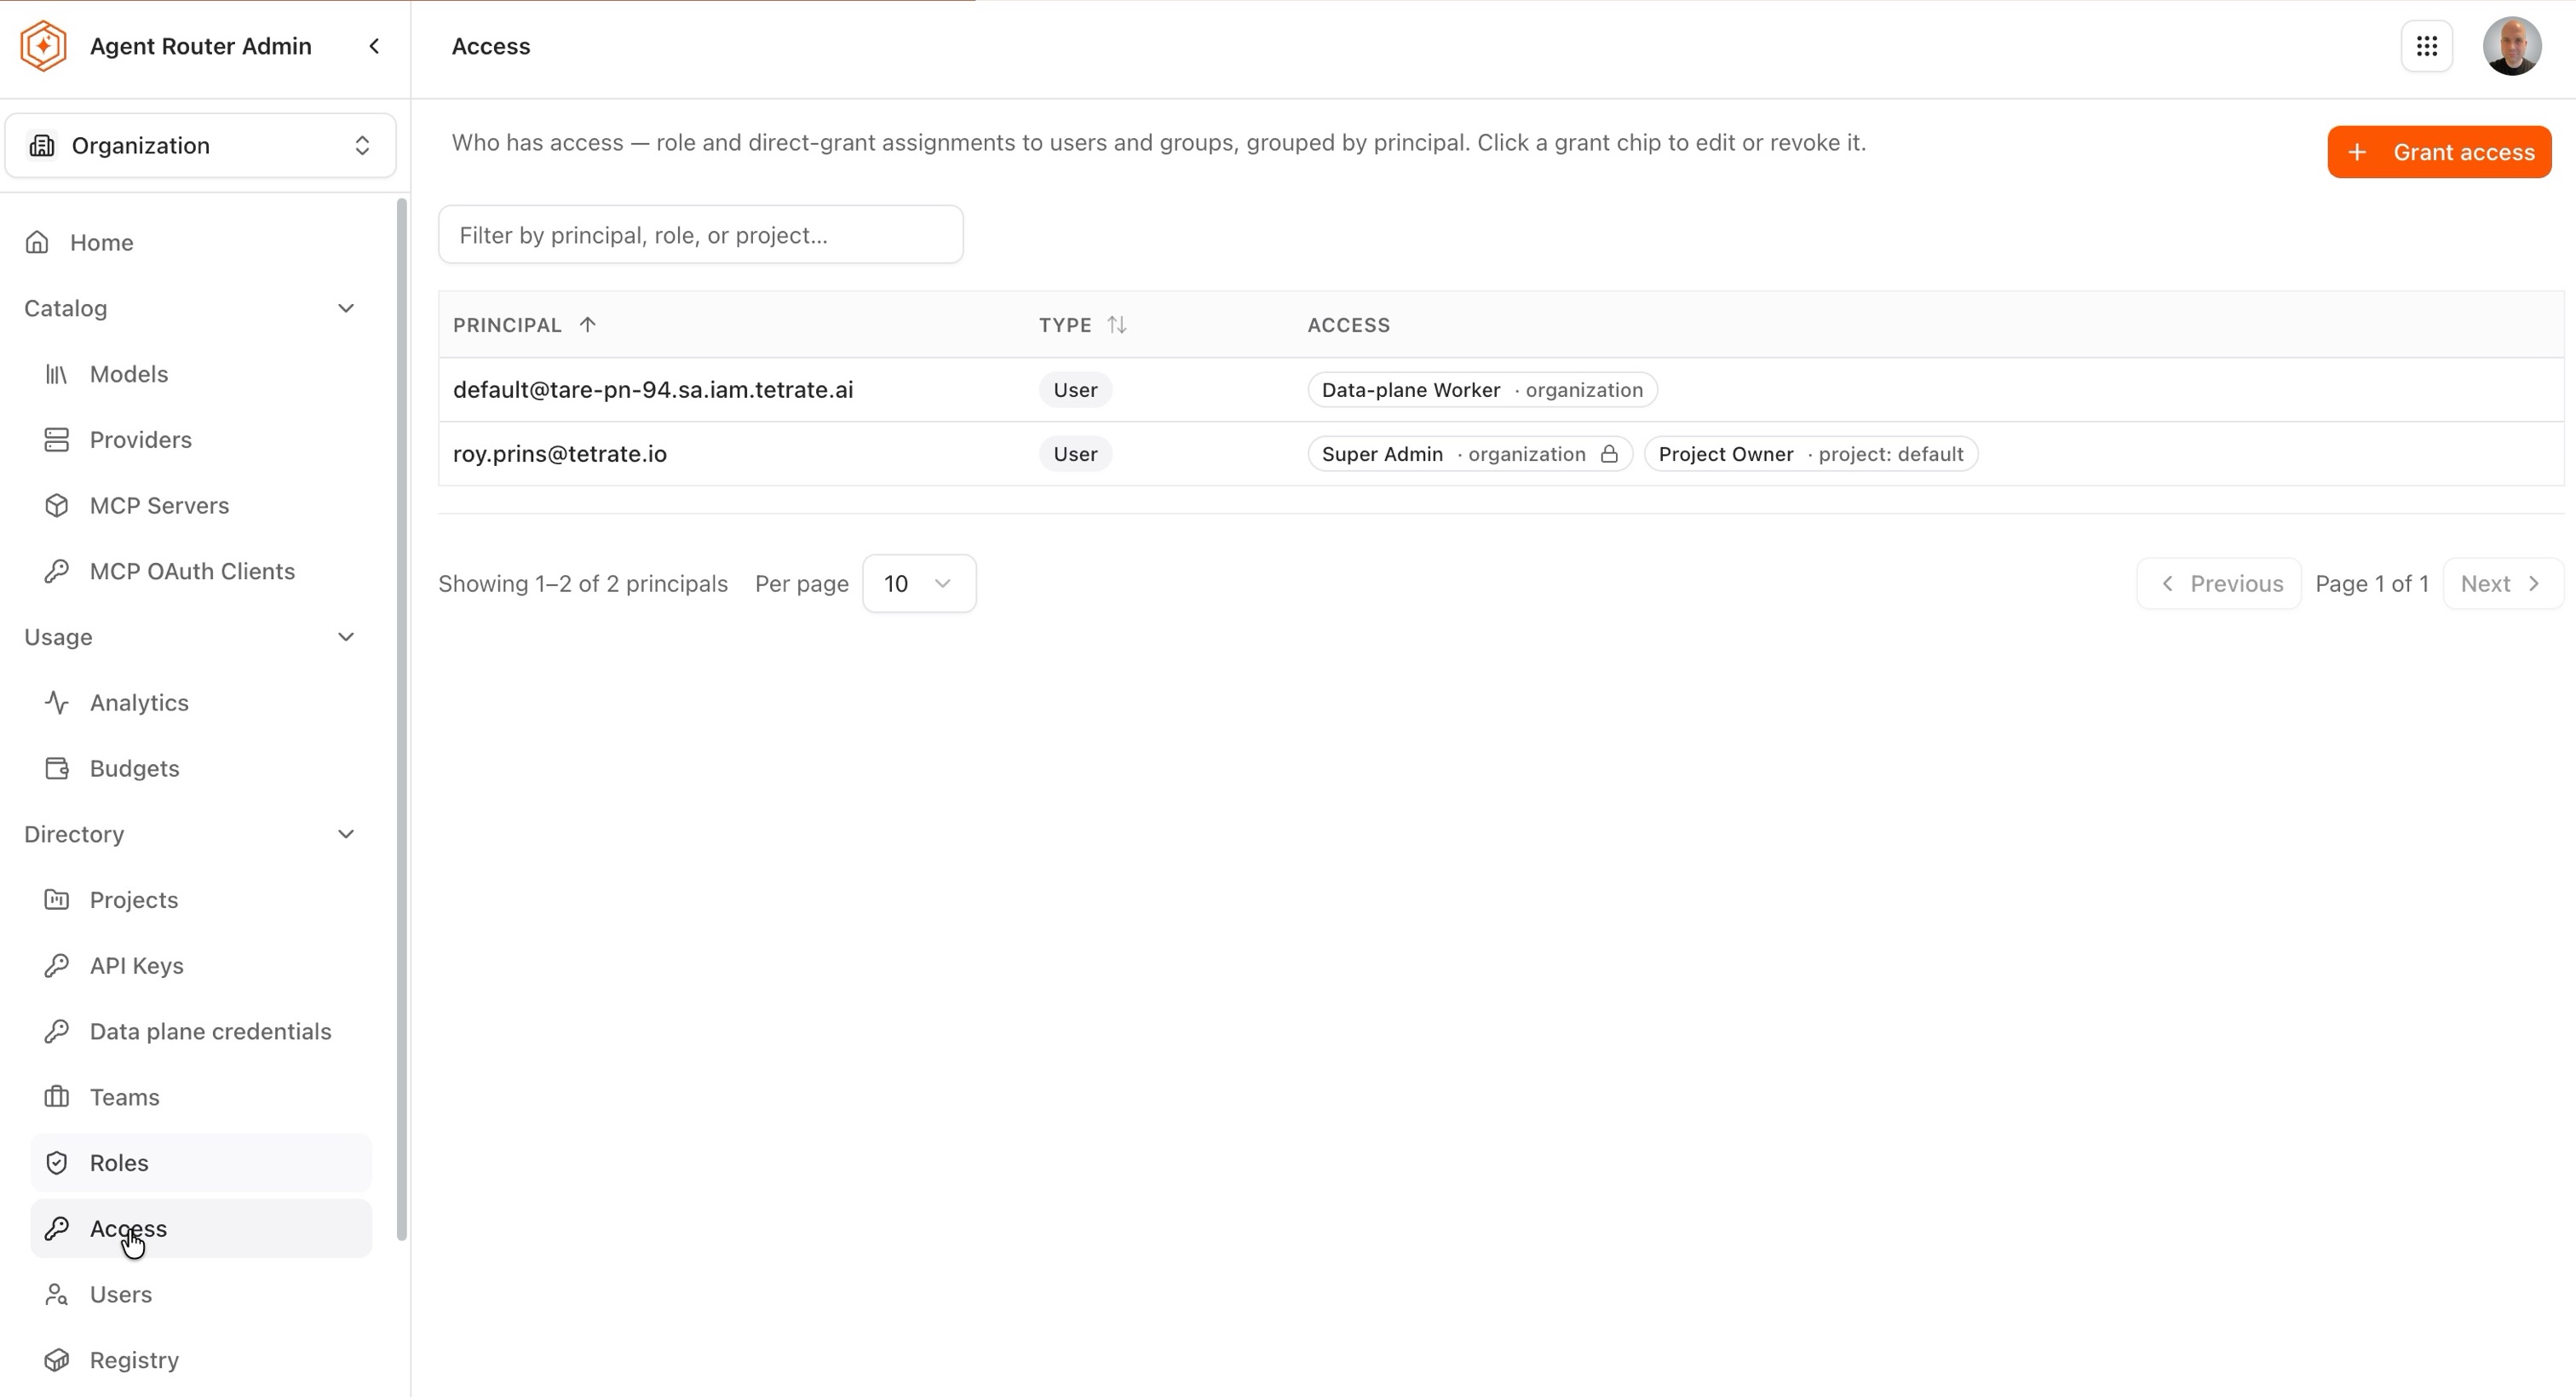
The Access page is the register of who holds what. Each row is a principal, a user or a group, and each grant that principal holds appears as a chip reading the role followed by the scope it applies at, such as Guardrails Admin · organization or Project Owner · project: default. Grants can be filtered by principal, role, or project.
- Go to Directory → Access.
- Select Grant access.
- Leave Principal type set to User.
- Under Principal, type a name or email and select the person from the results.
- Leave Grant set to A role.
- Under Roles, select one or more roles. Each is listed with its permitted scope on the right, and built-in roles are marked as such. Filter roles narrows the list.
- Under Apply to, choose Whole organization or Specific projects.
- Select Grant access.
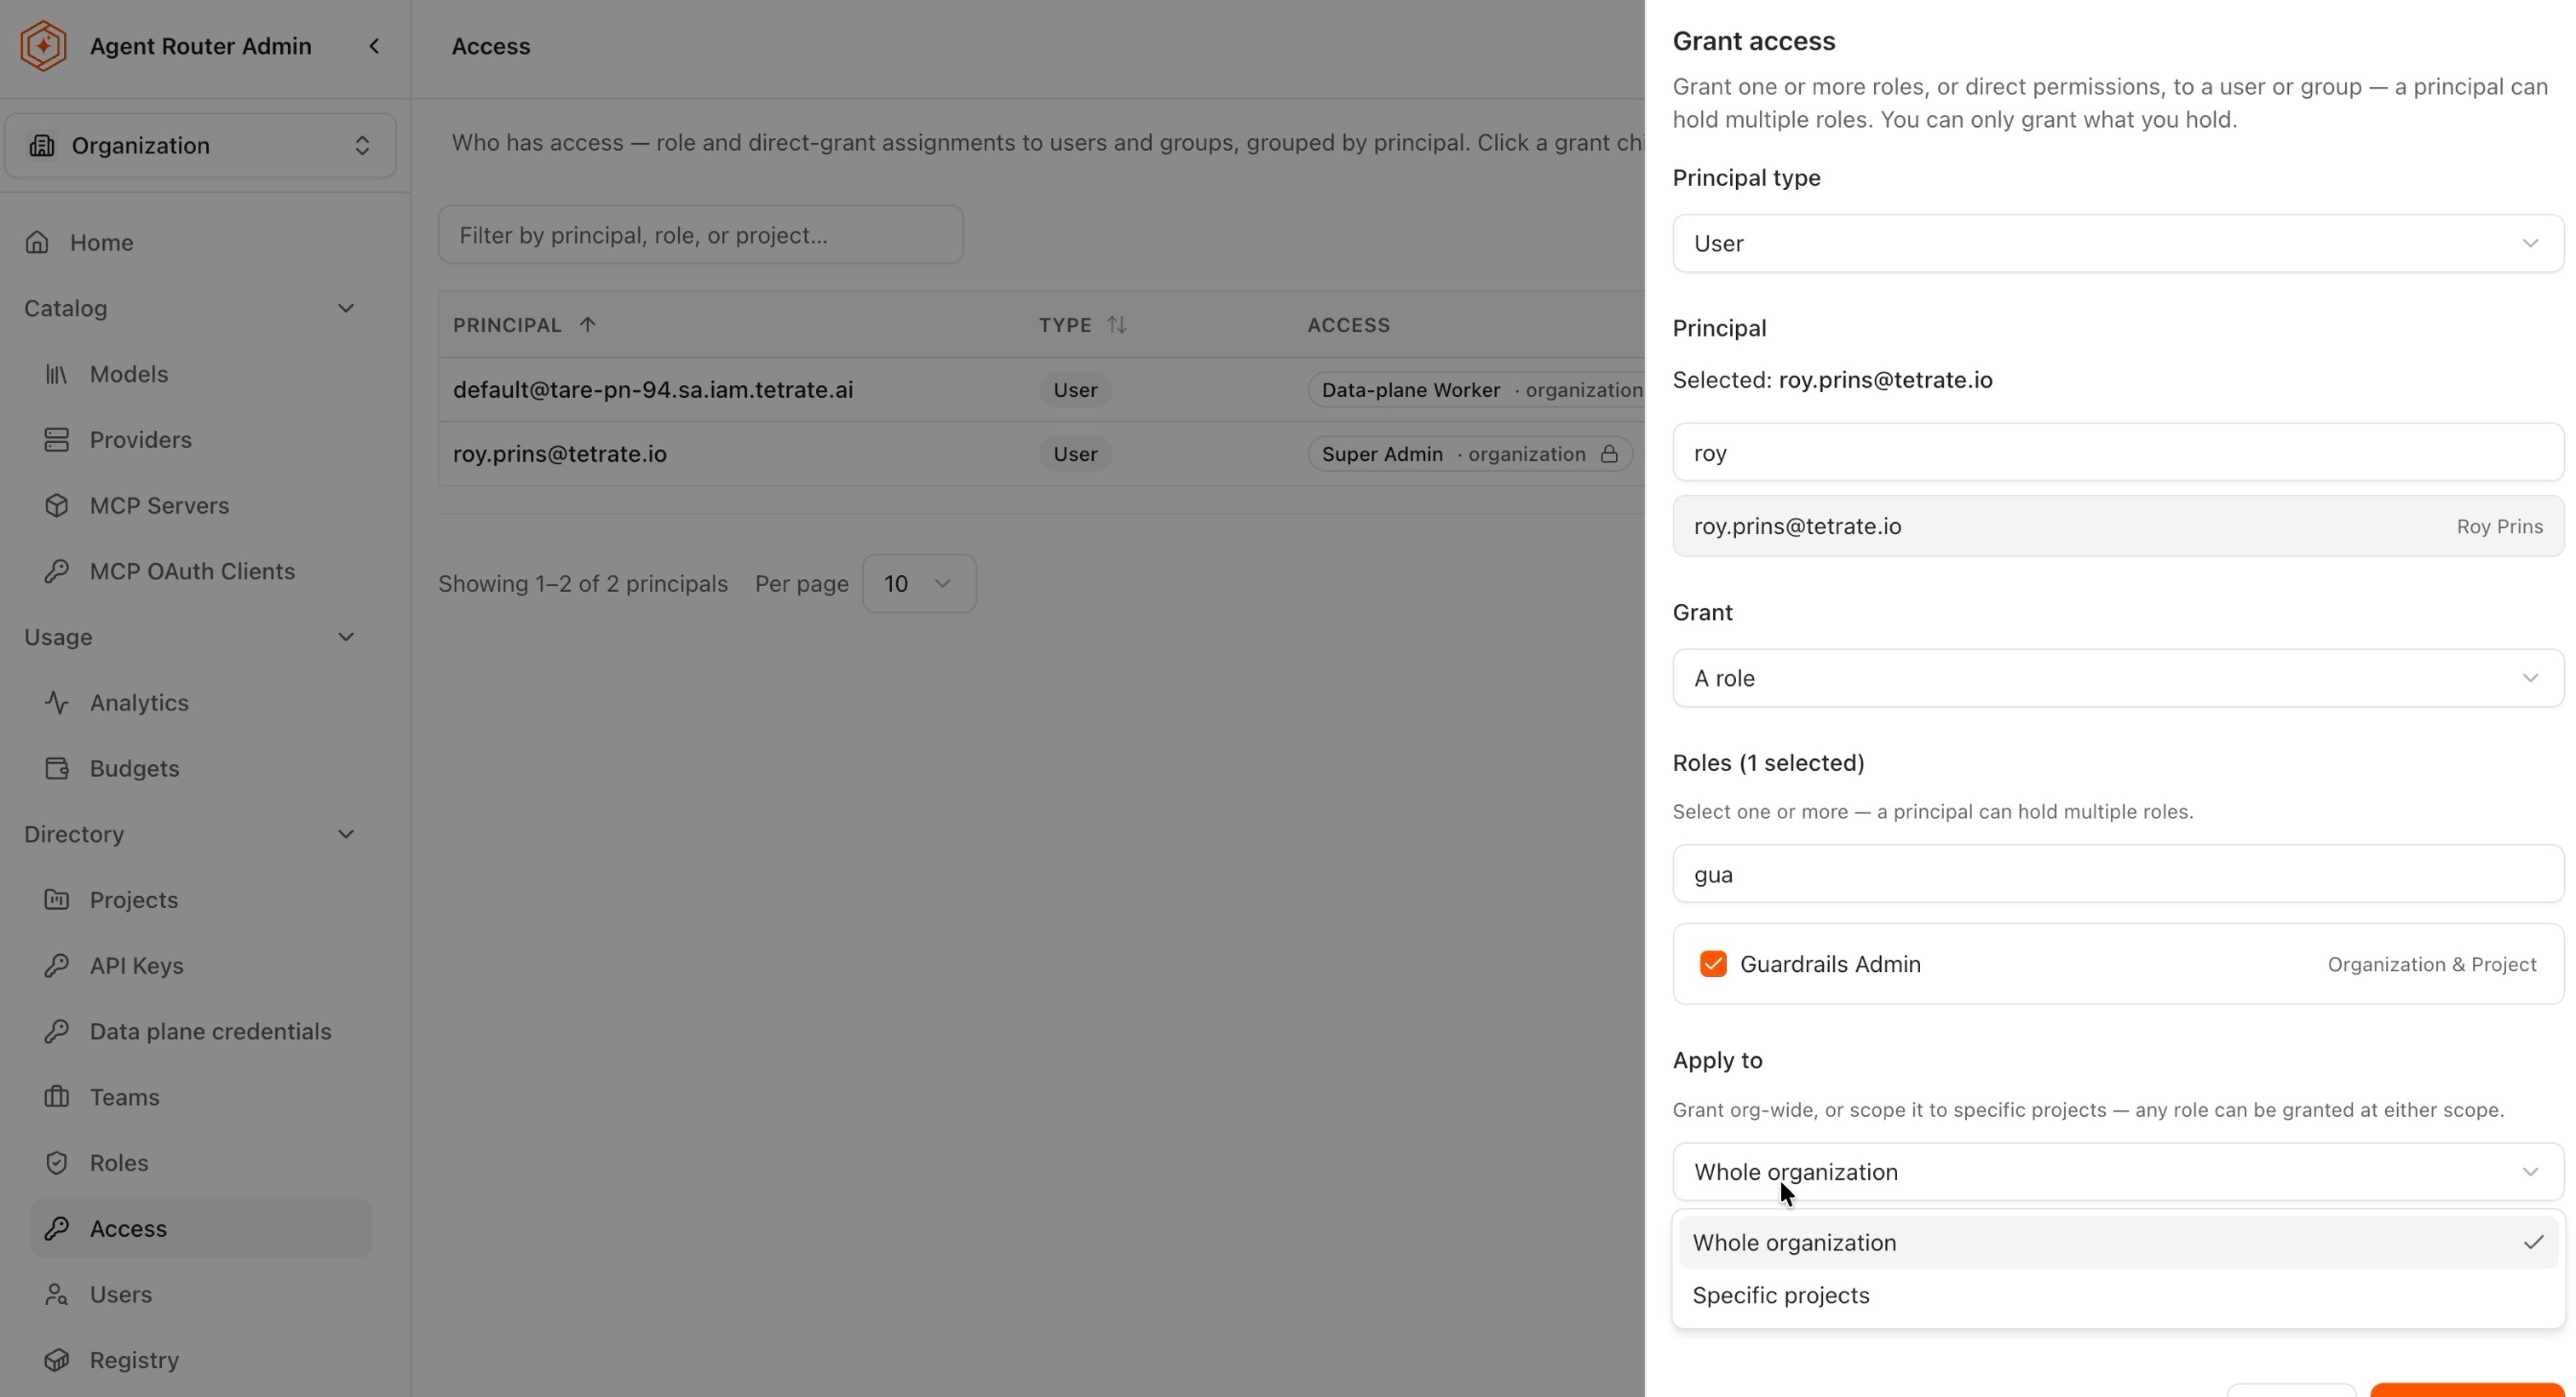
Three things about this panel are worth knowing before using it.
- Most roles can be granted at either scope. The role's scope levels say where a grant is permitted; Apply to decides where this grant lands. A role marked Organization & Project can therefore be granted org-wide to one person and scoped to a single project for another.
- A principal can hold several roles at once, and several can be selected in a single pass. The result is additive, as described under When a person has access from more than one place.
- Only access the operator already holds can be granted. A role carrying permissions beyond the operator's own cannot be handed out, which prevents privilege escalation through the grant form.
- Super Admin is single-purpose in this panel. It appears only when the operator is already a Super Admin and the principal is a user. Selecting it clears other selected roles and forces Apply to to Whole organization.
Setting Grant to Direct permissions instead of A role assigns individual permissions to the principal without going through a role. This is worth avoiding as a habit: a direct grant is invisible to anyone reviewing roles and has to be found on the Access page, whereas a role is reusable and self-documenting.
A confirmation step restates who is about to receive the access and at what scope.
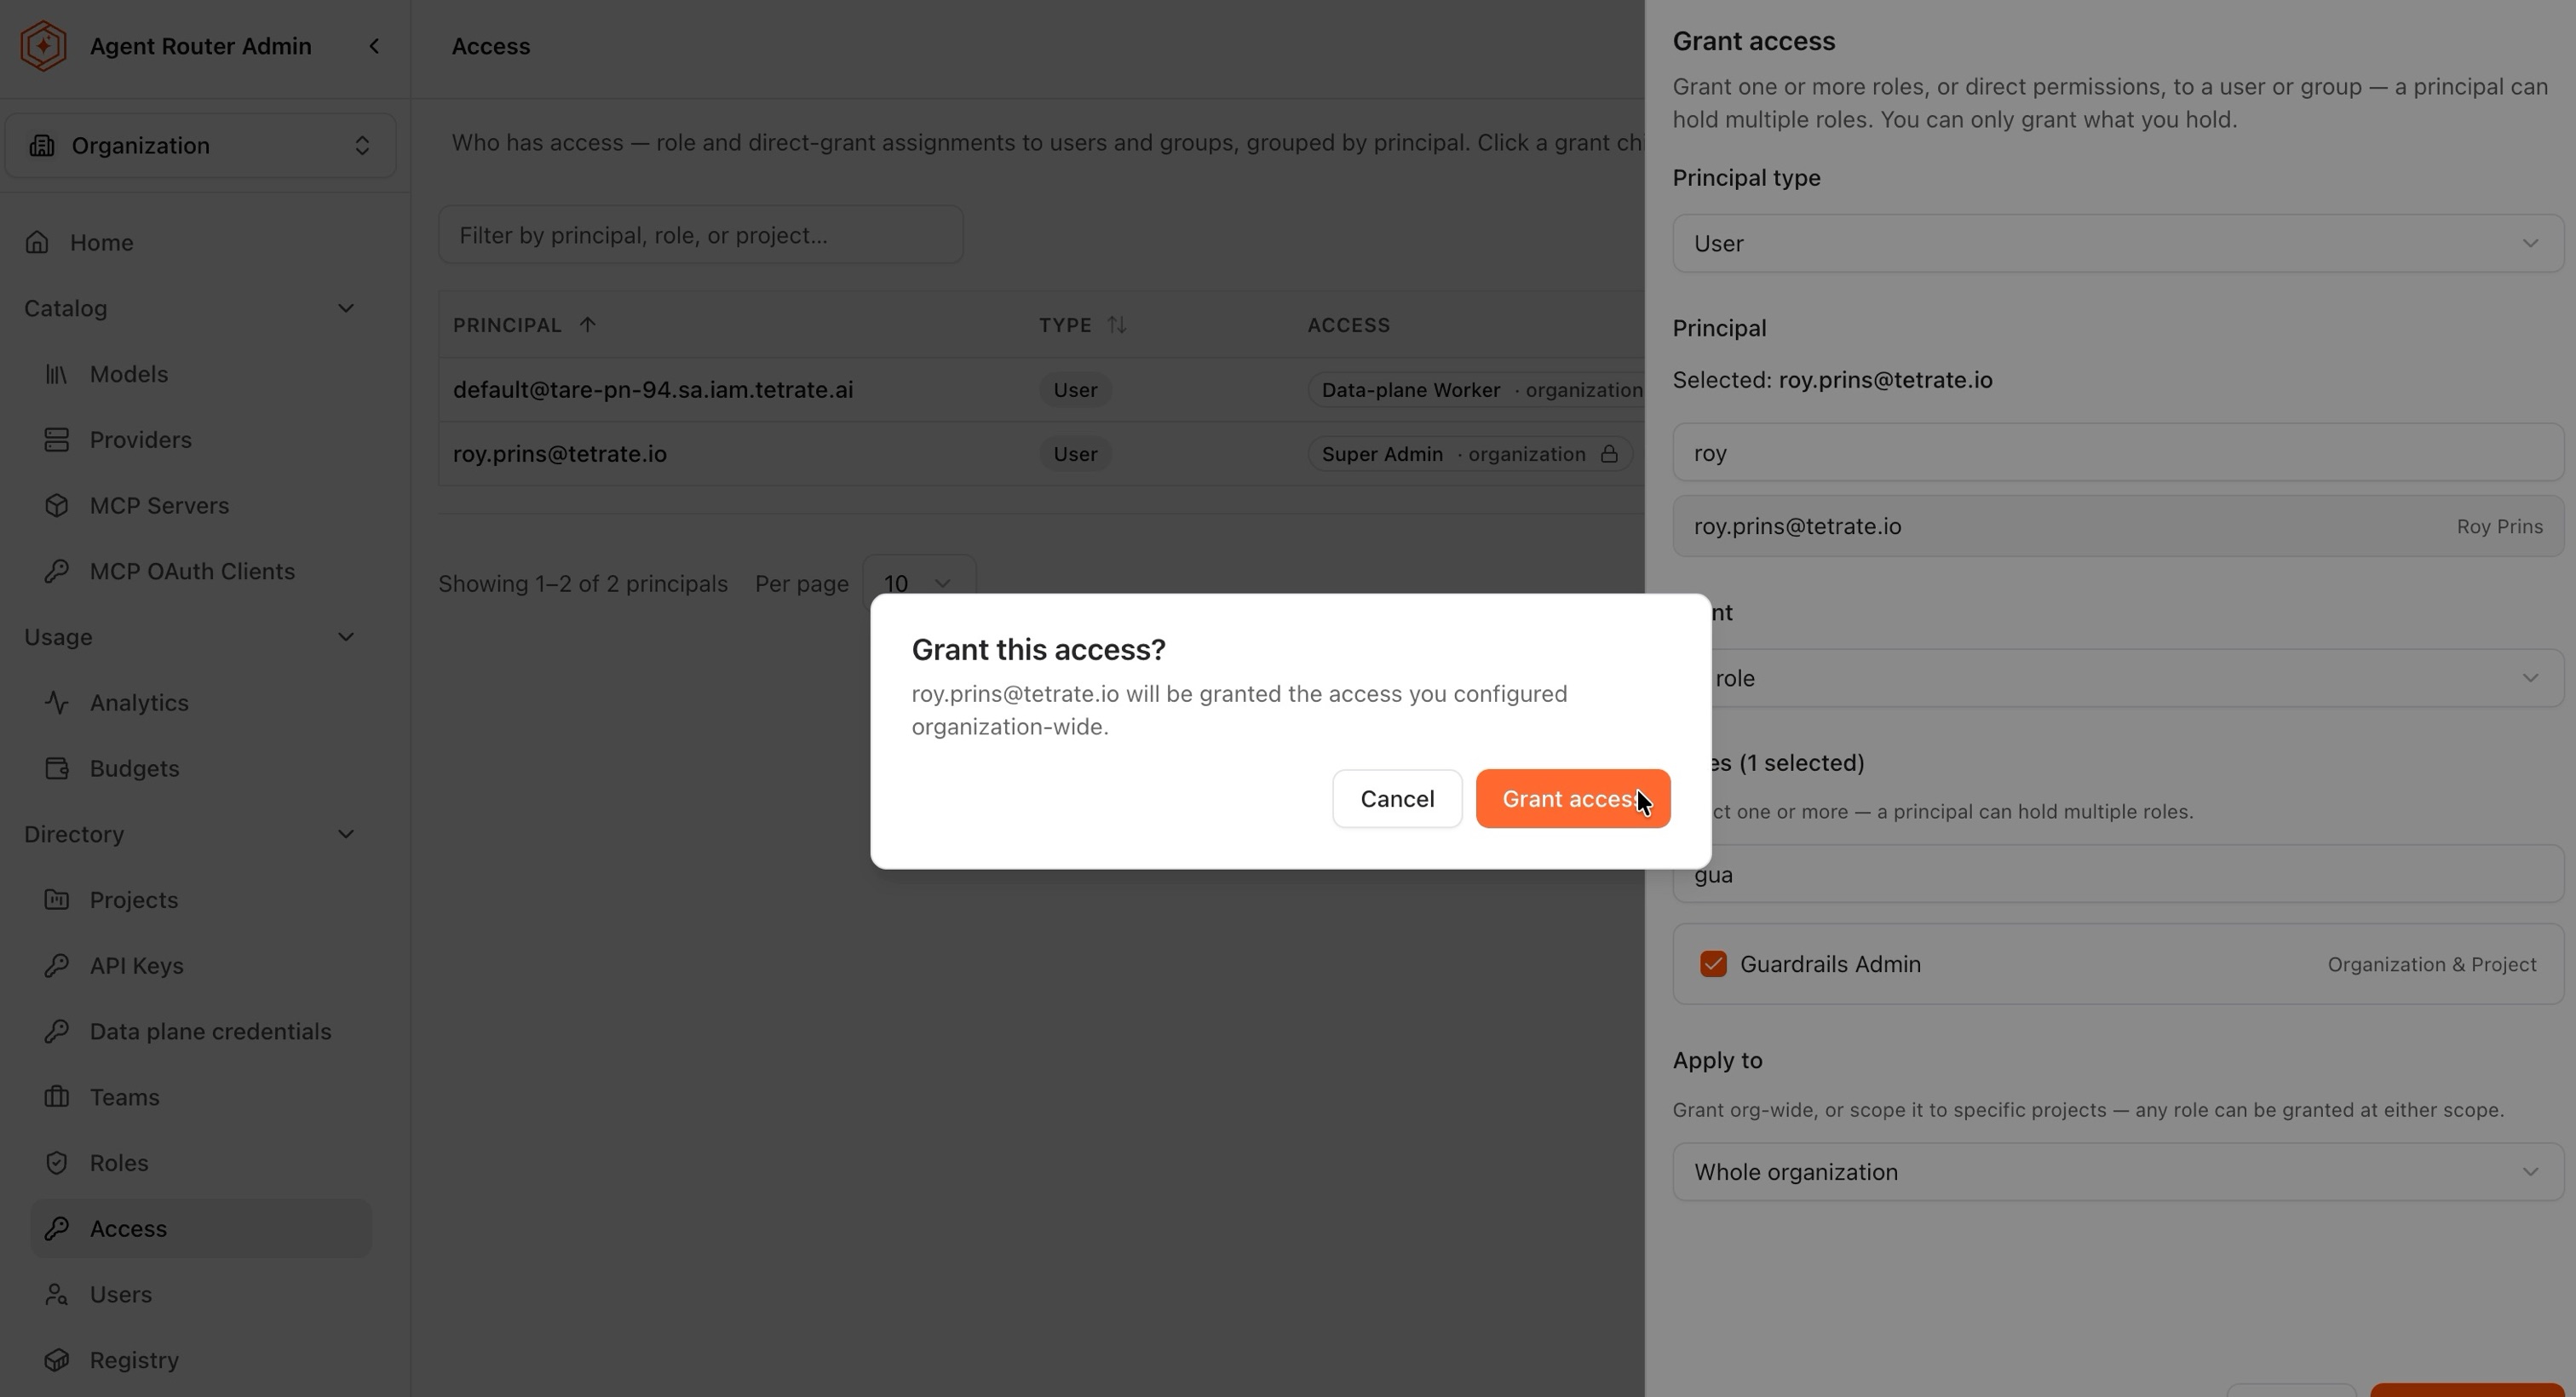
Once confirmed, the new chip appears against that principal on the Access page.
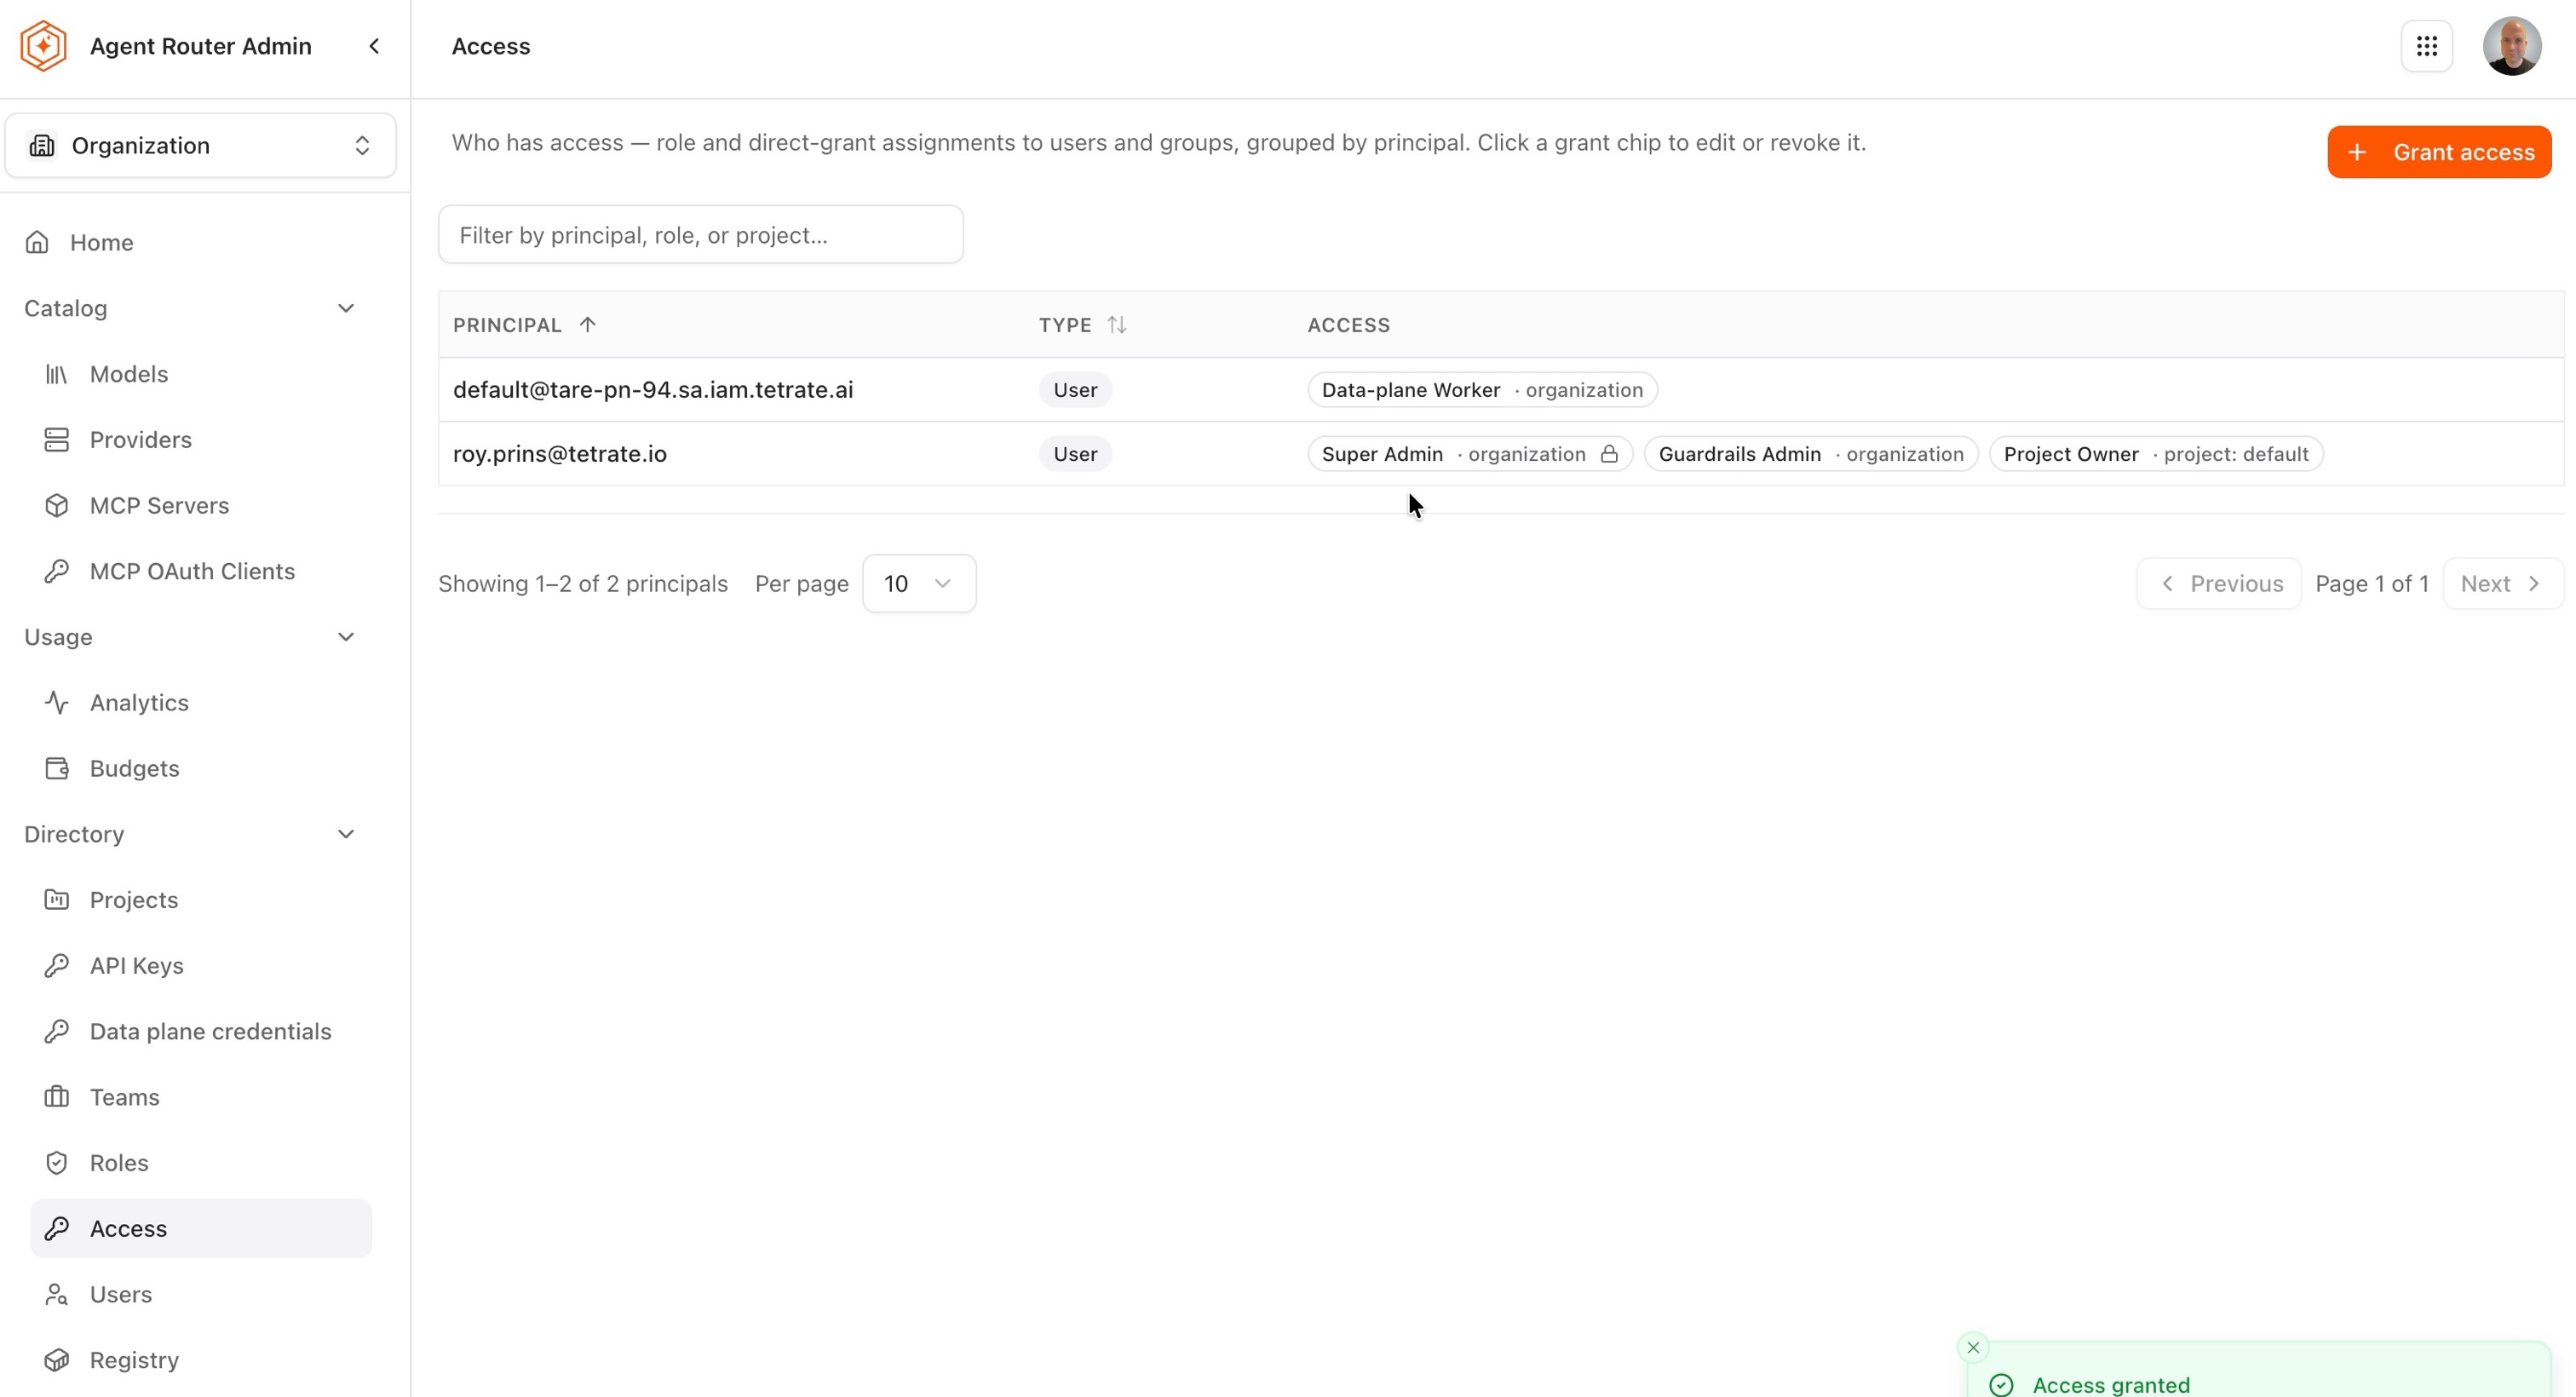
The grant takes effect on the recipient's next page load; no sign-out is required.
Step 3: grant a role to a team
Granting a role to a team once, rather than to each member separately, is the lower-maintenance option for a group of people who need the same access: adding someone to the team grants it, and removing them withdraws it.
- Confirm the team exists and holds the intended members. Teams are managed under Directory → Teams, as described in Create and manage teams.
- Go to Directory → Access and select Grant access.
- Change Principal type from User, then select the team under Principal.
- Select the role or roles, and set Apply to.
- Select Grant access, then confirm.
The panel is the same one used in Step 2, and everything in it behaves identically. Only the principal differs, which is why the Access page describes its rows as assignments "to users and groups" and labels each row with a Type.
Team grants behave as follows:
- Super Admin cannot be granted to a team. Grant it directly to a user who should administer the whole organization.
- A role granted to a team confers nothing until someone is a member of that team.
- A member inherits exactly the team's role and no more. A team holding a view-only role gives its members view-only access.
- The grant is live: a person added to the team gains the access on their next page load, and a person removed loses it immediately.
When a person has access from more than one place
A person can hold roles granted to them directly and also inherit roles granted to a team they belong to. The resulting access is the sum of all of them: every permission from every role held directly, plus every permission inherited through team membership. Grants only ever add access; there is no deny grant that cancels another.
For example, a person holding a direct role that permits editing models, who also belongs to a team holding a view-only role, can edit models (from the direct role) and view everything else (from the team). Removing them from the team leaves only the model editing the direct role provides; removing the direct role leaves only the view-only access inherited from the team.
Step 4: edit or revoke a grant
Access is not set once. People change job, a grant turns out to be broader than intended, or a role was scoped org-wide when a single project would have done. Both corrections start from the grant chip on the Access page.
- Go to Directory → Access.
- Select the grant chip to be changed. It opens for editing.
- To adjust it, change the Role, the type of Grant, or the Apply to scope, then select Save changes.
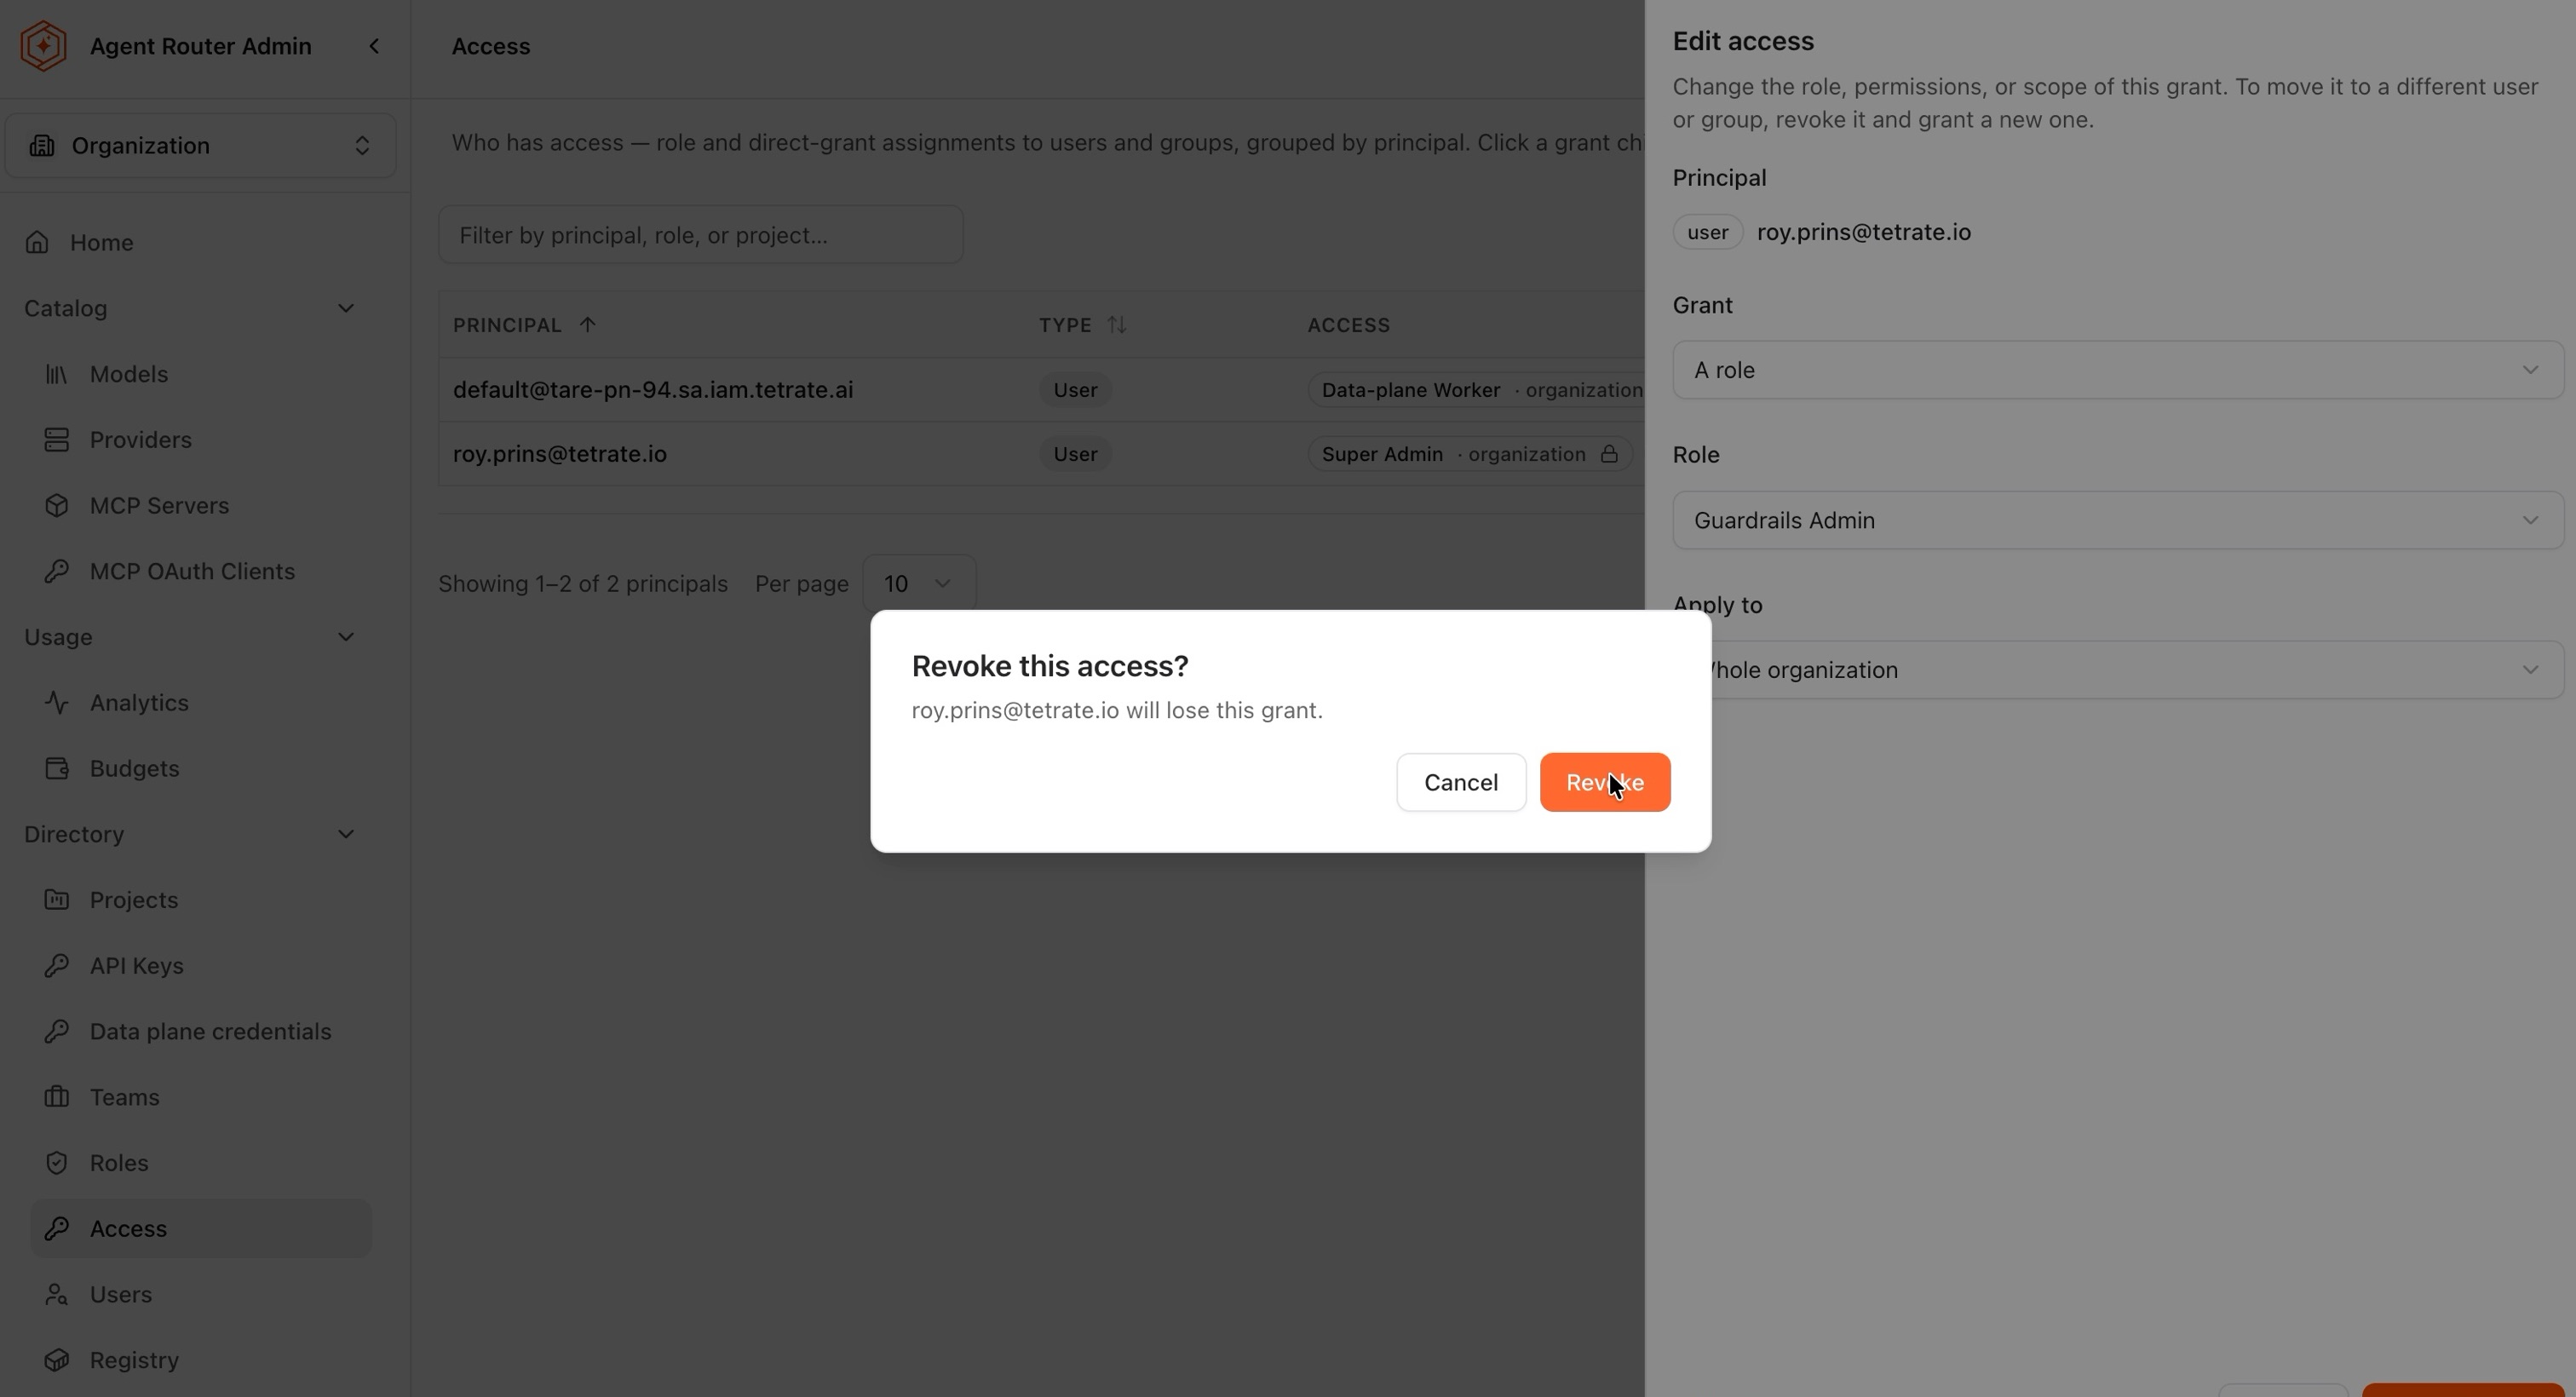
- To remove it, select Revoke, then confirm.
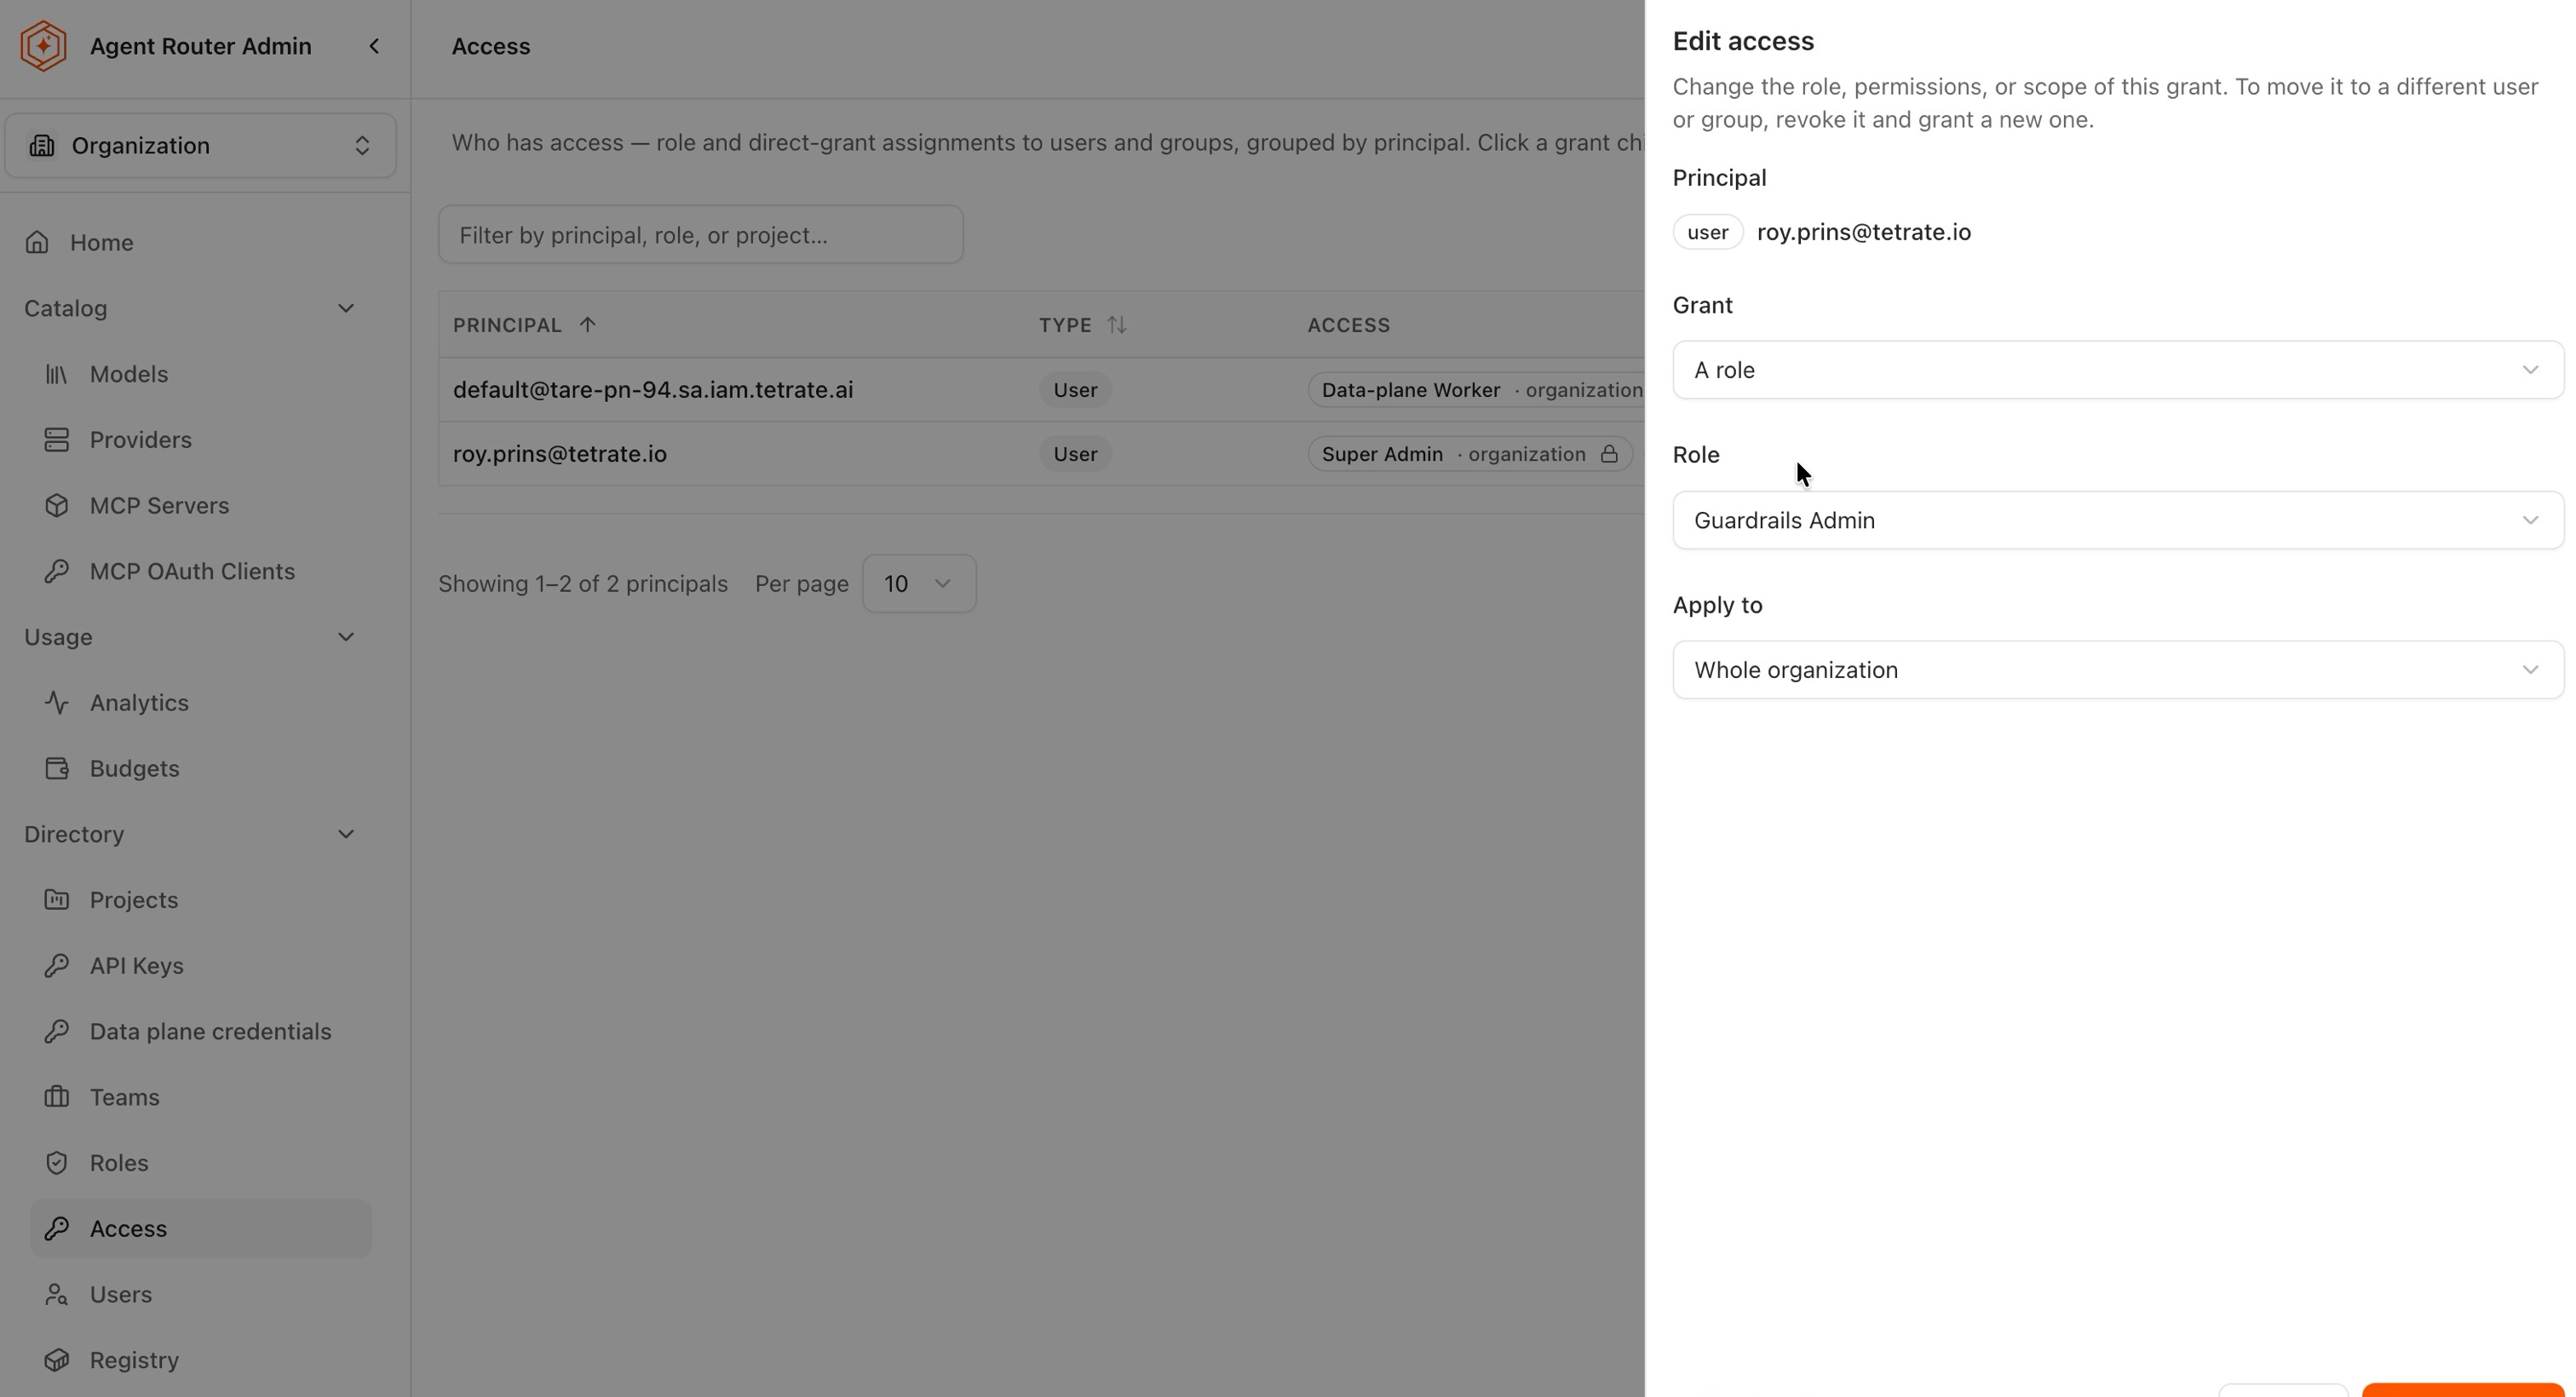
The principal cannot be changed here. Moving access from one person to another is done by revoking the grant and creating a new one, which keeps the audit trail honest about who held what and when.
Revoking asks for confirmation and names what will be lost.
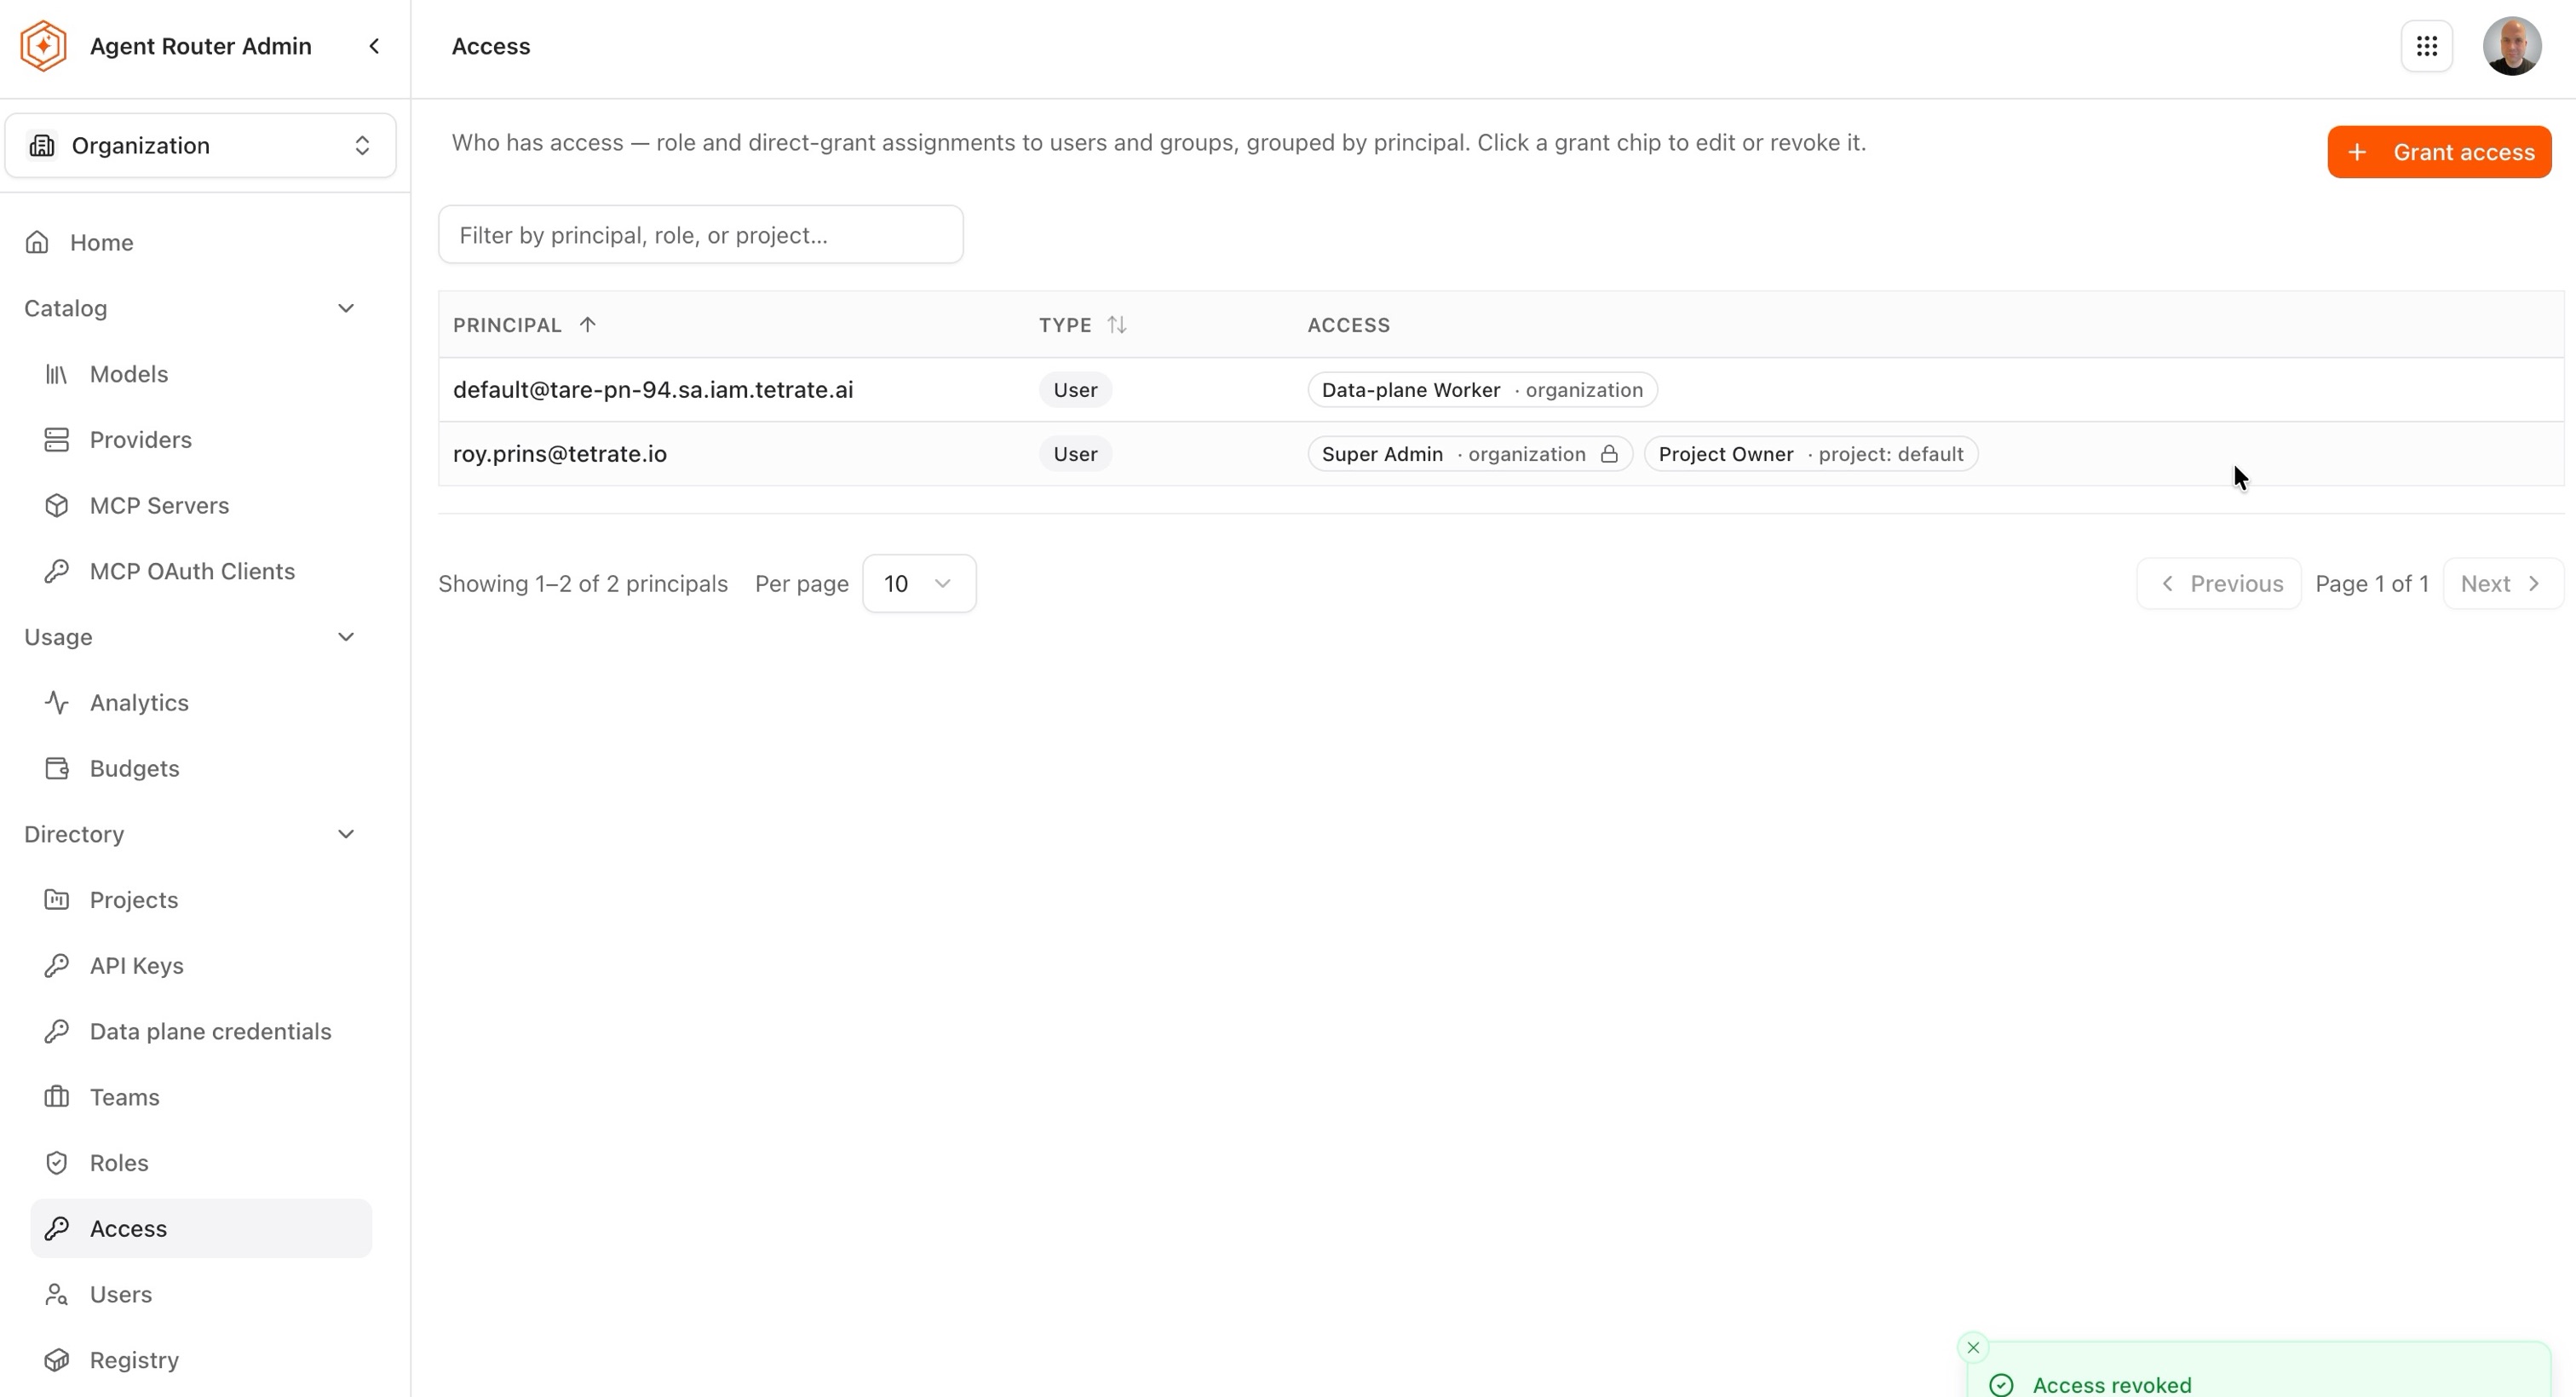
The chip then disappears from that principal's row, which is the confirmation that the access is gone.
Two points to note before revoking:
- Revocation is immediate, unlike granting, which lands on the recipient's next page load. Anyone relying on that access loses it at once, so a revocation made during someone's working day is felt during it.
- Removing one grant does not remove the rest. Where a person holds several grants, or inherits access through a team, revoking a single chip only withdraws what that chip represents. The remaining chips on the row are what still applies, which is why the row, rather than the individual grant, is the thing to read when the question is what someone can still do.
A padlock appears on protected grants. The operator's own Super Admin grant is protected from removal when it is the last Super Admin grant.
Removing Super Admin access
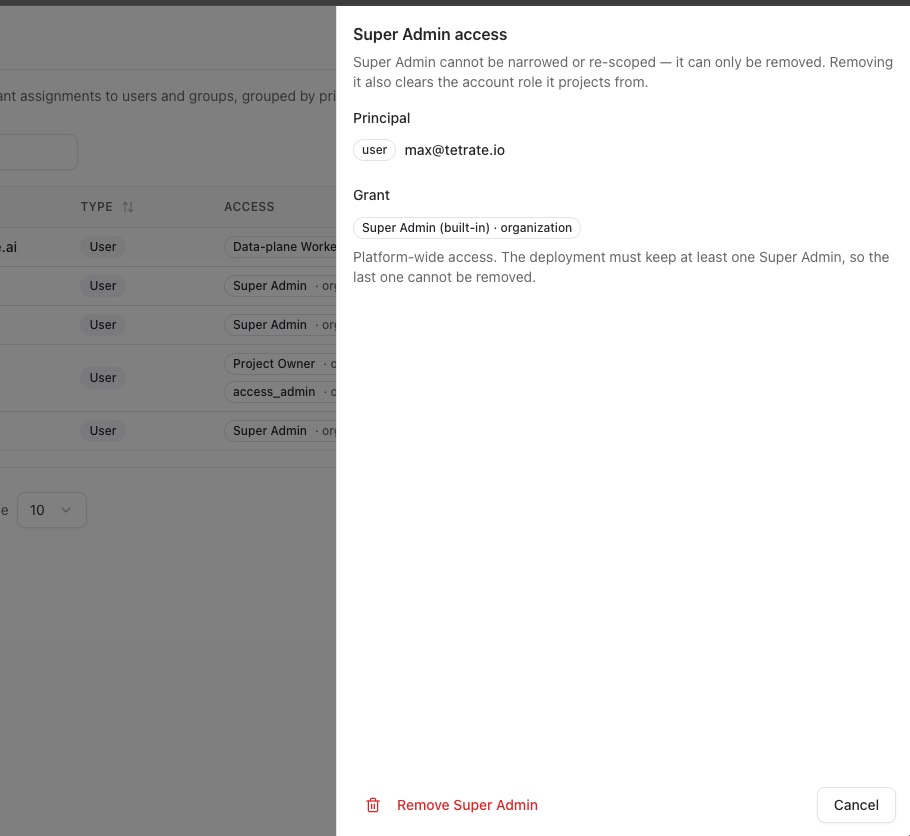
Super Admin is a protected role, and only a Super Admin can remove it. Unlike other access roles, it cannot be narrowed, re-scoped, changed to direct permissions, or moved to another principal. It can only be removed from a user, and removing it also clears the account role that grants platform-wide access.
Agent Router refuses to remove the last Super Admin, so the role cannot be dropped by accident. Handing it over is therefore a two-step operation: grant Super Admin to the incoming user first, then remove it from the outgoing one.
Step 5: verify the effect
Verification is carried out from the recipient's session rather than the administrator's, because a broader administrative role masks the restriction under test. Once the recipient has reloaded the Admin Console, confirm that:
- The sidebar lists only the menus the read permissions allow.
- Action buttons (New, Edit, Delete, and Grant access) appear only where the matching write permission is held.
- Entering the address of a page the role does not cover redirects to the unauthorized page.
If a page that should be closed is still reachable, the likely cause is a second grant. The Access page lists every grant held by that person, including access inherited through team membership.
Operational notes
- Built-in roles can be edited, but copying a built-in role and editing the copy is the safer pattern: the originals stay intact for comparison and reuse.
- A role's slug is its stable identifier and is the value used where a role is named rather than picked from a list. The display name can be changed freely; treat the slug as fixed once anything references it.
- Deleting a role is offered from the role's own panel. Where the role is still granted to someone, confirm on the Access page what would be withdrawn before deleting it, since the grant chips are the only place that relationship is visible.
- Prefer a role over Direct permissions. Direct grants work, but they are discoverable only by inspecting each principal on the Access page, so a permission audit that reviews roles alone will miss them.
- Role and grant changes are recorded. Every change writes an entry that can be reviewed under Audit Logs, as described in Audit Agent Router activity.
- Developers working in the Console rather than the Admin Console are not governed by these dashboard roles. Their access to a gateway follows project membership.
- Where roles are assigned from identity-provider claims, the mapping is evaluated on every login and overwrites the stored role. The precedence rules are documented in Configure SSO role mapping.
Where to go next