Provision models and providers
This guide covers the catalog layer in the Admin Dashboard: connect providers and enable models so there is something to grant to a project. Providers carry credentials and connectivity; models carry which of those providers' offerings appear in the catalog. A default project exists from onboarding (Key concepts → Projects); after enablement here, grant models in Create a project and grant models. Recurring work—credential rotation, retiring models, adding capacity, and private-link endpoints—is also covered below. To automate the same work, see Provision models via API.
Persona: Platform operator working in the Admin Dashboard.
Estimated time: 20--30 minutes for an initial provisioning pass, depending on how many providers and models are involved.
When this guide applies
This guide is the right starting point in any of these situations:
| Situation | Why this guide helps |
|---|---|
| First-time setup of a fresh deployment | The catalog must have enabled models before any project can be granted access to them |
| Adding a new AI provider relationship (a contract with a vendor, or a self-hosted endpoint) | The provider must be configured and verified before any of its models can be enabled |
| Adding new model versions from an existing provider | Agent Router exposes only the models that have been explicitly enabled, not everything the provider supports |
| Rotating provider credentials on a schedule or after a security event | A clean credential rotation is the recurring operational task that this layer requires |
| Retiring a model or provider as part of a sunset or contract change | Disabling at the provider or model level cleanly removes capability from the developer-facing surface |
Outcomes
By the end of this guide:
- At least one provider is configured with healthy credentials and an Active connection status.
- At least one model from that provider is enabled and visible to developers in the Console Model Catalog.
- The mechanics of credential rotation and provider removal are understood, so the recurring operational work can be performed safely.
- Where private-link connectivity is appropriate, the configuration that keeps model traffic on the cloud backbone has been considered.
Prerequisites
- Administrator access to the Admin Dashboard, typically the
super_adminorprovider_adminrole. The exact role model is covered in Configure Single Sign-On. - Valid credentials for at least one upstream AI provider: an API key, an Azure deployment endpoint, or whatever the provider expects.
- For private-link setups, the network-level configuration (the private endpoint, route, or service connection) is already in place in the cloud environment. The Admin Dashboard configures only the endpoint URL that the gateway dials; it does not provision the underlying network.
Orient in the Admin Dashboard
The Admin Dashboard is reached at the deployment's dashboard URL, for example https://dashboard.poc.tetrate.ai/, and is entered with administrator credentials or corporate SSO. The default landing screen is the Home page, which presents organization-wide metrics. The Console serves developers who consume models through the gateway; the Admin Dashboard is where what is available, to whom, and under what conditions is configured. Models and providers enabled here are what developers subsequently access in the Console.
Who uses the Admin Dashboard
Three operator personas typically interact with the Admin Dashboard, each with a distinct emphasis:
| Role | Typical tasks |
|---|---|
| Agent Router administrators | Enable and disable models, manage provider credentials, configure SSO |
| IT operations | Monitor Agent Router health, review audit logs |
| Security leads | Review user access, audit administrative actions, manage API keys |
Sidebar navigation
The Admin Dashboard sidebar is organised into the following sections:
| Section | Purpose |
|---|---|
| Home | The landing page; displays organization-wide metrics and quick links to common administrative tasks |
| Models Management | Browse the model registry, enable or disable models, filter by provider, and view context windows and pricing tiers |
| Providers Management | Manage connections to AI providers, view provider status, configure credentials, and add new connections |
| MCP Servers | Manage the catalogue of Model Context Protocol (MCP) servers available to Console users, configure authentication types, and view the tools each server exposes |
| MCP OAuth Clients | Create and manage OAuth client configurations for MCP servers that require OAuth-based authentication |
| Usage → Analytics | Organization-wide usage metrics across all users and API keys, with breakdowns by user, model, provider, and API key, time-range filtering, and cost analysis |
| Usage → Budgets | Spend ceilings per user or team, with billed vs passthrough spend overview |
| Announcements | Publish organization-wide notifications visible to Console users, with severity levels and scheduled publication dates |
| Users | View and manage all registered users, including roles, last sign-in timestamps, and activity |
| API Keys | Admin-level view of all API keys across Agent Router (key owners, creation dates, and last-used timestamps) with the ability to revoke keys |
| Audit Logs | Tamper-resistant chronological history of all administrative actions, filterable by user, action type, resource, and time range |
| Settings | Configure SAML or OIDC single sign-on with the corporate identity provider, and view or configure deployment instance settings |
Read the Home dashboard
The Home page refreshes its metrics on each load and reflects the current state of Agent Router. Five organization-wide metrics are displayed:
| Metric | Description |
|---|---|
| Total Users | Number of registered users across Agent Router, regardless of current activity status |
| Total API Keys | Number of API keys created, both active and revoked, giving a sense of total credential issuance |
| Total Requests | Cumulative count of requests routed through the gateway; Usage → Analytics provides time-range breakdowns |
| Active Models | Number of models currently enabled for Console users; disabled models do not appear in the Console |
| Provider Status | Summary of connected AI providers and whether each connection is healthy and reachable |
The Home page also provides shortcuts to the most common administrative tasks: jumping to Models Management to enable or disable models, to Users to review registered accounts, to Usage → Analytics for organization-wide consumption data, and to Audit Logs to inspect recent administrative actions.
Step 1: configure the provider
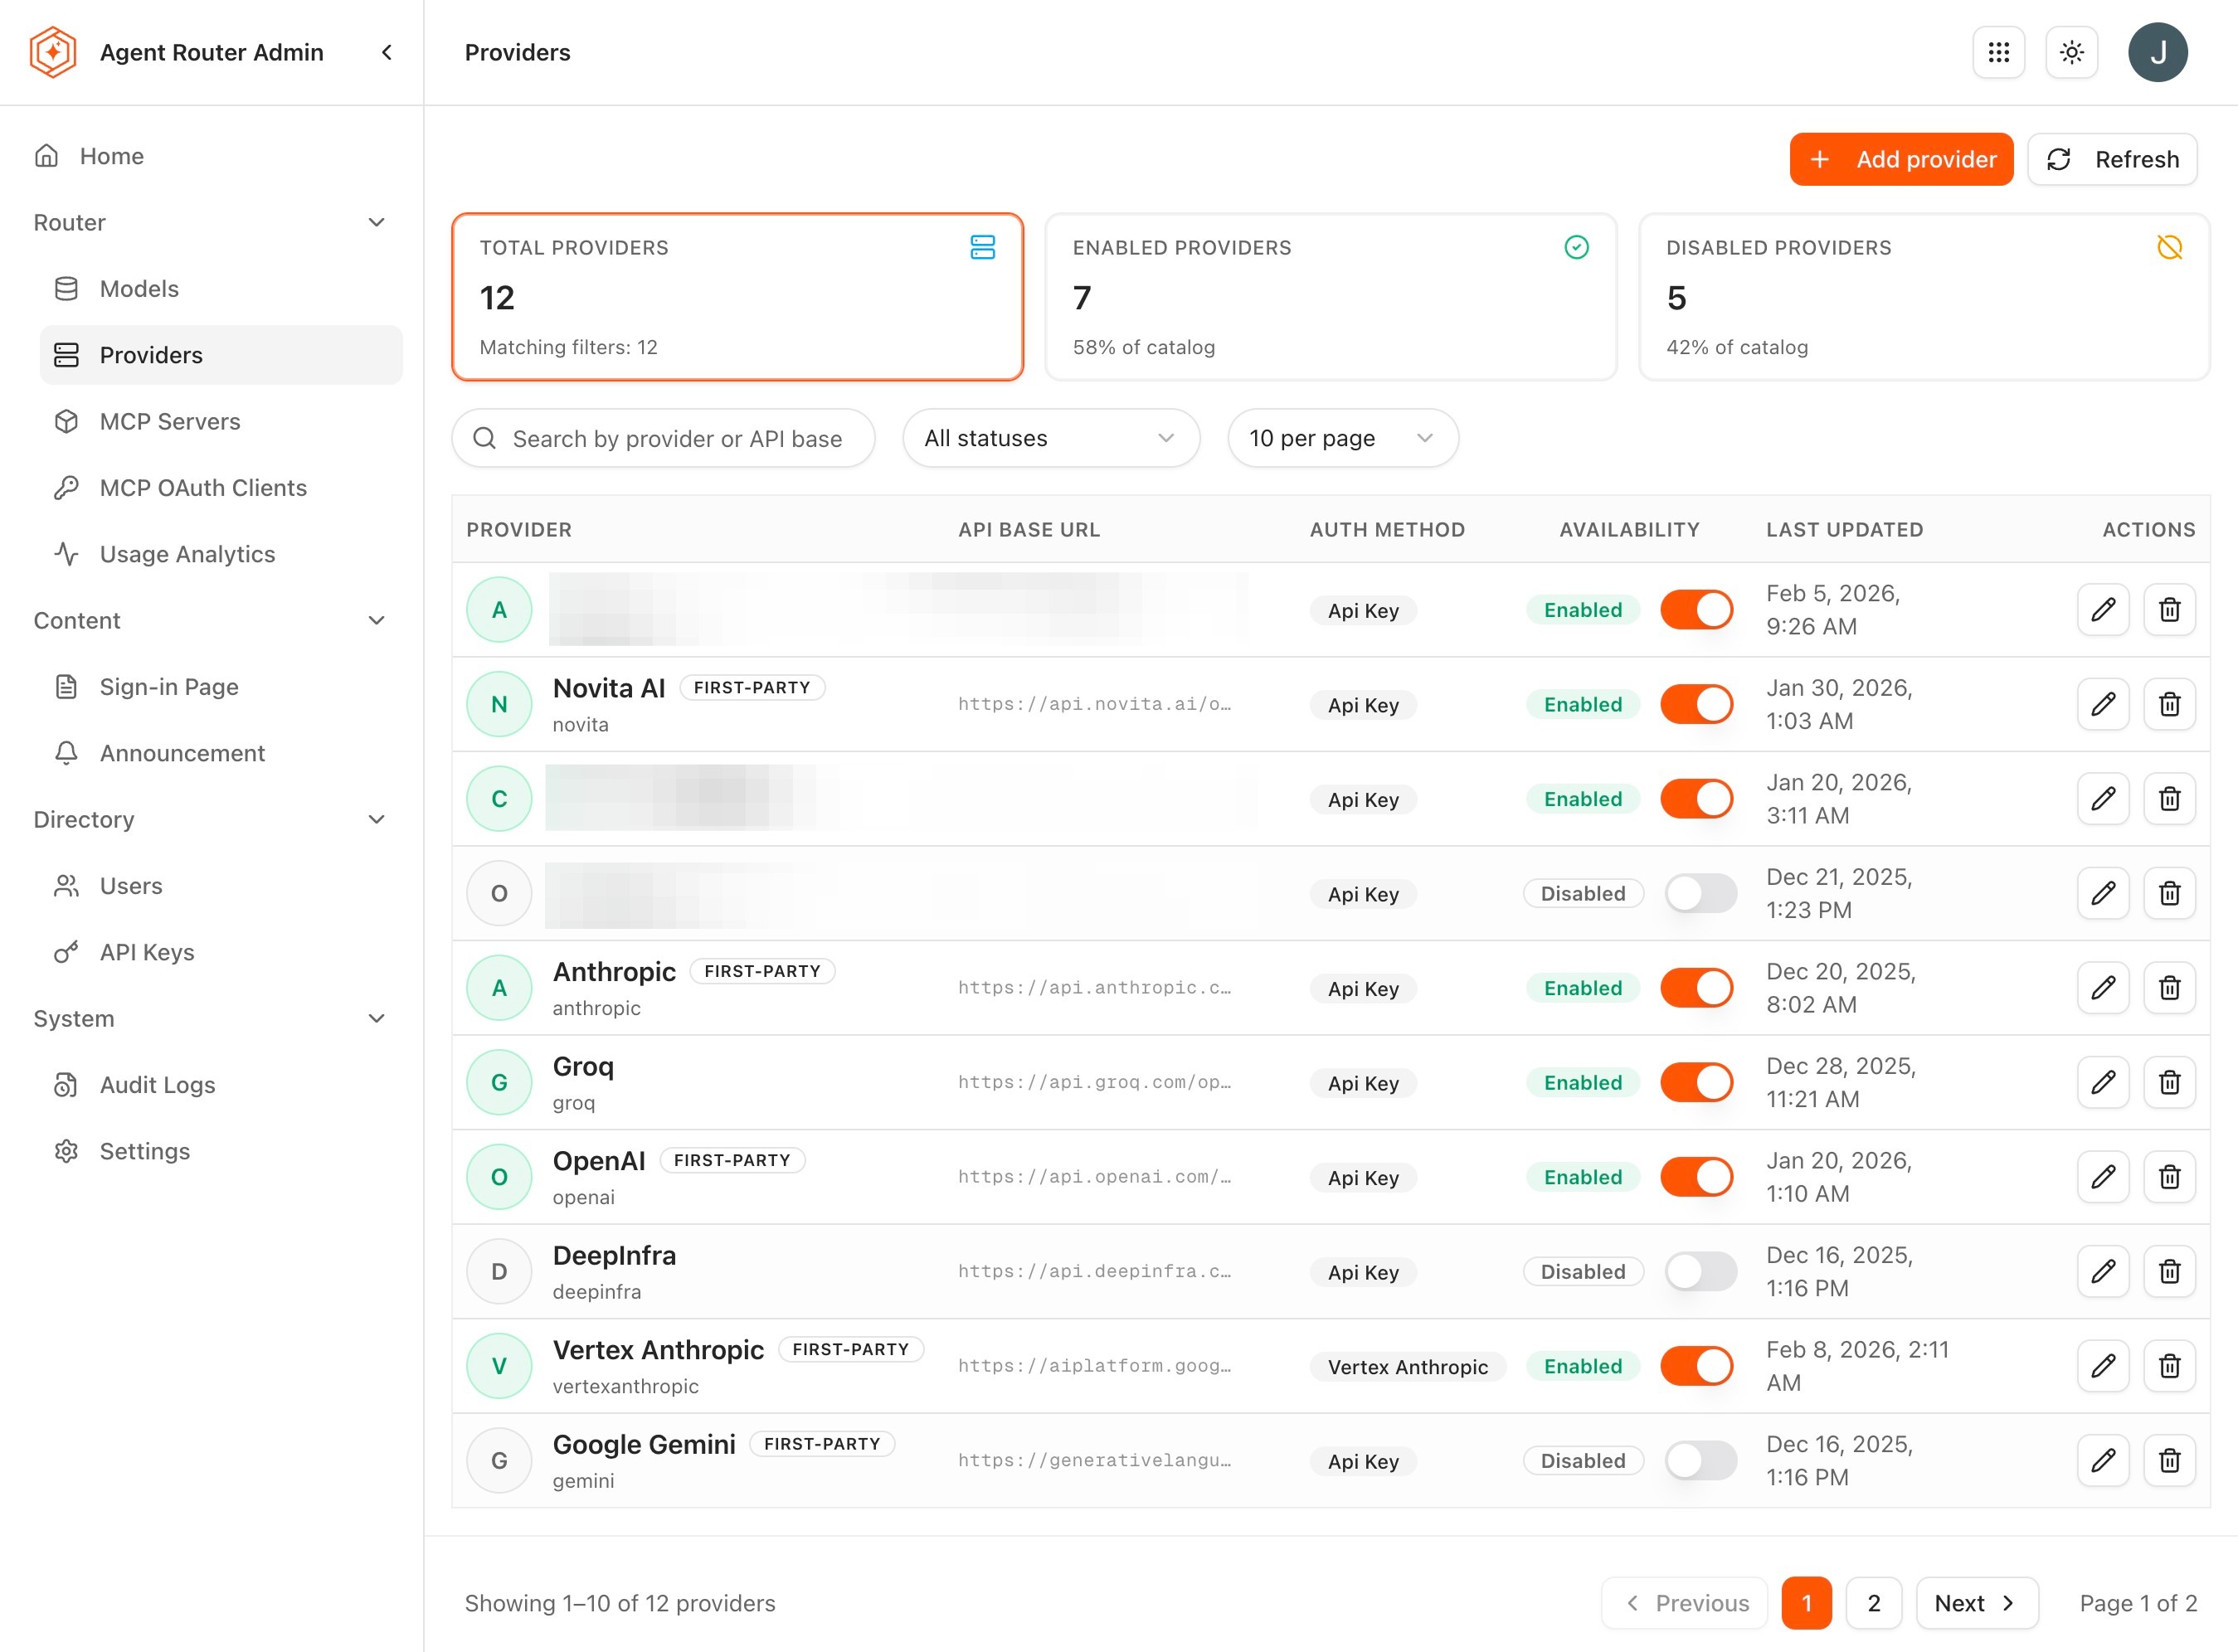
Providers are the upstream services the gateway is allowed to reach. Each provider entry carries the credentials and endpoint information for one external AI service.
- Sign in to the Admin Dashboard.
- Open Providers Management from the sidebar.
- Review the existing provider list. Each entry shows the provider name, current status (Active or Inactive), the number of models the provider exposes, and the timestamp of the last successful health check.
-
Click Add Provider at the top of the list.
-
Select the provider type from the dropdown. The supported set is broad and grows over time:
Provider Models exposed OpenAI GPT-4o, GPT-4o mini, o1, o3, and other OpenAI models Anthropic Claude Opus, Sonnet, and Haiku families Google Gemini 2.0 Flash, Gemini 2.5 Pro, and other Google AI models Azure OpenAI Azure-hosted OpenAI models with enterprise Azure credentials Mistral Mistral Large, Medium, and other Mistral models Cohere Command R, Command R+, and Cohere embeddings Together Open-source models hosted on Together AI infrastructure Perplexity Perplexity search-augmented models -
Enter the required credentials. The exact fields depend on the provider: a single API key for OpenAI and Anthropic; an endpoint URL and a key for Azure OpenAI; deployment-specific values for self-hosted backends.
-
Click Save.
-
Agent Router verifies the connection. A successful verification flips the provider's status to Active; a failure leaves it at Inactive with diagnostic detail in the row.
A common cause of an immediate Inactive status is a credential pasted with leading or trailing whitespace. The provider-side API rejects the key, Agent Router reports the failure, and the cause is invisible unless the credential is re-entered carefully. Re-pasting from a known-good source is the fastest first attempt at recovery.
Field reference: provider list
Each entry in the provider list carries the following columns:
| Column | Description |
|---|---|
| Provider Name | The provider identifier |
| Status | Active (connected and healthy) or Inactive (disconnected or credentials invalid) |
| Models | Number of models available through this provider |
| Last Verified | Timestamp of the most recent successful connection check |
Provider status is checked periodically and on each configuration change. An Inactive status may indicate expired API keys, network issues, or provider-side outages; the Last Verified timestamp shows when the connection was last confirmed healthy.
Private provider connectivity
For deployments where compliance or performance requirements demand that provider traffic stay on the cloud backbone rather than traversing the public internet, the endpoint URL field can be set to a private-link address: Azure Private Link, AWS PrivateLink, or GCP Private Service Connect. The data plane reaches the provider over the private connection without ever crossing the public internet.
Agent Router configures only the URL it dials. The underlying private endpoint (DNS, routing, and network policy) is configured at the cloud level beforehand, and the value entered here references the result of that work. For the architectural detail on this setup, see Architecture Overview.
Step 2: enable models for the provider
Once a provider's connection is healthy, the models it exposes appear in Models Management. They are not, however, immediately visible to developers; enablement is an explicit decision.
- Open Models Management from the sidebar.
- Review the model list. Each row shows the model identifier, the provider, the context window size, the pricing tier, and the current enabled/disabled status.
- Use the search box to find a model by name, or the provider filter to narrow the list. Both work in real time.
- Click any model row to open its detail view and review the full model information (provider, context window size, pricing tier, and current enabled/disabled status), then close the detail view to return to the list.
- Locate a model that should be exposed and toggle its Status switch to enabled.
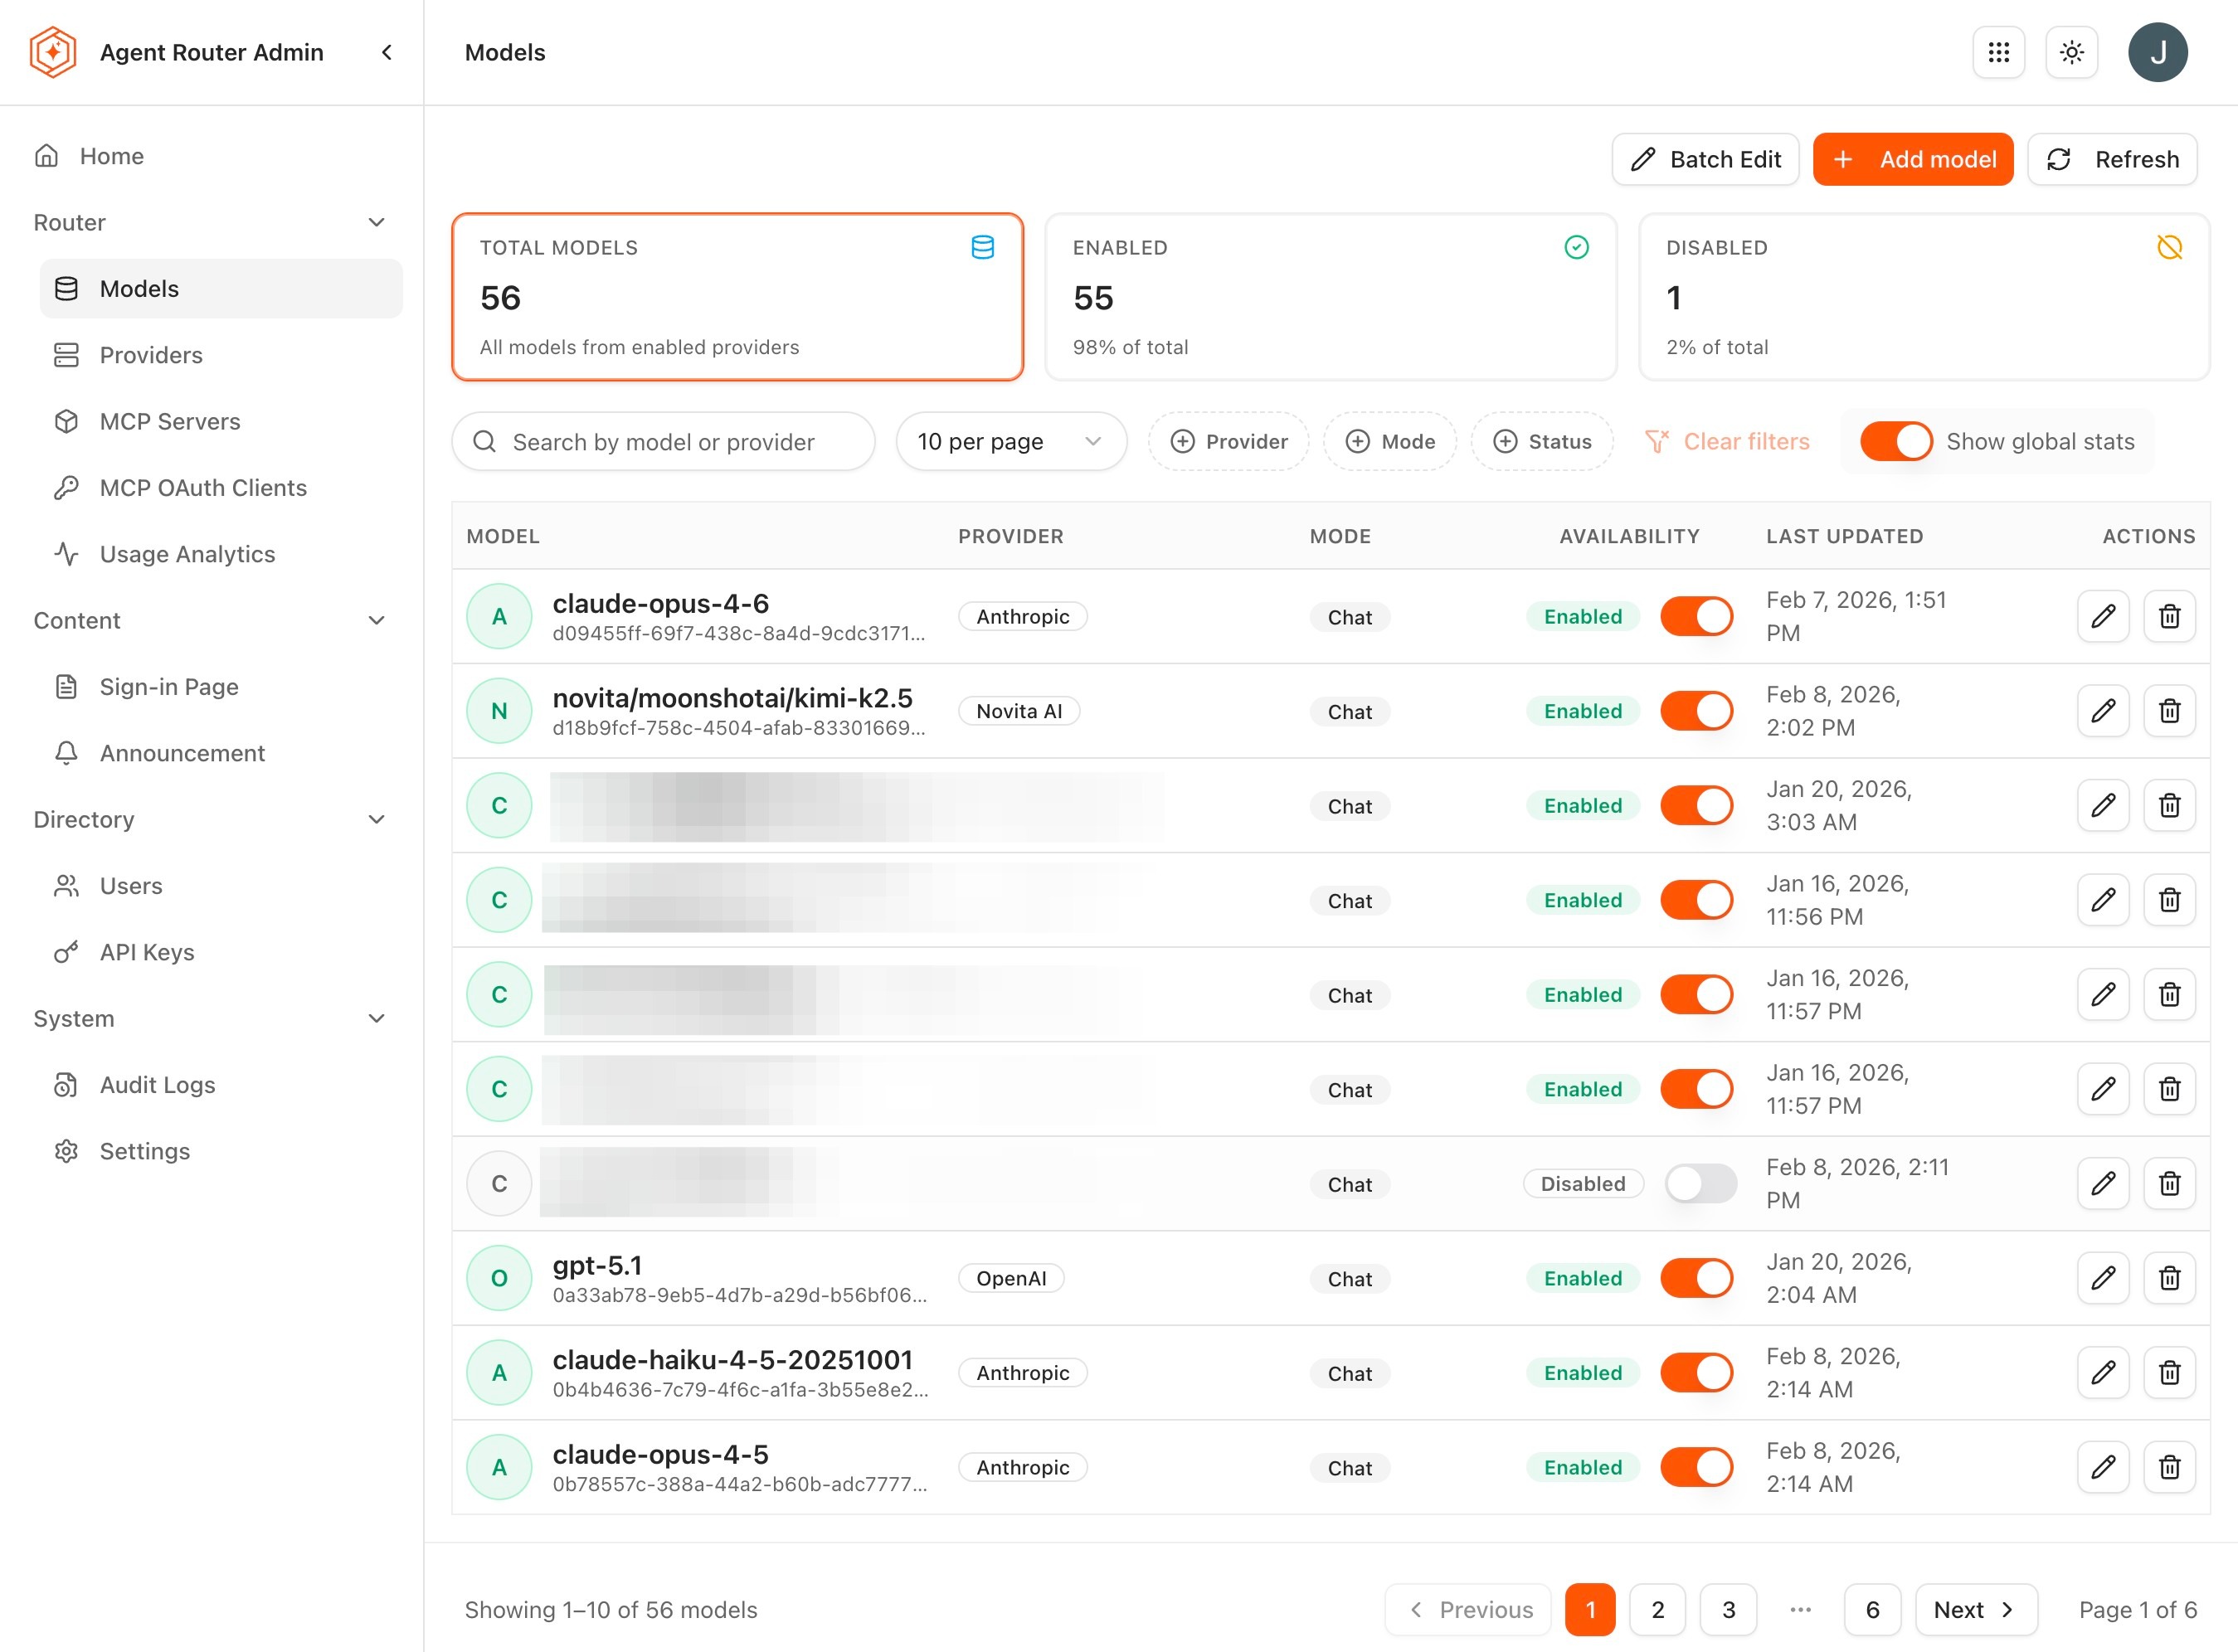
A newly-enabled model appears in the Console Model Catalog immediately. Developers whose routing configurations target it can start sending requests right away.
Field reference: model list
Each row in the model list carries the following columns:
| Column | Description |
|---|---|
| Model Name | The model identifier (e.g., gpt-4o, claude-sonnet-4-20250514, gemini-2.0-flash) |
| Provider | The AI provider that serves the model |
| Context Window | Maximum token context length supported by the model |
| Pricing Tier | Cost classification for the model |
| Status | Whether the model is enabled or disabled for Console users |
For larger provisioning passes (enabling everything from a new provider, retiring everything from a deprecated one), the bulk-action surface is significantly faster than per-row toggling:
- Select multiple models using the checkboxes on the left of each row.
- Open the Bulk Actions dropdown at the top of the list.
- Choose Enable Selected or Disable Selected.
- Confirm the operation when prompted. The selected models all update at once.
Curating the enabled set is the most important governance lever in this guide. A system that enables every model from every provider exposes developers to a confusing menu, complicates Reference and Usage Analytics, and makes it harder to enforce model-specific policy later. A system that enables only the models the organisation has actually decided to support is calmer, easier to audit, and easier to operate. Default to the smaller list.
Disabling a model does not delete it from the registry. The model can be re-enabled at any time, and re-enablement is immediate. Requests that target a disabled model receive a clear error indicating the model is unavailable, which makes the disabled state easy to observe both from the Admin Dashboard and from developer-side traffic.
Step 3: verify end-to-end through a developer-side request
The provisioning is most useful when its result is visible from where developers actually work. A short end-to-end check confirms that the model is reachable from the gateway and that the credentials flow correctly.
- Open the Console (a separate sign-in to the developer surface).
- Create or reuse an API key with a routing configuration that targets the newly-enabled model. The mechanics are covered in Route Requests Across Providers.
- Send a test request through the gateway.
- Confirm a successful response.
- Return to the Admin Dashboard.
- Open Usage → Analytics. Within a short delay, the test request appears in the organization-wide usage view, attributed to the model and provider just provisioned.
If the request fails with an authentication error on the upstream side, the provider's credentials are the most likely cause; if the request fails because the model is unavailable, the enablement step has been missed or has not yet propagated. Both failure modes are distinguishable in the Console's Request Logs.
Step 4: operate the provisioned layer
Provisioning is not a one-shot activity. Provider credentials rotate, models are released and retired, and the supported provider set itself changes over time. The Admin Dashboard supports the recurring operations from the same screens used for the initial setup.
Rotate provider credentials
Provider credentials need to be rotated for the usual reasons: scheduled rotation, suspected compromise, contract migration to a new account.
- Open Providers Management.
- Click the provider row to open its configuration.
- Update the credential fields with the new value.
- Click Save.
- Confirm that the status remains Active after re-verification.
The rotation takes effect on the next request. In-flight requests that were authorised with the old credential complete with it; subsequent requests use the new one. There is no service restart and no downtime window.
Remove a provider configuration
Retiring a provider (because a contract has ended, because the relationship is being consolidated onto another account, or because the provider itself has been deprecated) is a single action.
- Open the provider's configuration row.
- Click Delete or Remove Provider.
- Confirm.
Every model previously served by that provider becomes unavailable immediately. Any routing configuration that targeted those models will fall through to its configured fallback, if one exists, or fail with an unavailable-model error otherwise. Before removing a provider that is actively serving traffic, scan the Console-side routing configurations and reroute or retire any that depend on it.
Add new model versions
When a provider releases a new model version, the model appears in Models Management automatically once the provider's catalogue is refreshed. The decision to enable the new version is a separate, explicit step; Agent Router never enables new models on the operator's behalf.
A typical introduction:
- Locate the new model in the list.
- Review its context window and pricing tier.
- Toggle its status to enabled.
- Coordinate with the developer side, through internal communication or through the Communicate with Agent Router Users flow, so that developers know the model is available.
- Optionally pair the introduction with a canary rollout on the developer side, using the patterns from Apply Advanced Routing Rules in the developer guides.
What to do next
With the catalog in place, grant models to a project, then onboard keys and apply spend controls as needed. The provisioned models and providers remain in place for subsequent guides.
Where to go next
Create a project and grant models
Grant catalog models to a project so its gateway can route to them.
Provision models via API
Automate provider, credential, model, and project assignment through the Catalog API.
Onboard developers and issue keys
Make the provisioned models reachable to developer accounts.
Provision AWS Bedrock models
Configure AWS Bedrock as an AI model provider with region-specific endpoints.