Aggregate MCP servers into a profile
Introduction
The Model Context Protocol ecosystem has expanded rapidly. A productive AI client today typically wants access to a file-system server, a code-search server, a ticketing-system server, a documentation server, sometimes a browser server, sometimes a shell server, and a handful of organisation-specific servers wrapping internal APIs. Wiring each of those servers into each AI client individually (one block of MCP configuration in Claude Code, the same block again in Cursor, and again in VS Code) produces unmanageable per-client configuration and offers no central control over what is actually reachable. It also forecloses the question of governance: each direct connection bypasses the platform entirely, so identity, audit, and access control do not apply. An MCP profile is the platform's answer to that fan-out. A profile is a named collection of MCP servers exposed through a single Agent Router URL. The AI client is configured once, against the profile URL; the profile decides which servers and which tools it exposes; and every request flowing through the profile is subject to the platform's identity, observability, and policy model. Adding a new MCP server to an organisation becomes a profile edit rather than a coordinated change across every developer's local setup. This guide covers how a profile is created, how security is layered on top of it, and how the major MCP clients are wired in.
Persona: Developer working in the Agent Router Console.
Estimated time: 15--20 minutes, including client-side configuration.
When this guide applies
A profile is the right level to engage with when any of the following is true:
| Situation | Why a profile helps |
|---|---|
| Multiple AI clients need access to the same set of MCP servers | The clients all connect to one URL; server membership is edited centrally |
| The set of available MCP servers changes frequently | Adding or removing a server is a profile edit, with no per-client configuration drift |
| Access to MCP traffic needs to be governed | The profile applies the platform's identity, audit, and access-control model to every request |
| Different developers need different subsets of the available servers | Multiple profiles can be defined, each exposing the subset appropriate to its consumer |
For a single, ad-hoc server connection from a single client, profiles are still useful, but the operational benefit is smaller. The case grows quickly with the number of servers and clients in play.
Outcomes
By the end of this guide:
- An MCP profile exists in the Console, exposing one or more MCP servers from the platform catalogue.
- The profile has an appropriate security type configured (API Key for programmatic use, Built-in OAuth for interactive clients, or another option as appropriate).
- At least one MCP client (Claude Code, Cursor, or VS Code) is connected to the profile URL.
- A tool invocation through the profile has completed successfully and is visible in Request Logs.
Prerequisites
- A working API key with a routing configuration attached, as set up in Route Requests Across Providers.
- One or more MCP servers already registered in the platform catalogue by a platform operator. The operator-side step (adding servers to the catalogue and, where necessary, configuring OAuth clients for server-side authentication) is covered by the Govern MCP Server Access guide in Guides for Platform Operators. If the catalogue is empty, that work has to happen first; the Console exposes only what the catalogue holds.
- An MCP-compatible client installed locally: Claude Code, Cursor, or VS Code with an MCP extension.
Step 1: create the profile
A profile is the unit of configuration on the developer side. Each profile has a name, a security type, a collection of server-tool selections, and a single URL that clients connect to.
- Sign in to the Agent Router Console.
- Open Settings → MCP Profiles from the sidebar.
- Click Create Profile.
- Enter a descriptive profile name. The name appears in Request Logs and is surfaced in the connection UI of MCP clients, so a phrase tied to the profile's purpose (
dev-tools,research-assistant, orsupport-team-kit) is more useful than a generic value. - Proceed to security type selection.
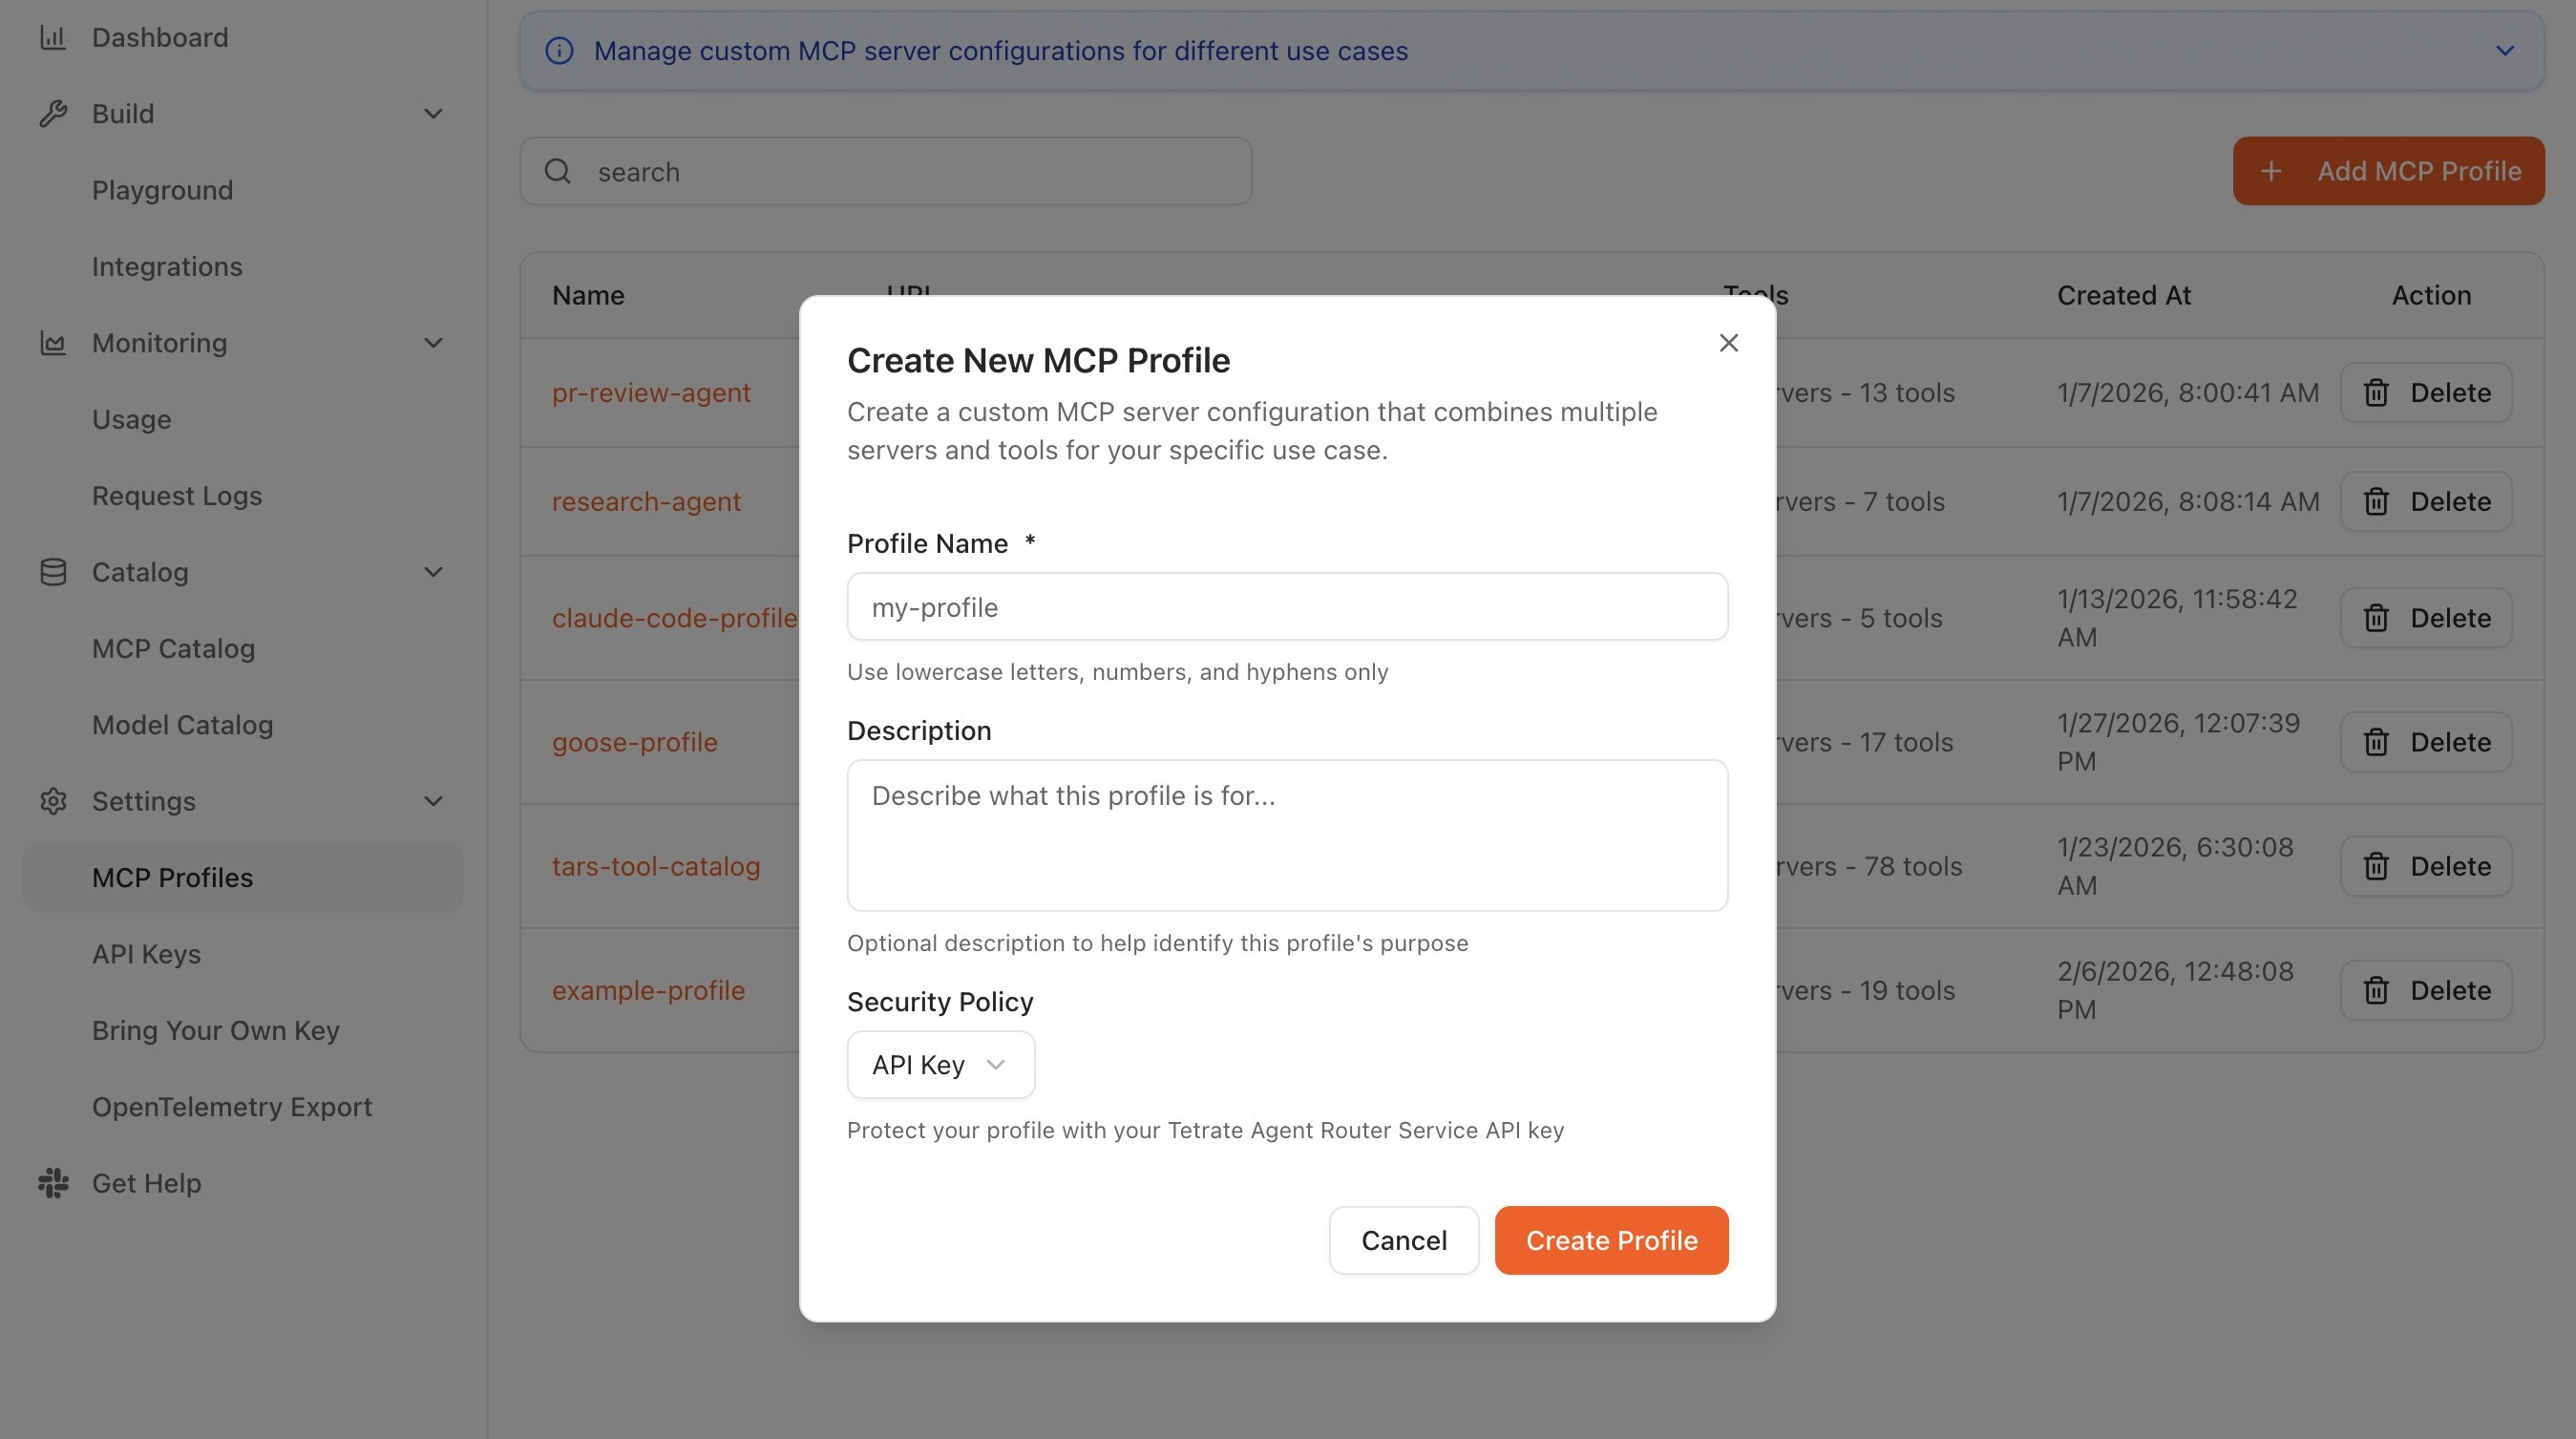
The profile name and URL are visible only to the Console account that owns the profile; profiles are not shared across users automatically. Sharing a profile with another developer is a matter of sharing the profile URL plus the appropriate credentials.
Step 2: choose the security type
The security type controls how MCP clients authenticate to the profile URL. The right choice depends on whether the consumer is a person sitting at an interactive client, a piece of automation, or a third-party tool with its own SSO integration.
| Security type | Authentication model | When to use it |
|---|---|---|
| API Key | The client presents an Agent Router API key as a bearer token | Programmatic access, CI pipelines, environments where an interactive OAuth flow would be intrusive |
| Built-in OAuth | The client runs Agent Router's own OAuth flow on first use | Interactive clients (Claude Code, Cursor, VS Code) where a browser prompt at first use is acceptable |
| Custom OAuth | The client authenticates through the organisation's own OAuth or OIDC provider | Environments with established SSO that should govern MCP access too |
| None | No authentication is enforced on the profile URL | Local development on trusted networks only; not appropriate for any shared or production use |
The choice can be revisited later, since security type is editable on the profile, but changing it does invalidate the previous connection method, so existing clients have to be reconfigured against the new model.
The profile-level security type is independent of any server-level authentication the underlying MCP servers may require. A profile secured with Built-in OAuth still forwards requests to its servers with whatever credentials those servers expect on their own backends. Both layers operate, and both have to be correct for a tool call to reach the upstream MCP server.
Server authentication
The server-level authentication each MCP server expects on its own backend is configured when the server is added to the profile. This layer is separate from the profile-level security type above. The MCP client only authenticates to the profile URL; the platform forwards each request to its server with the appropriate credentials.
| Server auth | Description |
|---|---|
| Open Access | The MCP server requires no authentication |
| Bearer Token | A static token passed to the MCP server, configured when the server is added to the profile |
| OAuth | An OAuth flow between the platform and the MCP server backend |
Step 3: add servers and choose tools
Once the security type is set, the profile is populated with servers and the tools those servers expose.
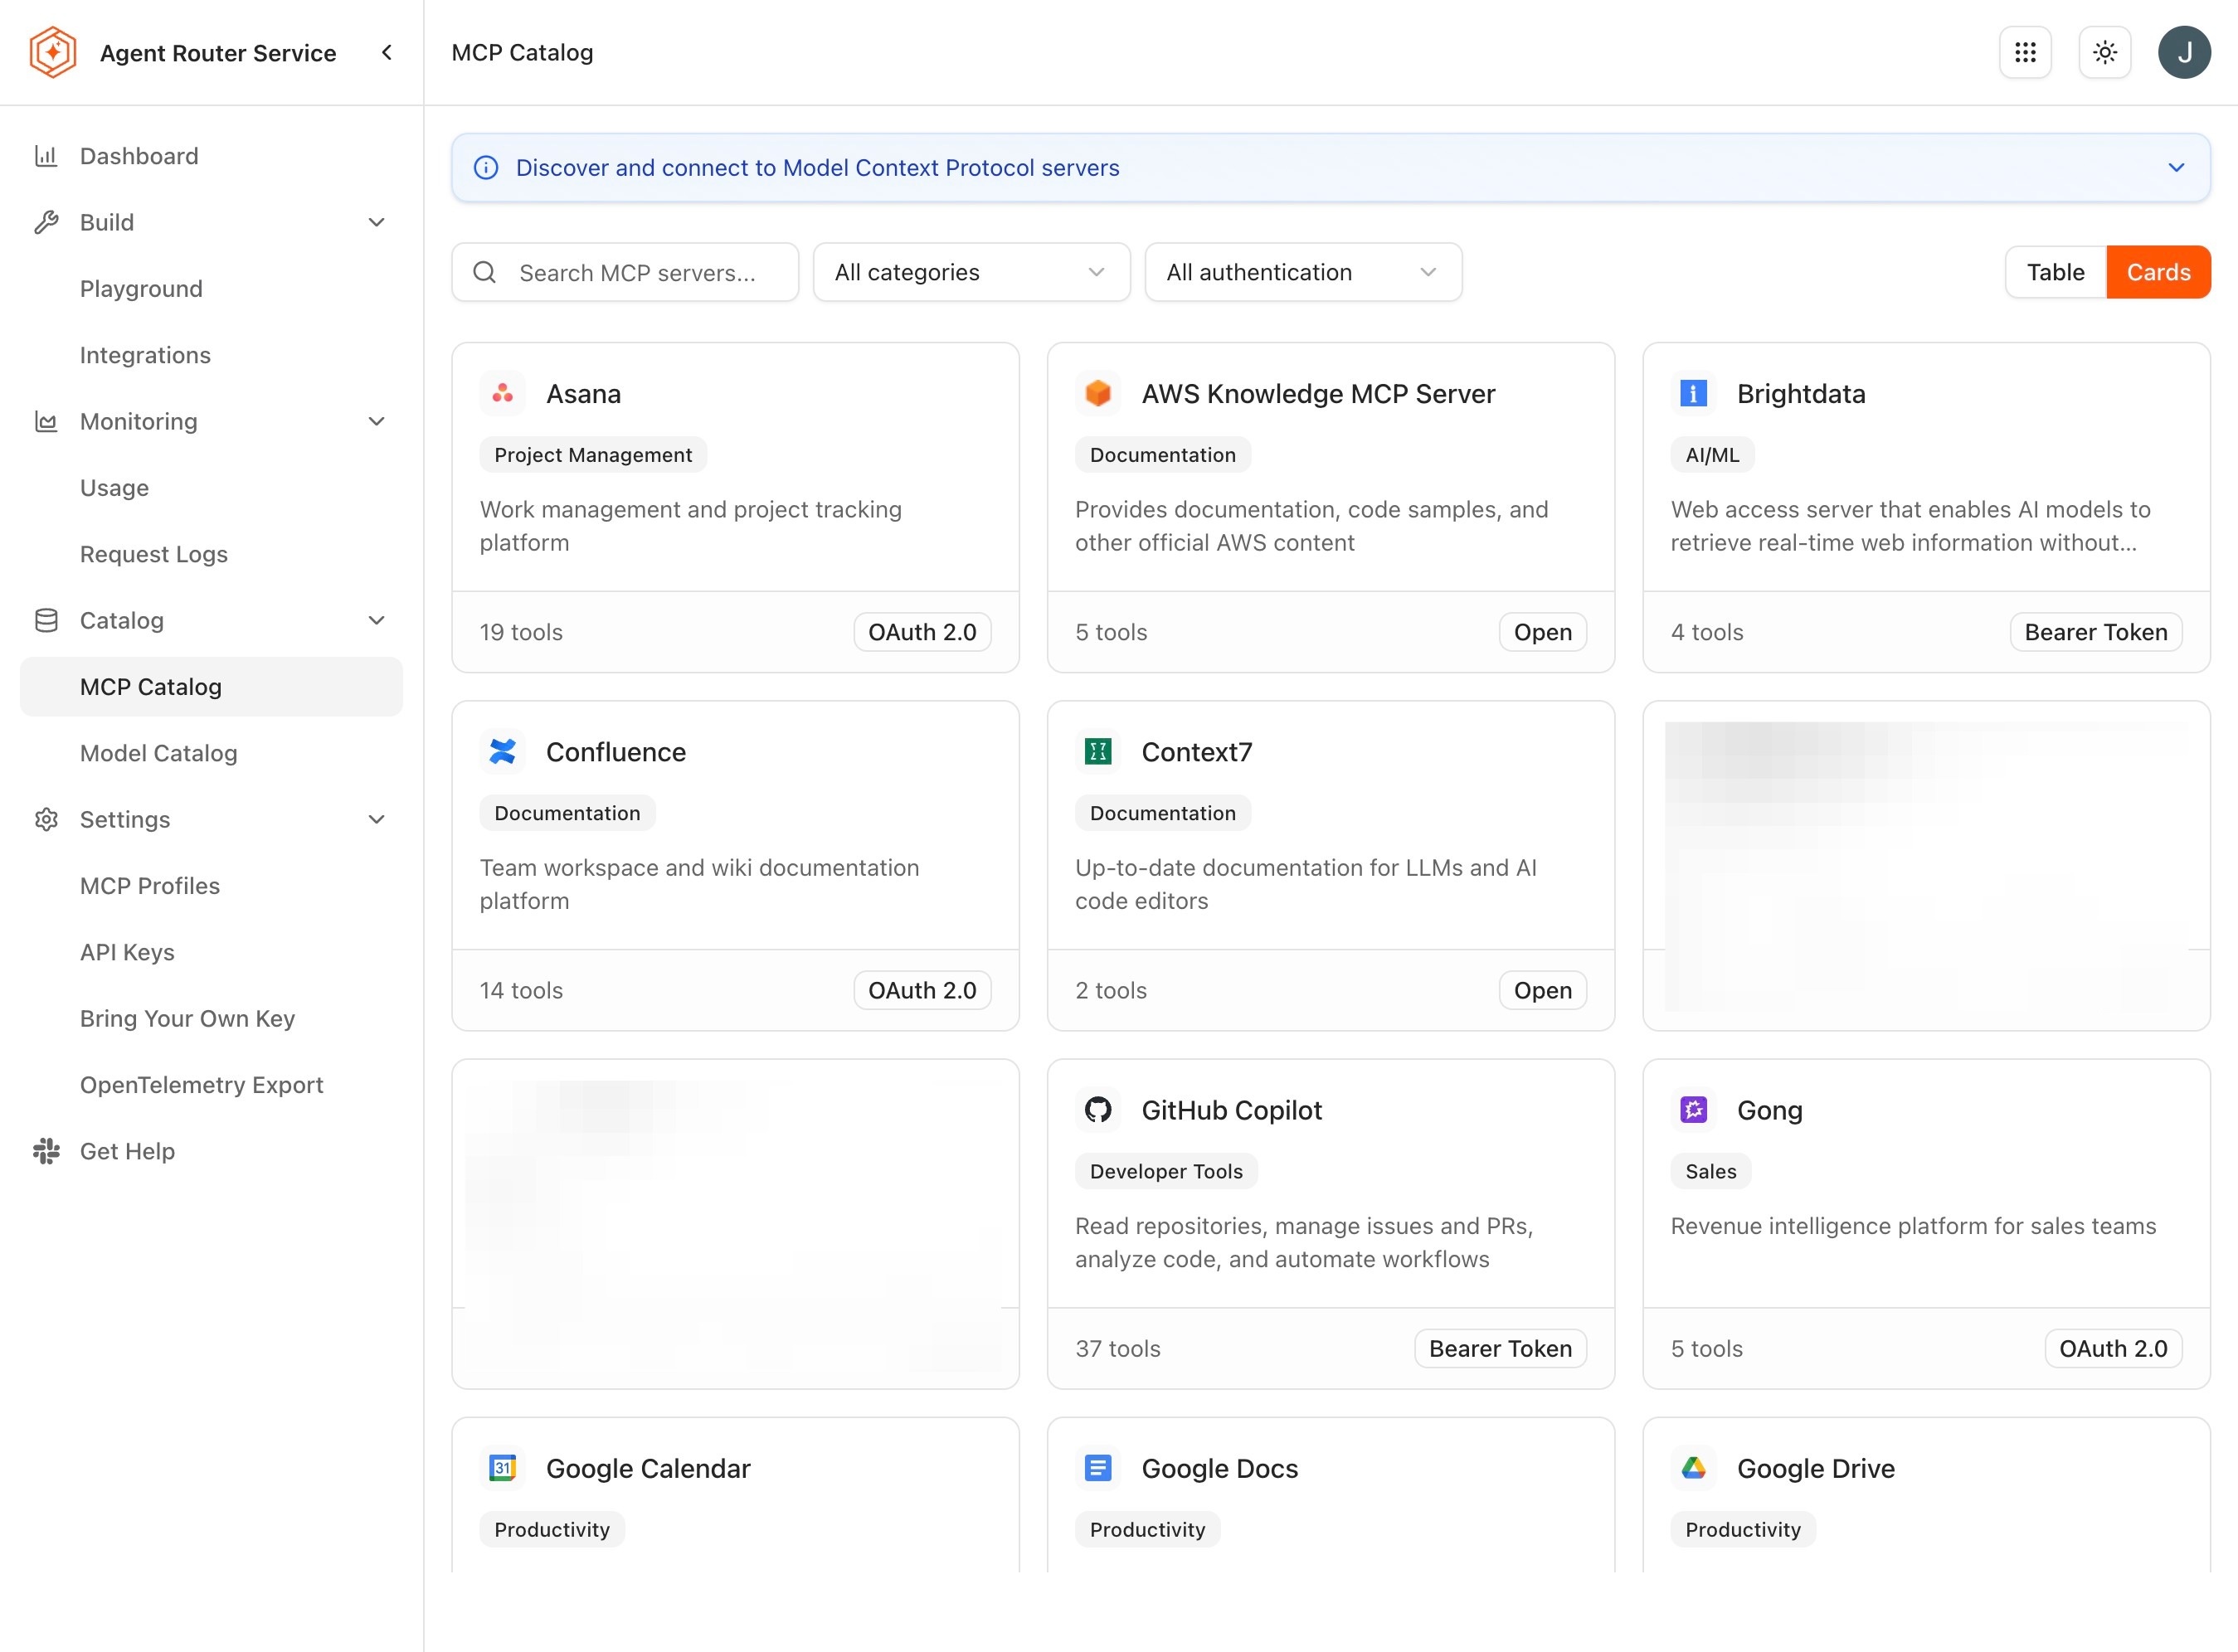
Browse the MCP Catalog
The MCP Catalog, reached from Catalog → MCP Catalog, lists every server a platform operator has registered. The catalogue is presented as a grid of server cards; a search bar filters the grid by name. Each card shows the server name, a short description, and the auth type the server requires: Open Access, Bearer Token, or OAuth. Clicking a card opens a detail view listing the tools the server exposes and its authentication requirements. The catalogue is browse-only; servers are added to a profile from the profile editor, not from the catalogue page.
The set of catalogued servers is managed by the platform operator and may grow over time. Examples of servers commonly available in the catalogue:
| Server | Description |
|---|---|
| Google Drive | Access and search files in Google Drive |
| Slack | Send messages and interact with Slack workspaces |
| GitHub | Access repositories, issues, and pull requests |
| Stripe | Query payment data and manage Stripe resources |
| HuggingFace | Browse and interact with HuggingFace models and datasets |
| Salesforce | Access Salesforce CRM data and records |
| AWS Knowledge | Query AWS Knowledge Bases |
| Context7 | Access up-to-date library documentation and code examples |
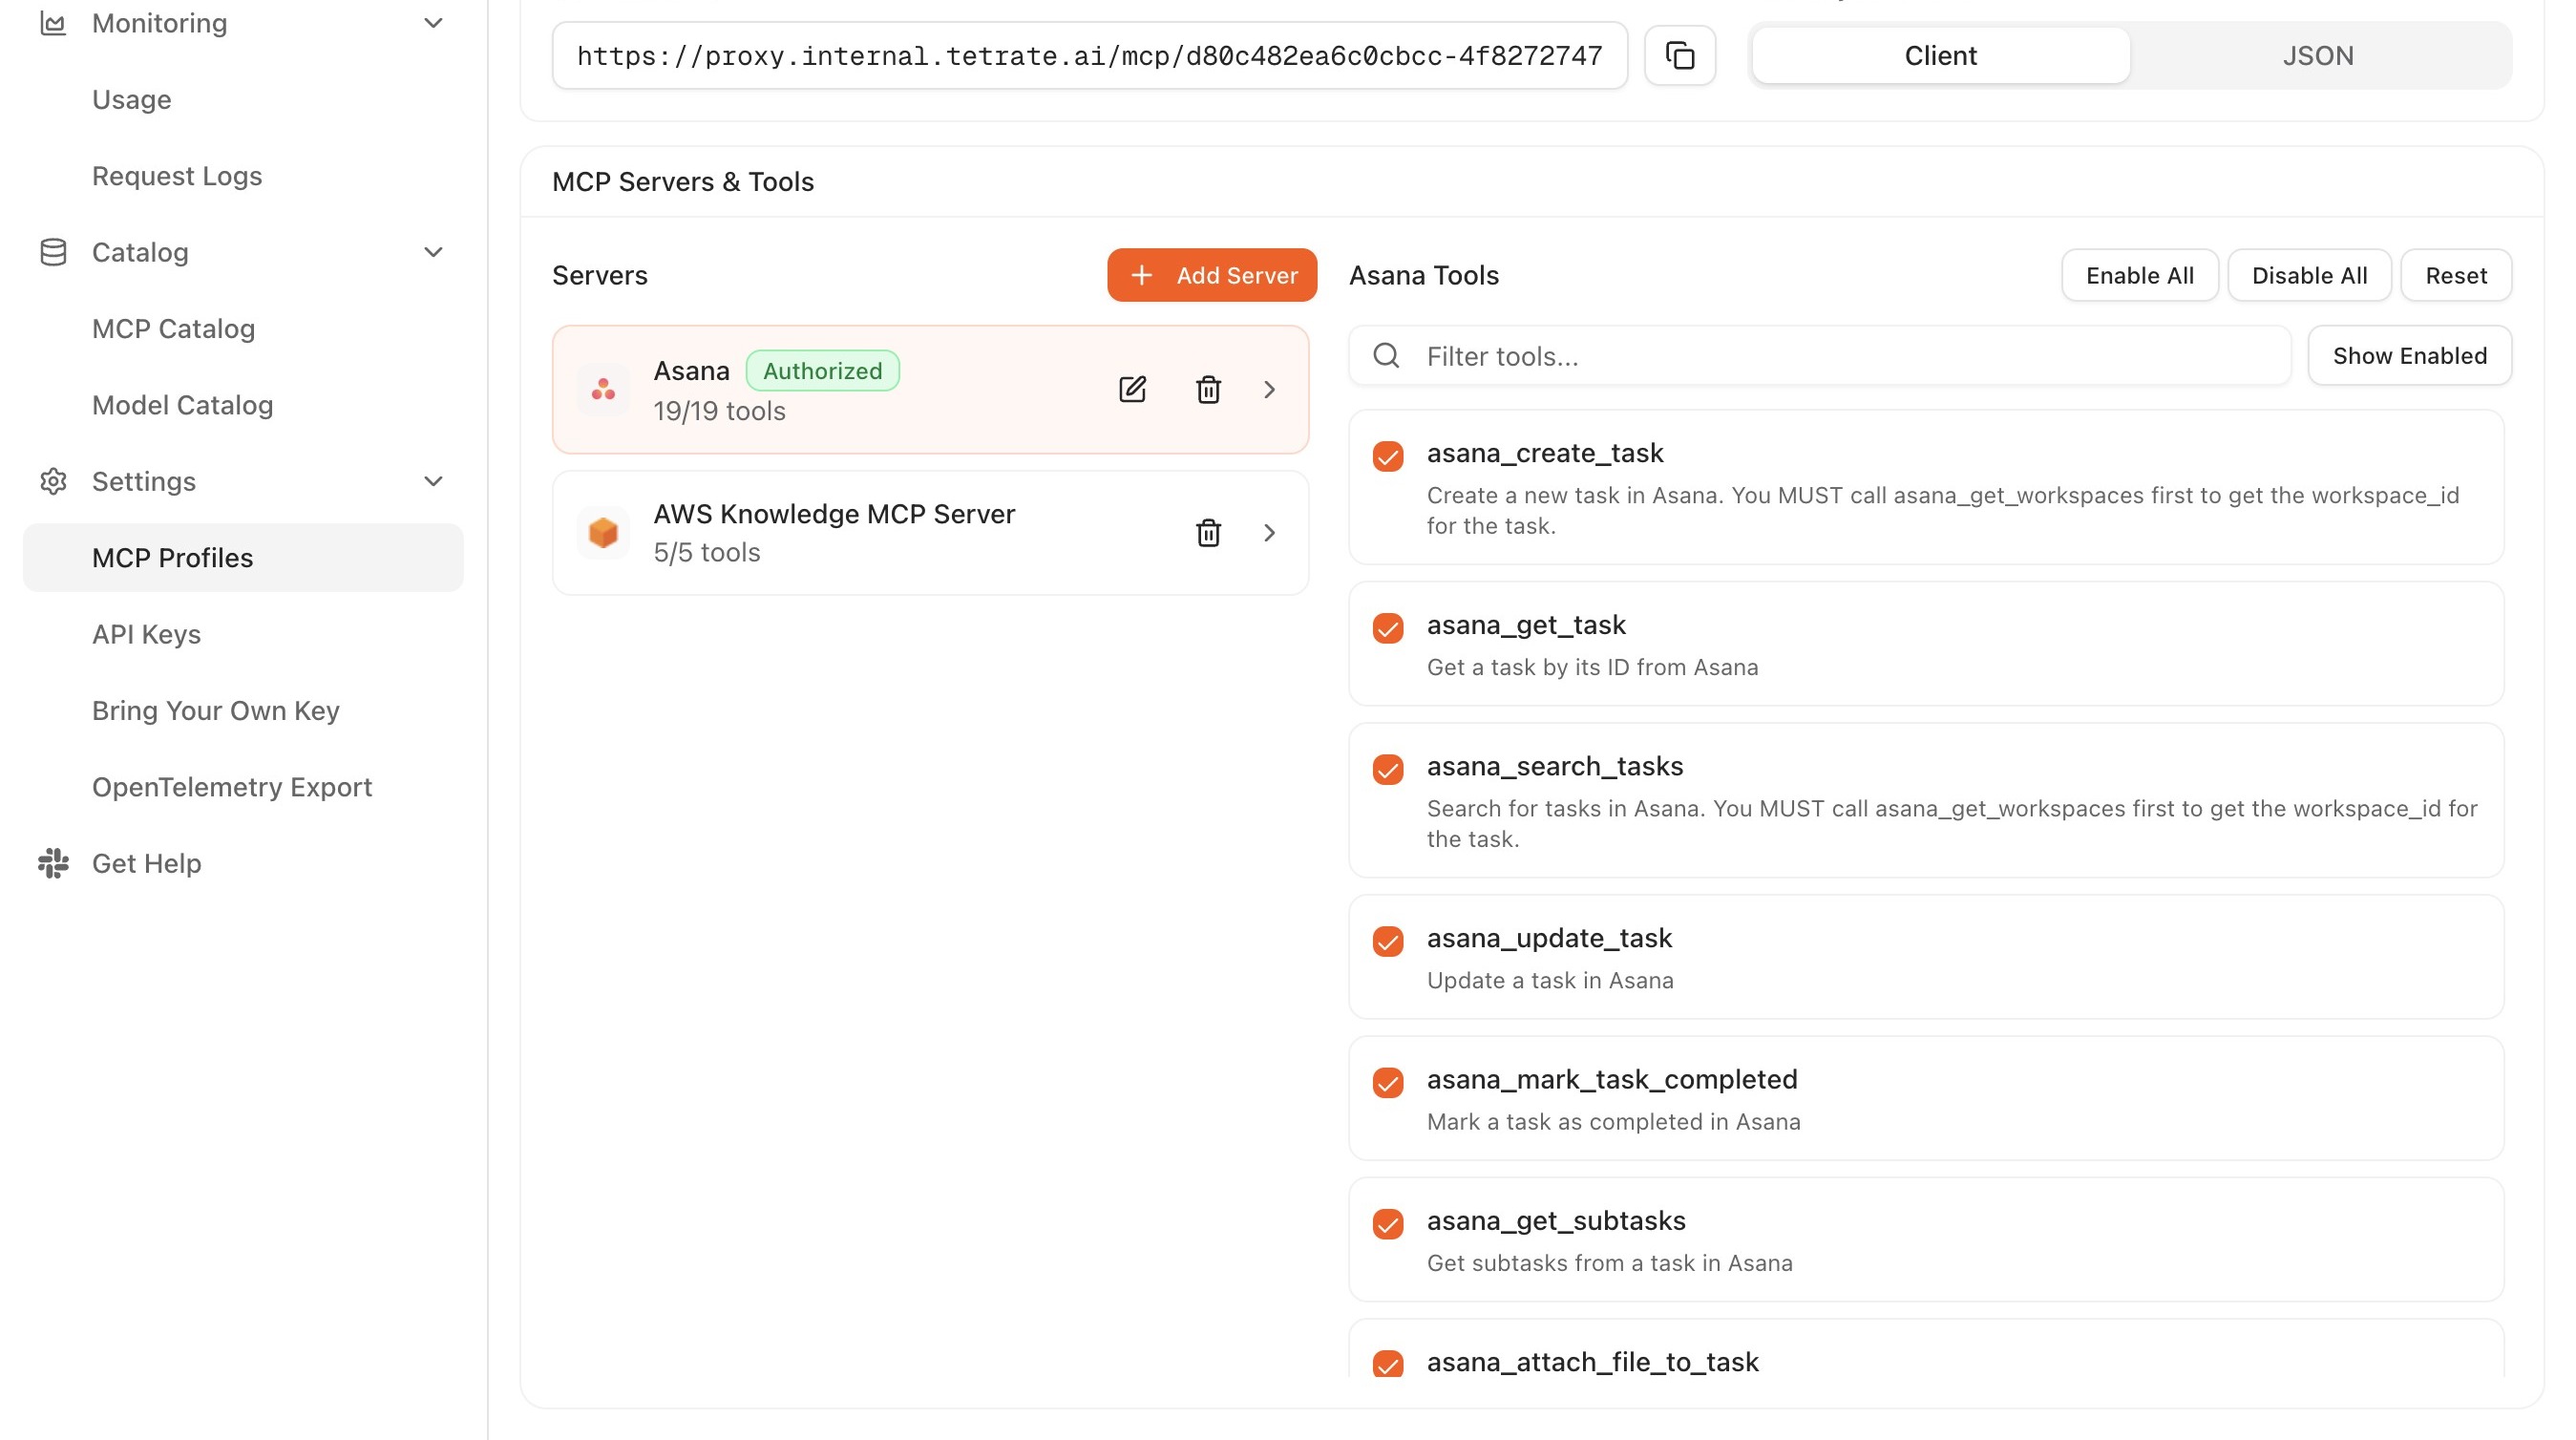
- In the profile editor, click Add Server.
- The catalogue lists every MCP server the platform operator has registered, along with the tools each one exposes.
- Select a server.
- Review the tools it advertises and choose which ones to include in this profile. Selecting all is appropriate when the profile is meant to be a general-purpose toolkit; selecting a subset is appropriate when the profile is meant to be a focused, role-specific kit.
- Repeat Add Server for each additional server the profile should expose.
- Review the summary panel showing every selected server and tool.
- Click Save or Create to finalise the profile.
A single profile supports a maximum of 32 tools across all of its servers. The limit reflects the practical attention budget of most AI clients; tool lists longer than this tend to produce worse model behaviour because the choice space becomes unmanageable. If more than 32 tools are needed in total, the right answer is usually two or more profiles, each focused on a distinct task or persona, rather than a single overloaded profile.
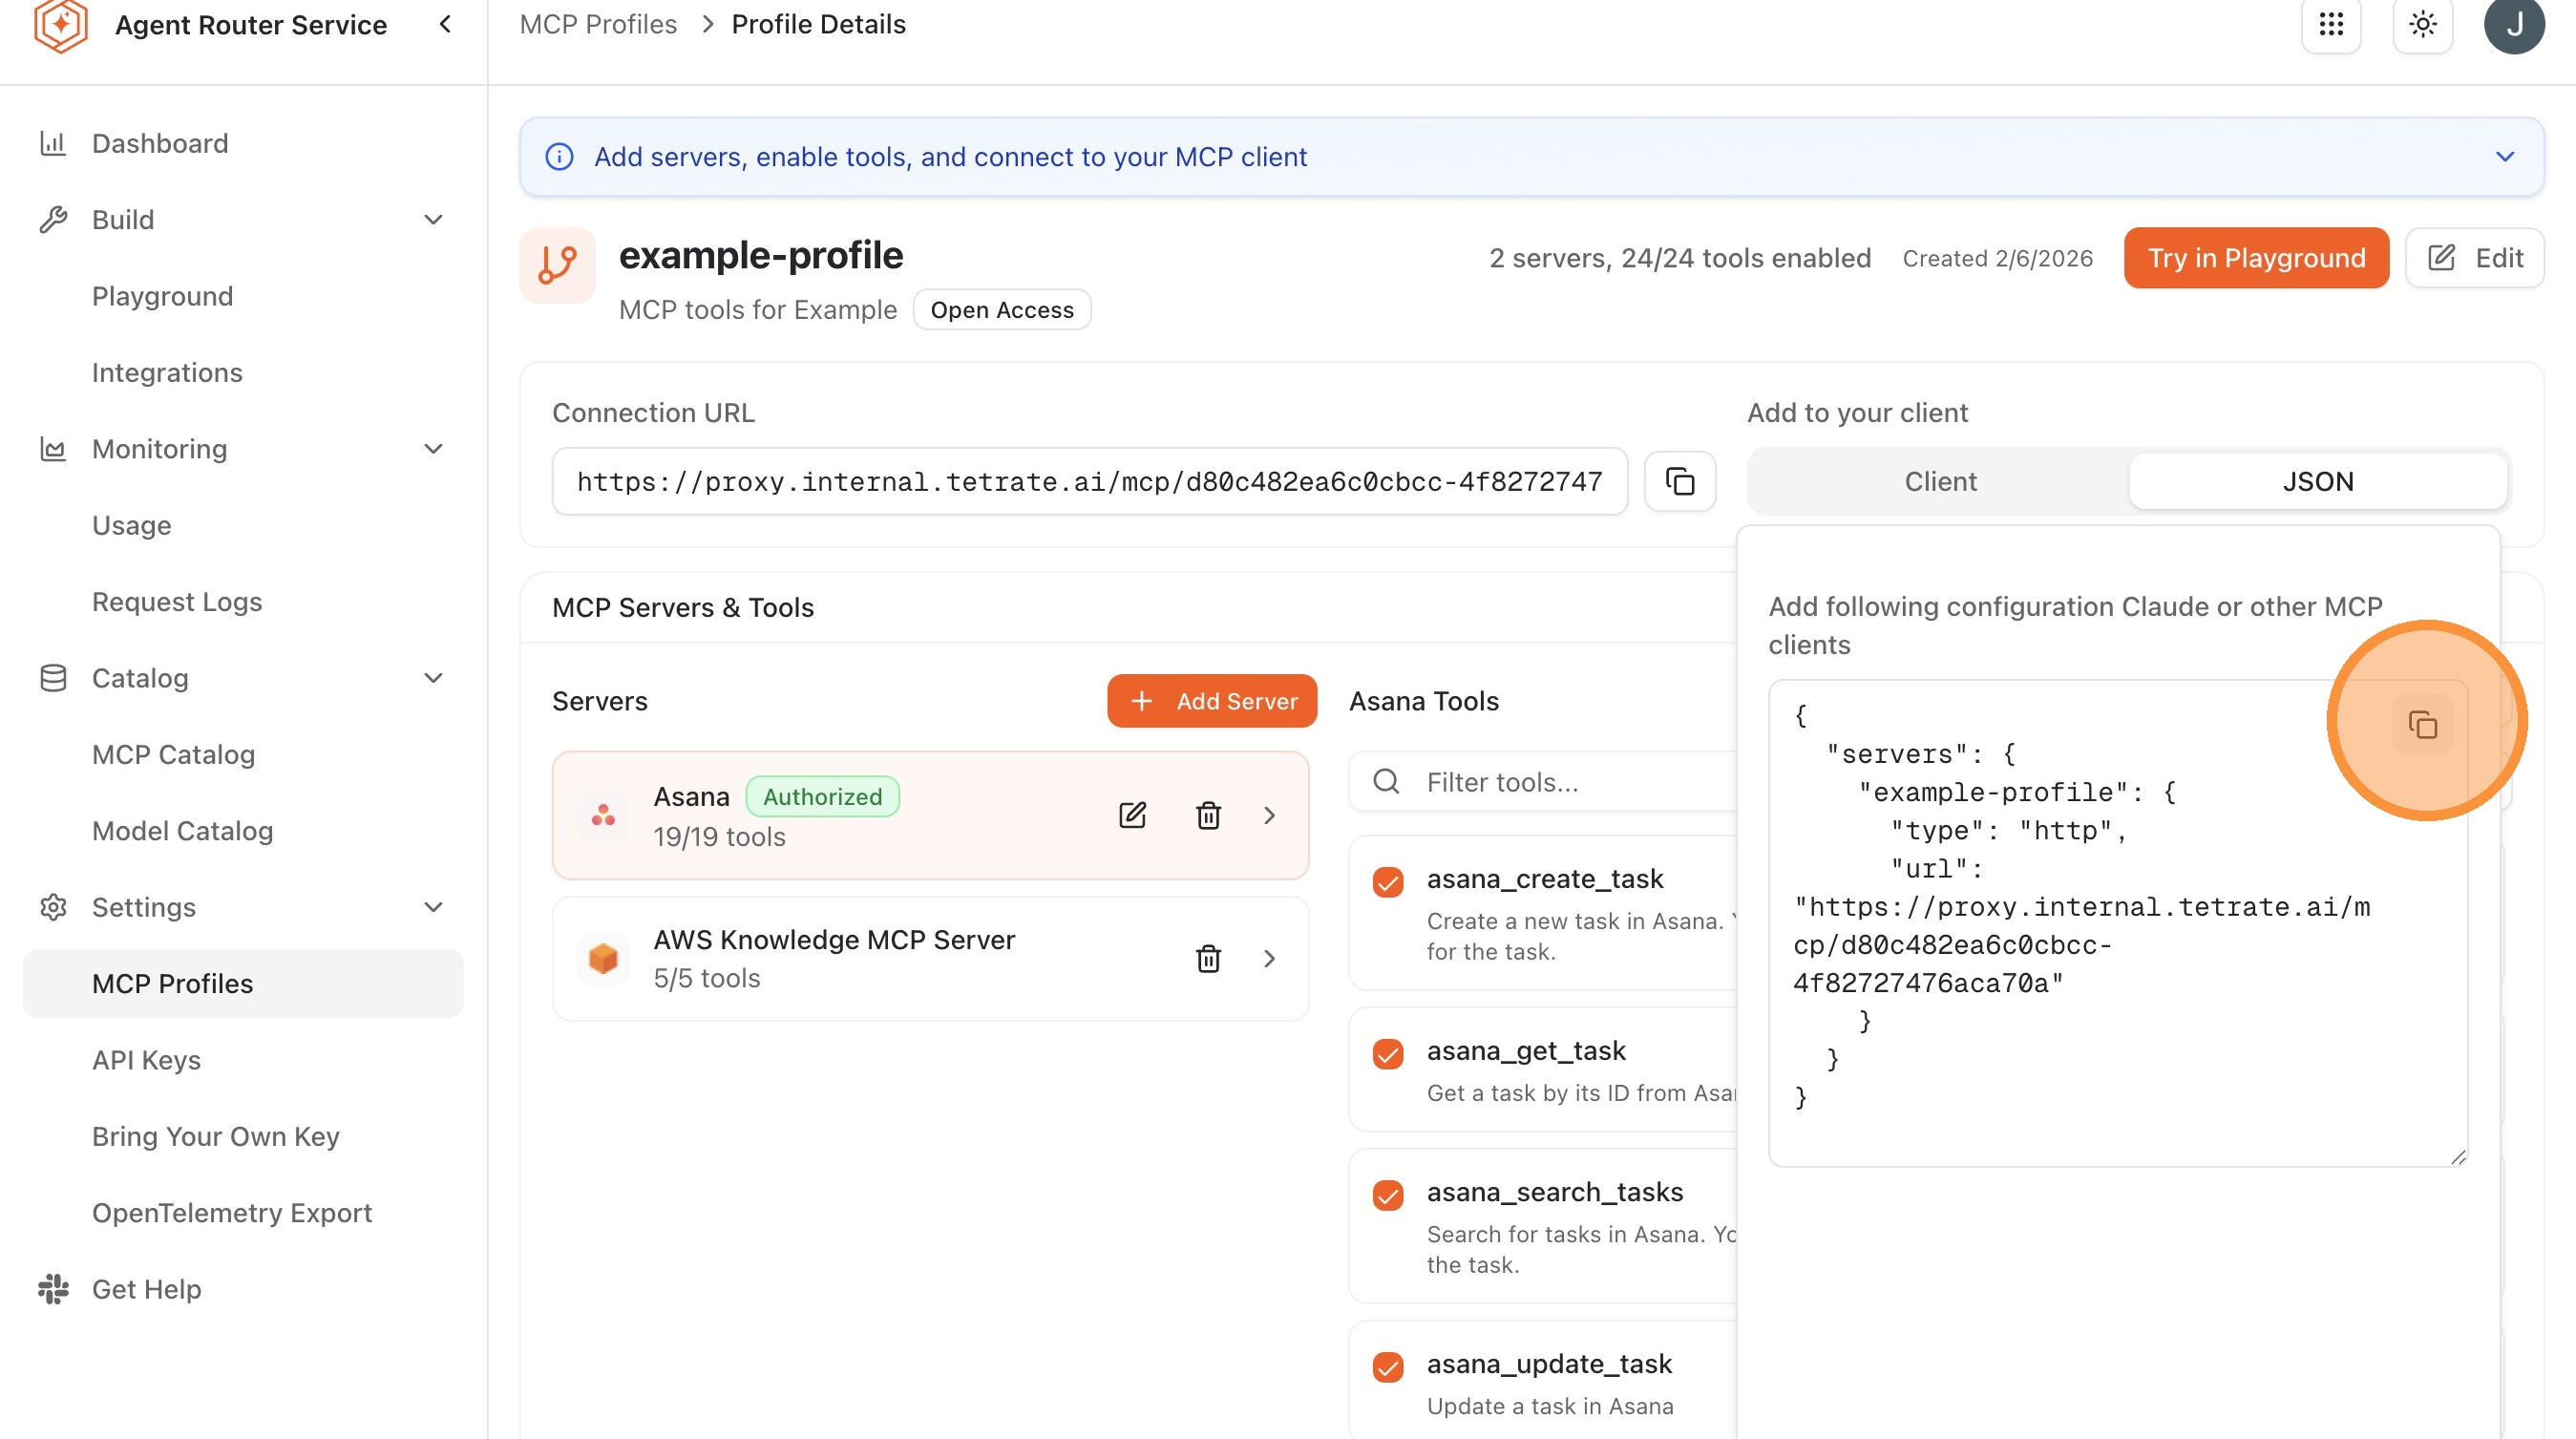
On save, the Console displays the Profile URL. This is the single endpoint the MCP client will connect to. Copy it; subsequent steps depend on it.
Step 4: connect from the MCP client
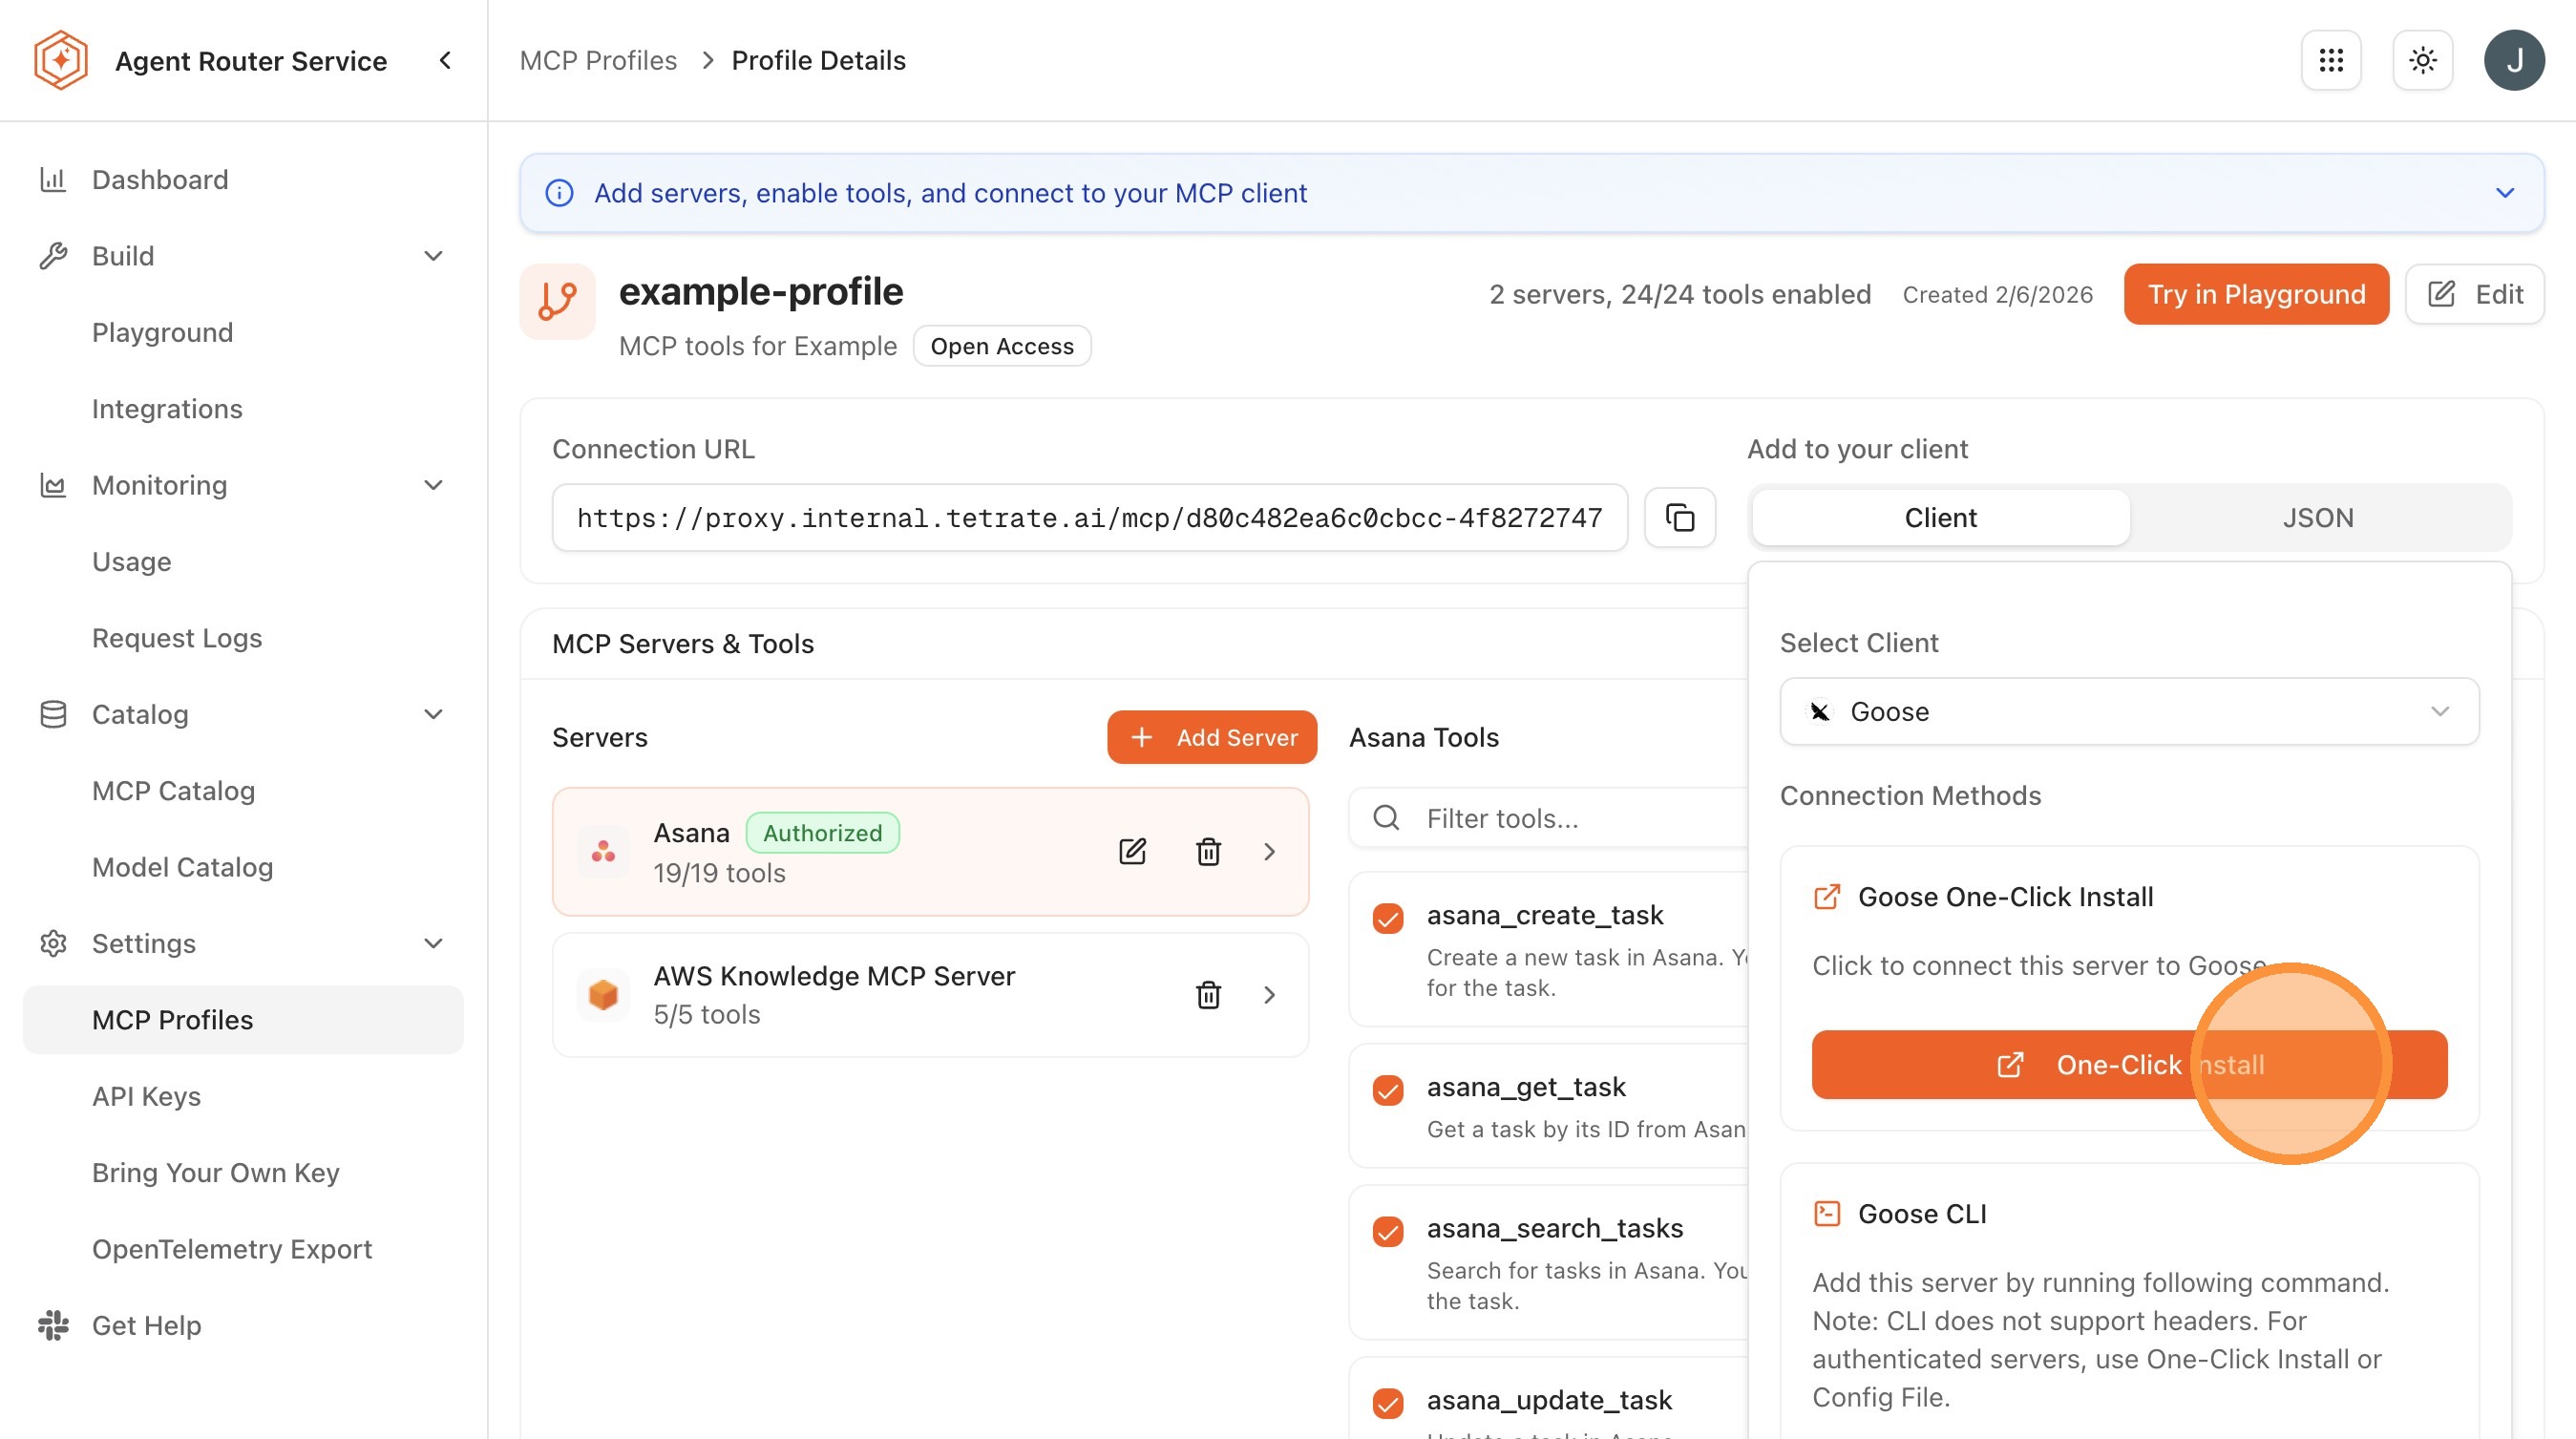
The Console exposes two paths for getting the profile URL into the local client: a guided Add to Client flow that performs as much of the setup as possible automatically, and a Get JSON Config option that returns the raw configuration block for manual installation. The guided flow is the right starting point for most clients; the manual flow is useful when the client's MCP configuration is checked into version control. Both paths are reached from the Connect button on the profile row in the MCP Profiles page.
- Add to Client: click Connect, select the target client (Claude Code, Cursor, VS Code, and so on), then follow the one-click installation instructions.
- Get JSON Config: click Connect, select Get JSON Config, then copy the returned JSON block into the client's MCP configuration file.
Claude Code
A single command registers the profile with Claude Code:
claude mcp add --transport streamable-http "my-profile" \
  https://YOUR_PROXY_URL/mcp/v1/profiles/YOUR_PROFILE_ID
my-profile is the local name the connection is given inside Claude Code; YOUR_PROFILE_ID is the profile identifier copied from the Console. If the profile uses Built-in OAuth, Claude Code opens a browser window for authentication the first time a tool is invoked. If the profile uses API Key authentication, the key is supplied through an environment variable or through Claude Code's own settings.
Claude Code also accepts a JSON configuration block, which is the form returned by Get JSON Config. For an API Key profile, the key is carried in an Authorization header and the profile URL uses the SSE endpoint suffix:
{
  "mcpServers": {
    "agent-router": {
      "url": "https://YOUR_PROXY_URL/mcp/v1/profiles/YOUR_PROFILE_ID/sse",
      "headers": {
        "Authorization": "Bearer YOUR_API_KEY"
      }
    }
  }
}
Cursor
Cursor reads MCP configuration from .cursor/mcp.json, either in the project directory or in the user-level settings. The minimum configuration for an unauthenticated or OAuth profile is:
{
  "mcpServers": {
    "my-profile": {
      "url": "https://YOUR_PROXY_URL/mcp/v1/profiles/YOUR_PROFILE_ID"
    }
  }
}
For an API Key profile, an Authorization header is added:
{
  "mcpServers": {
    "my-profile": {
      "url": "https://YOUR_PROXY_URL/mcp/v1/profiles/YOUR_PROFILE_ID",
      "headers": {
        "Authorization": "Bearer YOUR_API_KEY"
      }
    }
  }
}
As an alternative to editing the file directly, the server can be added through the Cursor UI: open Settings → MCP, click Add Server, enter the profile URL and any authentication details, then save. Cursor picks up the change without a full restart in most cases; if the connection does not appear, restarting the client resolves it.
VS Code
VS Code's MCP configuration lives in .vscode/mcp.json, either at the workspace level or in user settings, and uses the same shape as Cursor's:
{
  "mcpServers": {
    "my-profile": {
      "url": "https://YOUR_PROXY_URL/mcp/v1/profiles/YOUR_PROFILE_ID"
    }
  }
}
For API Key profiles, the same Authorization header is added. For Built-in OAuth or Custom OAuth profiles, VS Code prompts for authentication through a browser flow when the connection is first established.
Step 5: test the connection
The simplest verification is to ask the AI client to use one of the profile's tools and confirm the call lands in Request Logs.
- In the MCP client, confirm that the tools from the profile are listed and available. Most clients surface this through a tool inspector or a command palette.
- Trigger one of the tools through a natural-language prompt, for example, asking the assistant to perform a task that requires the file-system tool or the search tool exposed by the profile.
- Confirm the tool execution completes successfully.
- In the Console, open Monitoring → Request Logs.
- Locate the MCP request, where MCP traffic is distinguished from chat-completion traffic in the log surface, and expand it to confirm the routing was as expected.
If a tool fails to invoke, the most common causes are profile-level authentication mismatches (the client's credentials do not match the profile's security type), server-level authentication failures (the upstream MCP server rejected the request), or a missing tool in the profile (the client requested a tool that was not included in the tool selection in Step 3). Each of these failure modes is distinguishable in Request Logs.
Editing a profile after the fact
Profiles are not write-once. Servers can be added or removed, tool selections can be tightened or expanded, the security type can be changed, and the profile can be renamed. Each edit takes effect on save without disturbing the profile URL itself.
A profile deletion, in contrast, immediately invalidates the URL. Any client still connected to the URL will lose access to its tools on the next request, and the URL is not reissued if the profile is recreated under the same name. For one-off cleanup this is the right behaviour; for routine maintenance, editing the existing profile is the right approach.
What to do next
- Integrate the gateway with an app: expose the same platform to non-MCP clients and SDKs. See Integrate the gateway with an app.
- Test prompts in the Playground: exercise an MCP profile interactively from inside the Console. See Test prompts in the Playground.
- Monitor traffic and usage: track MCP request volume alongside chat-completion traffic. See Monitor traffic and usage.
The profile and its client connections remain in place for subsequent guides.
Where to go next